Unsloth, 양자화된 버전의 QwQ-32B에서 중복 추론 문제 해결
최근 Qwen 팀은 QwQ-32B 모델, 많은 추론 모델에서 사용되어 온 벤치마크 이 쇼는 DeepSeek-R1 시스템의 성능은 훌륭합니다. 그러나 많은 사용자가 무한 생성, 과도한 중복, 토큰 문제 및 미세 조정 문제를 겪었습니다. 이 문서는 이러한 문제를 디버그하고 해결하는 데 도움이 되는 자세한 가이드를 제공하여 QwQ-32B의 잠재력을 최대한 발휘할 수 있도록 하는 것을 목표로 합니다.
Unsloth 팀에서 업로드한 모델은 위의 버그를 수정하고 미세 조정, vLLM 및 트랜스포머와 같은 도구 및 프레임워크를 더 잘 지원할 수 있도록 합니다. 다음을 사용하는 분들을 위해 llama.cpp 를 백엔드 엔진으로 사용하는 사용자 및 기타 사용자는 이 링크 무한 생성 문제 해결에 대한 안내를 확인하세요.
Unsloth QwQ-32B 모델(버그 수정):
공식 권장 설정
⚙️ 공식 권장 설정
Qwen의 공식 권장 사항에 따라 모델 추론에 권장되는 매개변수 설정은 다음과 같습니다:
- 온도: 0.6
- Top_K: 40(권장 범위 20-40)
- Min_P: 0.1(선택 사항이지만 잘 작동함)
- Top_P: 0.95
- 반복 페널티: 1.0(llama.cpp 및 트랜스포머에서 1.0은 비활성화를 의미함)
- 채팅 템플릿:
<|im_start|>user\nCreate a Flappy Bird game in Python.<|im_end|>\n<|im_start|>assistant\n<think>\n
llama.cpp 권장 설정
llama.cpp 권장 설정
Unsloth 팀은 많은 사용자가 1.0 이상의 버전을 사용하는 것을 선호한다는 사실을 발견했습니다. Repetition Penalty 그러나 이 접근 방식은 실제로 llama.cpp의 샘플링 메커니즘을 방해합니다. 중복 패널티는 생성되는 중복 수를 줄이기 위한 것이지만 실험 결과 이 접근 방식은 원하는 효과를 얻지 못하는 것으로 나타났습니다.
반복 페널티를 완전히 비활성화하는 것도 옵션입니다(1.0으로 설정). 하지만 Unsloth 팀은 적절한 반복 페널티가 무한 생성을 억제하는 데 여전히 효과적이라는 사실을 발견했습니다.
반복 페널티를 효과적으로 사용하려면 llama.cpp에서 샘플러의 순서를 조정하여 적용 시 Repetition Penalty 를 설정해야 하며, 그렇지 않으면 무한 생성됩니다. 이렇게 하려면 다음 파라미터를 추가합니다:
--samplers "top_k;top_p;min_p;temperature;dry;typ_p;xtc"
기본적으로 llama.cpp는 다음과 같은 샘플러 순서를 사용합니다:
--samplers "dry;top_k;typ_p;top_p;min_p;xtc;temperature"
Unsloth 팀의 조정된 순서는 기본적으로 온도와 건조의 위치를 바꾸고 min_p를 앞으로 이동합니다. 즉, 샘플러가 다음 순서로 적용된다는 뜻입니다:
top_k=40
top_p=0.95
min_p=0.1
temperature=0.6
dry
typ_p
xtc
문제가 지속되면 --repeat-penalty 1.0의 값이 1.2 또는 1.3으로 약간 증가했습니다.
llama.cpp의 샘플링 방향 문제를 알려주신 @krist486님께 감사드립니다.
건식 반복 페널티
☀️ 드라이 반복 페널티
Unsloth 팀은 제안된 dry penalty 사용량을 0.8로 설정하고 0.8 값을 사용하려고 했습니다. 그러나 실험 결과 다음과 같은 결과가 나타났습니다.dry penalty 특히 코드를 생성할 때 구문 오류가 발생할 가능성이 더 높습니다. 그래도 문제가 계속 발생하면 사용자가 dry penalty 0.8로 증가합니다.
사용하기로 선택한 경우 dry penalty를 사용하면 샘플링 순서를 조정하는 것도 똑같이 도움이 될 수 있습니다.
올라마 실행 QwQ-32B 튜토리얼
🦙 Ollama QwQ-32B 튜토리얼 실행
- 아직 설치되지 않은 경우
ollama먼저 설치하세요!
apt-get update
apt-get install pciutils -y
curl -fSSL [https://ollama.com/install.sh](https://www.google.com/url?sa=E&q=https%3A%2F%2Follama.com%2Finstall.sh) | sh
- 모델을 실행하세요! 실행이 실패하면 다른 터미널에서 실행해 보세요.
ollama serve언슬로스 팀은 포옹하는 얼굴 업로드 모델에 모든 수정 사항과 제안된 매개변수(온도 등)를 포함시켰습니다.param문서화!
ollama run hf.co/unsloth/QwQ-32B-GGUF:Q4_K_M
llama.cpp QwQ-32B 실행을 위한 자습서
📖 llama.cpp 실행 중 QwQ-32B 자습서
- 통해 (틈새) llama.cpp 최신 버전 받기
llama.cpp. 다음 빌드 지침을 참조하여 빌드할 수 있습니다. GPU가 없거나 CPU 추론만 수행하려는 경우에는-DGGML_CUDA=ON다음으로 교체-DGGML_CUDA=OFF.
apt-get update
apt-get install pciutils build-essential cmake curl libcurl4-openssl-dev -y
git clone [https://github.com/ggerganov/llama.cpp](https://www.google.com/url?sa=E&q=https%3A%2F%2Fgithub.com%2Fggerganov%2Fllama.cpp)
cmake llama.cpp -B llama.cpp/build
-DBUILD_SHARED_LIBS=ON -DGGML_CUDA=ON -DLLAMA_CURL=ON
cmake --build llama.cpp/build --config Release -j --clean-first --target llama-quantize llama-cli llama-gguf-split
cp llama.cpp/build/bin/llama-* llama.cpp
- 모델 다운로드(설치 후)
pip install huggingface_hub hf_transfer(이후). Q4_K_M 또는 기타 양자화 버전(예: BF16 고정밀)을 선택할 수 있습니다. 더 많은 버전을 보려면 https://huggingface.co/unsloth/QwQ-32B-GGUF.
# !pip install huggingface_hub hf_transfer
import os
os.environ["HF_HUB_ENABLE_HF_TRANSFER"] = "1"
from huggingface_hub import snapshot_download
snapshot_download(
repo_id="unsloth/QwQ-32B-GGUF",
local_dir="unsloth-QwQ-32B-GGUF",
allow_patterns=[" Q4_K_M "],  # For Q4_K_M
)
- Unsloth에서 제공한 Flappy Bird 테스트 스크립트를 실행하면 출력 결과가
Q4_K_M_yes_samplers.txt문서화. - 실제 상황에 따라 매개변수를 조정하세요.
--threads 32CPU 스레드 수를 설정합니다.--ctx-size 16384컨텍스트 길이를 설정합니다.--n-gpu-layers 99GPU 오프로드 티어 수를 설정합니다. GPU의 메모리가 부족하다면--n-gpu-layers값을 설정합니다. CPU 추론만 사용하는 경우 이 매개변수를 제거합니다. --repeat-penalty 1.1노래로 응답--dry-multiplier 0.5는 반복 페널티 및 드라이 페널티 매개변수로, 사용자가 필요에 따라 조정할 수 있습니다.
./llama.cpp/llama-cli
--model unsloth-QwQ-32B-GGUF/QwQ-32B-Q4_K_M.gguf
--threads 32
--ctx-size 16384
--n-gpu-layers 99
--seed 3407
--prio 2
--temp 0.6
--repeat-penalty 1.1
--dry-multiplier 0.5
--min-p 0.1
--top-k 40
--top-p 0.95
-no-cnv
--samplers "top_k;top_p;min_p;temperature;dry;typ_p;xtc"
--prompt "<|im_start|>user\nCreate a Flappy Bird game in Python. You must include these things:\n1. You must use pygame.\n2. The background color should be randomly chosen and is a light shade. Start with a light blue color.\n3. Pressing SPACE multiple times will accelerate the bird.\n4. The bird's shape should be randomly chosen as a square, circle or triangle. The color should be randomly chosen as a dark color.\n5. Place on the bottom some land colored as dark brown or yellow chosen randomly.\n6. Make a score shown on the top right side. Increment if you pass pipes and don't hit them.\n7. Make randomly spaced pipes with enough space. Color them randomly as dark green or light brown or a dark gray shade.\n8. When you lose, show the best score. Make the text inside the screen. Pressing q or Esc will quit the game. Restarting is pressing SPACE again.\nThe final game should be inside a markdown section in Python. Check your code for errors and fix them before the final markdown section.<|im_end|>\n<|im_start|>assistant\n <think> \n"
2>&1 | tee Q4_K_M_yes_samplers.txt
위의 플래피 버드 게임 힌트는 언슬로스의 DeepSeekR1-동적 1.58비트 블로그. 전체 큐 단어는 아래와 같습니다:
<|im_start|>user
Create a Flappy Bird game in Python. You must include these things:
1. You must use pygame.
2. The background color should be randomly chosen and is a light shade. Start with a light blue color.
3. Pressing SPACE multiple times will accelerate the bird.
4. The bird's shape should be randomly chosen as a square, circle or triangle. The color should be randomly chosen as a dark color.
5. Place on the bottom some land colored as dark brown or yellow chosen randomly.
6. Make a score shown on the top right side. Increment if you pass pipes and don't hit them.
7. Make randomly spaced pipes with enough space. Color them randomly as dark green or light brown or a dark gray shade.
8. When you lose, show the best score. Make the text inside the screen. Pressing q or Esc will quit the game. Restarting is pressing SPACE again.
The final game should be inside a markdown section in Python. Check your code for errors and fix them before the final markdown section.<|im_end|>
<|im_start|>assistant
<think>
다음은 모델에서 생성된 Python 코드의 시작 부분과 끝 부분입니다(사고 과정을 제거한 상태):
import pygame
import random
import sys
pygame.init()
### Continues
class Bird:
def __init__(self):
### Continues
def main():
best_score = 0
current_score = 0
game_over = False
pipes = []
first_time = True  # Track first game play
# Initial setup
background_color = (173, 216, 230)  # Light blue initially
land_color = random.choice(land_colors)
bird = Bird()
while True:
for event in pygame.event.get():
### Continues
if not game_over:
# Update bird and pipes
bird.update()
### Continues
# Drawing
### Continues
pygame.display.flip()
clock.tick(60)
if __name__ == "__main__":
main()
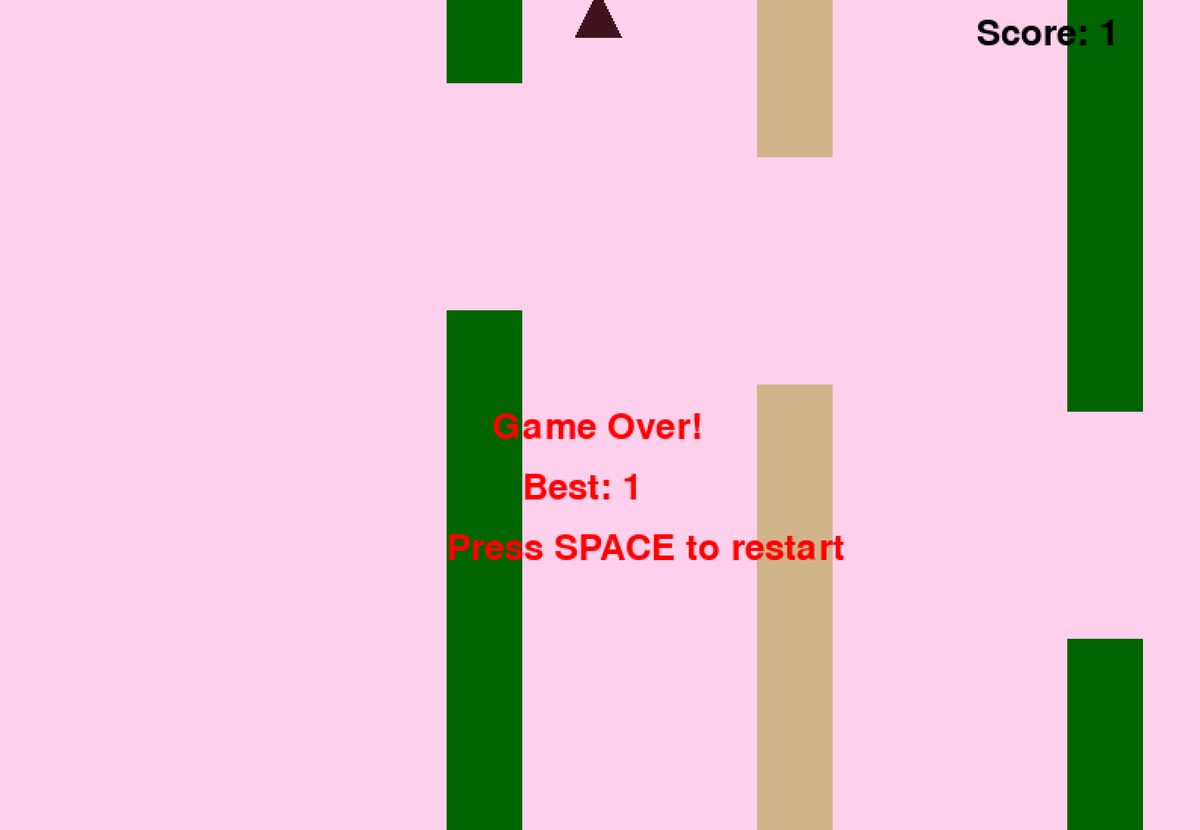
모델이 작동하는 Flappy Bird 게임을 성공적으로 생성했습니다!

다음으로, --샘플러 "top_k;top_p;min_p;temperature;dry;typ_p;xtc" 파라미터를 제거하고 Unsloth 수정 없이 동일한 명령을 실행해 보세요. 출력은 Q4_K_M_no_samplers.txt 파일에 저장됩니다.
./llama.cpp/llama-cli
--model unsloth-QwQ-32B-GGUF/QwQ-32B-Q4_K_M.gguf
--threads 32
--ctx-size 16384
--n-gpu-layers 99
--seed 3407
--prio 2
--temp 0.6
--repeat-penalty 1.1
--dry-multiplier 0.5
--min-p 0.1
--top-k 40
--top-p 0.95
-no-cnv
--prompt "<|im_start|>user\nCreate a Flappy Bird game in Python. You must include these things:\n1. You must use pygame.\n2. The background color should be randomly chosen and is a light shade. Start with a light blue color.\n3. Pressing SPACE multiple times will accelerate the bird.\n4. The bird's shape should be randomly chosen as a square, circle or triangle. The color should be randomly chosen as a dark color.\n5. Place on the bottom some land colored as dark brown or yellow chosen randomly.\n6. Make a score shown on the top right side. Increment if you pass pipes and don't hit them.\n7. Make randomly spaced pipes with enough space. Color them randomly as dark green or light brown or a dark gray shade.\n8. When you lose, show the best score. Make the text inside the screen. Pressing q or Esc will quit the game. Restarting is pressing SPACE again.\nThe final game should be inside a markdown section in Python. Check your code for errors and fix them before the final markdown section.<|im_end|>\n<|im_start|>assistant\n<think>\n"
2>&1 | tee Q4_K_M_no_samplers.txt
수정 사항을 사용하지 않으면 모델은 루프와 많은 수의 Python 구문 오류 및 기타 다양한 문제가 있는 결과를 생성합니다. 예를 들어 다음 코드 스니펫은 올바른 것처럼 보이지만 실제로는 올바르지 않습니다! 39줄 pipes.clear() ### <<< NameError: 이름 'pipes'가 정의되지 않았습니다. 'pipes'를 가져오는 것을 잊으셨나요? 'pipes'를 가져오는 것을 잊으셨나요?
import pygame
import random
pygame.init()
# Constants
WIDTH, HEIGHT = 800, 600
GROUND_HEIGHT = 20
GRAVITY = 0.7
PIPE_SPEED = -3
BIRD_SIZE = 45
MIN_GAP = 130
MAX_GAP = 200
PIPE_COLORS = [(0, 96, 0), (205, 133, 63), (89, 97, 107)]
DARK_BROWN = (94, 72, 4)
YELLOW = (252, 228, 6)
screen = pygame.display.set_mode((WIDTH, HEIGHT))
clock = pygame.time.Clock()
def random_light_color():
return (
random.randint(180, 230),
random.randint(190, 300),
random.randint(250, 255)
)
def reset_game():
global bird_x, bird_y
global pipes, score
global background_color, land_color
global bird_shape, bird_color
# Bird properties
bird_x = WIDTH * 0.3
bird_y = HEIGHT // 2
bird_vel = -5  # Initial upward thrust
pipes.clear() ### <<< NameError: name 'pipes' is not defined. Did you forget to import 'pipes'?
반복 페널티를 1.5로 더 높이면 구문 오류가 더 분명해지고 코드가 전혀 작동하지 않는 등 상황이 더 악화됩니다.
import pygame
from random import randint  # For generating colors/shapes/positions randomly
pygame.init()
# Constants:
WIDTH, HEIGHT =456 ,702   #
BACKGROUND_COLOR_LIGHTS=['lightskyblue']
GAP_SIZE=189           #
BIRD_RADIUS=3.
PIPE_SPEED=- ( )    ?
class Game():
def __init__(self):
self.screen_size=( )
def reset_game_vars():
global current_scor e
# set to zero and other initial states.
# Main game loop:
while running :
for event in pygame.event.get() :
if quit ... etc
pygame.quit()
print("Code is simplified. Due time constraints, full working version requires further implementation.")
Q4_K_M의 양자화 버전에만 문제가 있는 것이지, 고정밀 버전인 BF16은 괜찮을 거라고 생각할 수도 있겠죠? 하지만 그렇지 않습니다. BF16 고정밀 모델을 사용하더라도 Unsloth 팀이 제공한 -samplers "top_k;top_p;min_p;temperature;dry;typ_p;xtc" 수정 사항을 적용하지 않고 반복 페널티를 사용하면 생성 실패가 발생할 수 있습니다.
토큰이 표시되지 않나요?
🤔 토큰 표시되지 않나요?
일부 시스템에서 채팅 템플릿에 기본적으로 추가된 토큰으로 인해 사고 과정을 올바르게 출력하지 못할 수 있다는 사용자들의 피드백이 있었습니다. 사용자는 이를 포함하려면 진자 템플릿을 수동으로 편집해야 합니다:
{%- if tools %} {{- '<|im_start|>system\n' }} {%- if messages[0]['role'] == 'system' %} {{- messages[0]['content'] }} {%- else %} {{- '' }} {%- endif %} {{- "\n\n# Tools\n\nYou may call one or more functions to assist with the user query.\n\nYou are provided with function signatures within <tools></tools> XML tags:\n<tools>" }} {%- for tool in tools %} {{- "\n" }} {{- tool | tojson }} {%- endfor %} {{- "\n</tools>\n\nFor each function call, return a json object with function name and arguments within <tool_call></tool_call> XML tags:\n<tool_call>\n{\"name\": <function-name>, \"arguments\": <args-json-object>}\n</tool_call><|im_end|>\n" }} {%- else %} {%- if messages[0]['role'] == 'system' %} {{- '<|im_start|>system\n' + messages[0]['content'] + '<|im_end|>\n' }} {%- endif %} {%- endif %} {%- for message in messages %} {%- if (message.role == "user") or (message.role == "system" and not loop.first) %} {{- '<|im_start|>' + message.role + '\n' + message.content + '<|im_end|>' + '\n' }} {%- elif message.role == "assistant" and not message.tool_calls %} {%- set content = message.content.split('</think>')[-1].lstrip('\n') %} {{- '<|im_start|>' + message.role + '\n' + content + '<|im_end|>' + '\n' }} {%- elif message.role == "assistant" %} {%- set content = message.content.split('</think>')[-1].lstrip('\n') %} {{- '<|im_start|>' + message.role }} {%- if message.content %} {{- '\n' + content }} {%- endif %} {%- for tool_call in message.tool_calls %} {%- if tool_call.function is defined %} {%- set tool_call = tool_call.function %} {%- endif %} {{- '\n<tool_call>\n{"name": "' }} {{- tool_call.name }} {{- '", "arguments": ' }} {{- tool_call.arguments | tojson }} {{- '}\n</tool_call>' }} {%- endfor %} {{- '<|im_end|>\n' }} {%- elif message.role == "tool" %} {%- if (loop.index0 == 0) or (messages[loop.index0 - 1].role != "tool") %} {{- '<|im_start|>user' }} {%- endif %} {{- '\n<tool_response>\n' }} {{- message.content }} {{- '\n</tool_response>' }} {%- if loop.last or (messages[loop.index0 + 1].role != "tool") %} {{- '<|im_end|>\n' }} {%- endif %} {%- endif %} {%- endfor %} {%- if add_generation_prompt %} {{- '<|im_start|>assistant\n<think>\n' }} {%- endif %}
마지막 \n을 제거하도록 수정되었습니다. 이 수정으로 인해 모델이 추론 중에 \n을 수동으로 추가해야 하지만 항상 작동하는 것은 아닙니다. DeepSeek 팀은 또한 모든 모델이 기본적으로 토큰을 추가하도록 수정하여 모델을 추론 모드로 강제 전환했습니다.
따라서 {%- if add_generation_prompt %} {{- 'assistant\n\n' }} {%- endif %}를 {%- if add_generation_prompt %} {로 변경합니다. {- 'assistant\n' }} {%- endif %}, 즉 \n을 제거합니다.
n 부분이 삭제된 전체 진자 템플릿입니다.
{%- if tools %} {{- '<|im_start|>system\n' }} {%- if messages[0]['role'] == 'system' %} {{- messages[0]['content'] }} {%- else %} {{- '' }} {%- endif %} {{- "\n\n# Tools\n\nYou may call one or more functions to assist with the user query.\n\nYou are provided with function signatures within <tools></tools> XML tags:\n<tools>" }} {%- for tool in tools %} {{- "\n" }} {{- tool | tojson }} {%- endfor %} {{- "\n</tools>\n\nFor each function call, return a json object with function name and arguments within <tool_call></tool_call> XML tags:\n<tool_call>\n{\"name\": <function-name>, \"arguments\": <args-json-object>}\n</tool_call><|im_end|>\n" }} {%- else %} {%- if messages[0]['role'] == 'system' %} {{- '<|im_start|>system\n' + messages[0]['content'] + '<|im_end|>\n' }} {%- endif %} {%- endif %} {%- for message in messages %} {%- if (message.role == "user") or (message.role == "system" and not loop.first) %} {{- '<|im_start|>' + message.role + '\n' + message.content + '<|im_end|>' + '\n' }} {%- elif message.role == "assistant" and not message.tool_calls %} {%- set content = message.content.split('</think>')[-1].lstrip('\n') %} {{- '<|im_start|>' + message.role + '\n' + content + '<|im_end|>' + '\n' }} {%- elif message.role == "assistant" %} {%- set content = message.content.split('</think>')[-1].lstrip('\n') %} {{- '<|im_start|>' + message.role }} {%- if message.content %} {{- '\n' + content }} {%- endif %} {%- for tool_call in message.tool_calls %} {%- if tool_call.function is defined %} {%- set tool_call = tool_call.function %} {%- endif %} {{- '\n<tool_call>\n{"name": "' }} {{- tool_call.name }} {{- '", "arguments": ' }} {{- tool_call.arguments | tojson }} {{- '}\n</tool_call>' }} {%- endfor %} {{- '<|im_end|>\n' }} {%- elif message.role == "tool" %} {%- if (loop.index0 == 0) or (messages[loop.index0 - 1].role != "tool") %} {{- '<|im_start|>user' }} {%- endif %} {{- '\n<tool_response>\n' }} {{- message.content }} {{- '\n</tool_response>' }} {%- if loop.last or (messages[loop.index0 + 1].role != "tool") %} {{- '<|im_end|>\n' }} {%- endif %} {%- endif %} {%- endfor %} {%- if add_generation_prompt %} {{- '<|im_start|>assistant\n' }} {%- endif %}
추가 참고 사항
추가 참고 사항
Unsloth 팀은 처음에 이 문제가 다음과 같은 원인에서 비롯된 것으로 추측했습니다:
- QwQ의 컨텍스트 길이는 기본 128K가 아니라 32K에 YaRN 확장자를 더한 값일 수 있습니다. 예를 들어 https://huggingface.co/Qwen/QwQ-32B 에서 readme 파일을 참조하세요:
{
...,
"rope_scaling": {
"factor": 4.0,
"original_max_position_embeddings": 32768,
"type": "yarn"
}
}
Unsloth 팀은 llama.cpp에서 YaRN 처리를 다시 작성하려고 했지만 문제가 지속되었습니다.
--override-kv qwen2.context_length=int:131072
--override-kv qwen2.rope.scaling.type=str:yarn
--override-kv qwen2.rope.scaling.factor=float:4
--override-kv qwen2.rope.scaling.original_context_length=int:32768
--override-kv qqwen2.rope.scaling.attn_factor=float:1.13862943649292 \
- Unsloth 팀은 또한 RMS 레이어노름 엡실론 값이 잘못되었을 수 있으며, 1e-5가 아닌 1e-6이 되어야 한다고 의심했습니다. 예를 들어, 1e-5가 아닌 1e-6이 되어야 합니다. 이 링크. rms_norm_eps=1e-06 및 이 링크. rms_norm_eps=1e-05에서 이 값을 다시 작성하려고 시도했지만 여전히 문제가 해결되지 않았습니다:
--override-kv qwen2.attention.layer_norm_rms_epsilon=float:0.000001 \
- Unsloth 팀은 @kalomaze의 도움으로 llama.cpp와 트랜스포머 간의 토큰 생성기 ID를 테스트하여 일치하는지 확인했습니다. 그 결과 일치하는 것으로 확인되었으므로 토큰 생성기 ID의 불일치는 문제의 원인이 아닙니다.
Unsloth 팀의 실험 결과는 다음과 같습니다:
61KB file_BF16_no_samplers.txt
BF16 완전 정밀도, 샘플 수리 미적용
55KB file_BF16_yes_samplers.txt
BF16 고정밀, 샘플링 수리 적용
71KB final_Q4_K_M_no_samplers.txt
Q4_K_M 정확도, 샘플 수정 적용되지 않음
65KB final_Q4_K_M_yes_samplers.txt
Q4_K_M 정확도, 샘플링 수정 적용
토큰화 도구 버그 수정
✏️ 토큰라이저 버그 수정
- Unsloth 팀은 미세 조정에 영향을 미치는 몇 가지 특정 문제도 발견했습니다.EOS 토큰은 맞지만, PAD 토큰에 대한 더 논리적인 선택은 ""입니다.Unsloth 팀은 https://huggingface.co/unsloth/QwQ-32B/blob/ 에서 구성을 업데이트했습니다. Unsloth 팀이 main/tokenizer_config.json에서 구성을 업데이트했습니다.
"eos_token": "<|im_end|>",
"pad_token": "<|endoftext|>",
동적 4비트 양자화
🛠️ 동적 4비트 양자화
Unsloth 팀은 또한 일반 4비트 양자화 모델에 비해 모델 정확도를 크게 향상시키는 동적 4비트 양자화 모델도 업로드했습니다! 아래 그림은 양자화 과정 중 QwQ 모델 활성화 값과 가중치에 대한 오류 분석을 보여줍니다:

Unsloth 팀은 동적 4비트 정량 모델을 https://huggingface.co/unsloth/QwQ-32B-unsloth-bnb-4bit 에 업로드했습니다.
이후 vLLM 버전 0.7.3(2024년 2월 20일) https://github.com/vllm-project/vllm/releases/tag/v0.7.3 부터 vLLM에서 Unsloth 동적 4비트 정량 모델 로딩을 지원하기 시작했습니다!
모든 GGUF 형식 모델은 https://huggingface.co/unsloth/QwQ-32B-GGUF 에서 확인할 수 있습니다!
© 저작권 정책
기사 저작권 AI 공유 서클 모두 무단 복제하지 마세요.
관련 게시물

댓글 없음...


