1.모델 소개
Qwen2-VL이 출시된 이후 5개월 동안 수많은 개발자가 Qwen2-VL 시각 언어 모델 위에 새로운 모델을 구축하여 Qwen 팀에 귀중한 피드백을 제공했습니다. 이 기간 동안 Qwen 팀은 더욱 유용한 시각 언어 모델을 구축하는 데 집중했습니다. 오늘, Qwen 팀은 Qwen 제품군의 최신 멤버인 Qwen2.5-VL을 소개하게 되어 기쁘게 생각합니다.
주요 개선 사항:
- 시각적 이해: Qwen 2.5-VL은 꽃, 새, 물고기, 곤충과 같은 일반적인 사물을 인식할 뿐만 아니라 이미지의 텍스트, 차트, 아이콘, 그래프 및 레이아웃을 분석하는 데도 능숙합니다.
- 에이전티시티: Qwen2.5-VL은 컴퓨터와 휴대폰에서 사용할 수 있는 추론 및 동적 명령 도구의 기능을 통해 시각적 에이전트의 역할을 직접 수행합니다.
- 긴 동영상 이해 및 이벤트 캡처: Qwen 2.5-VL은 1시간 이상의 동영상을 이해할 수 있으며, 이번에는 관련 동영상 클립을 정확히 찾아내어 이벤트를 캡처하는 새로운 기능이 추가되었습니다.
- 다양한 형식의 시각적 현지화 가능: Qwen2.5-VL은 경계 상자 또는 점을 생성하여 이미지에서 객체의 위치를 정확하게 찾을 수 있으며, 좌표와 속성에 대한 안정적인 JSON 출력을 제공할 수 있습니다.
- 구조화된 출력 생성: 송장, 양식, 표 등과 같은 스캔 데이터의 경우 Qwen 2.5-VL은 해당 내용의 구조화된 출력을 지원하므로 금융, 비즈니스 및 기타 분야에서 유용하게 사용할 수 있습니다.
모델 아키텍처:
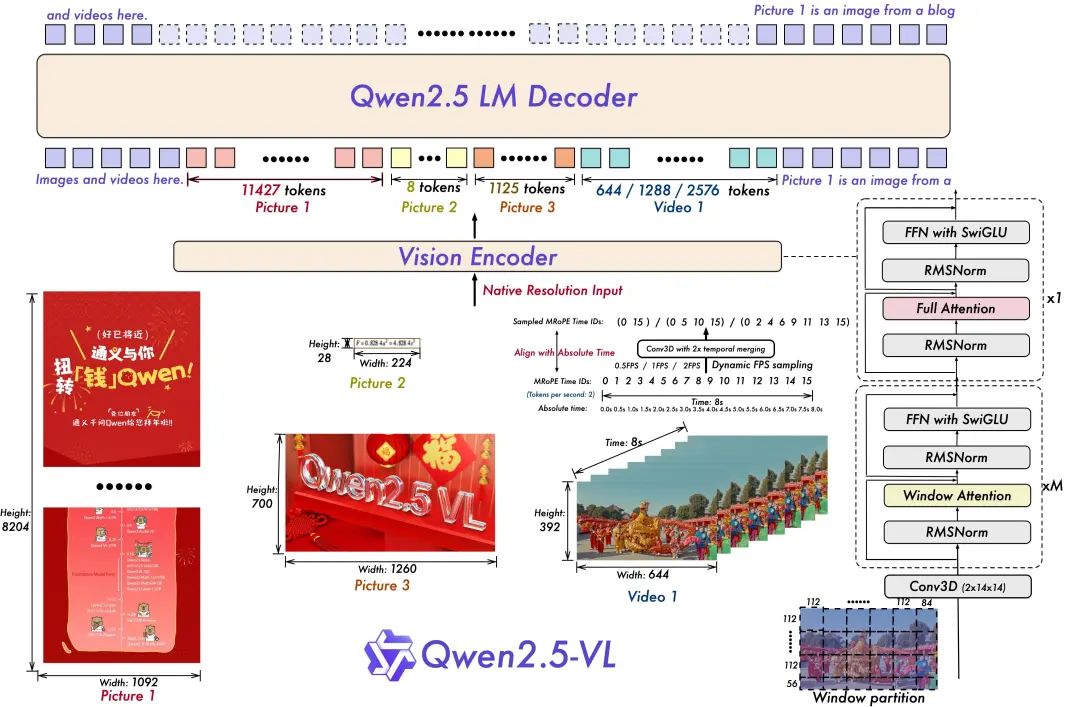
- 동영상 이해를 위한 동적 해상도 및 프레임 속도 교육:
동적 FPS 샘플링을 사용하여 동적 해상도를 시간적 차원으로 확장하면 모델이 다양한 샘플 속도로 비디오를 이해할 수 있습니다. 이에 따라 Qwen 팀은 시간적 차원의 ID와 절대 시간 정렬로 mRoPE를 업데이트하여 모델이 시간적 순서와 속도를 학습하고 궁극적으로 특정 순간을 정확히 찾아낼 수 있는 능력을 갖추도록 했습니다.
- 간소화되고 효율적인 비주얼 코더
Qwen 팀은 전략적으로 윈도우 주의 메커니즘을 ViT에 도입하여 훈련 및 추론 속도를 향상시켰습니다. ViT 아키텍처는 SwiGLU 및 RMSNorm을 통해 더욱 최적화되어 Qwen 2.5 LLM의 구조와 일치하도록 조정되었습니다.
이 오픈 소스에는 30억, 70억, 72억의 파라미터를 가진 세 가지 모델이 있습니다. 이 리포지토리에는 명령으로 조정된 72B Qwen2.5-VL 모델.
모델 앙상블:
https://www.modelscope.cn/collections/Qwen25-VL-58fbb5d31f1d47
모델링 경험:
https://chat.qwenlm.ai/
기술 블로그:
https://qwenlm.github.io/blog/qwen2.5-vl/
코드 주소:
https://github.com/QwenLM/Qwen2.5-VL
2.모델링 효과
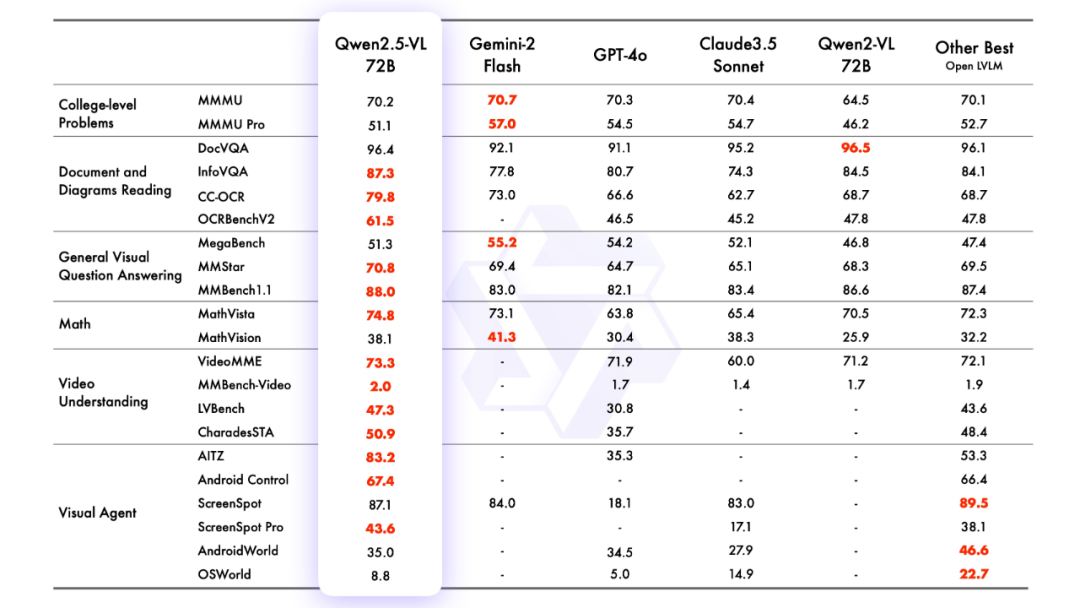
모델링 평가
호세 마리아 곤살레스 씨
3.모델링된 추론
트랜스포머로 추론하기
Qwen2.5-VL의 코드는 최신 트랜스포머에 있으며, 다음 명령을 사용하여 소스에서 빌드하는 것이 좋습니다:
pip install git+https://github.com/huggingface/transformersAPI를 사용할 때와 마찬가지로 다양한 유형의 시각적 입력으로 쉽게 작업할 수 있도록 툴킷이 제공됩니다. 여기에는 base64, URL, 인터리브 이미지 및 동영상이 포함됩니다. 다음 명령을 사용하여 설치할 수 있습니다:
pip install qwen-vl-utils[decord]==0.0.8코드에 대한 추론:
from transformers import Qwen2_5_VLForConditionalGeneration, AutoTokenizer, AutoProcessor
from qwen_vl_utils import process_vision_info
from modelscope import snapshot_download

# Download and load the model
model_dir = snapshot_download("Qwen/Qwen2.5-VL-3B-Instruct")

# Default: Load the model on the available device(s)
model = Qwen2_5_VLForConditionalGeneration.from_pretrained(
model_dir, torch_dtype="auto", device_map="auto"
)

# Optional: Enable flash_attention_2 for better acceleration and memory saving
# model = Qwen2_5_VLForConditionalGeneration.from_pretrained(
# "Qwen/Qwen2.5-VL-3B-Instruct",
# torch_dtype=torch.bfloat16,
# attn_implementation="flash_attention_2",
# device_map="auto",
# )

# Load the default processor
processor = AutoProcessor.from_pretrained(model_dir)

# Optional: Set custom min and max pixels for visual token range
# min_pixels = 256 * 28 * 28
# max_pixels = 1280 * 28 * 28
# processor = AutoProcessor.from_pretrained(
# "Qwen/Qwen2.5-VL-3B-Instruct", min_pixels=min_pixels, max_pixels=max_pixels
# )

# Define input messages
messages = [
{
"role": "user",
"content": [
{
"type": "image",
"image": "https://qianwen-res.oss-cn-beijing.aliyuncs.com/Qwen-VL/assets/demo.jpeg",
},
{"type": "text", "text": "Describe this image."},
],
}
]

# Prepare inputs for inference
text = processor.apply_chat_template(messages, tokenize=False, add_generation_prompt=True)
image_inputs, video_inputs = process_vision_info(messages)
inputs = processor(
text=[text],
images=image_inputs,
videos=video_inputs,
padding=True,
return_tensors="pt",
)
inputs = inputs.to("cuda")

# Inference: Generate output
generated_ids = model.generate(**inputs, max_new_tokens=128)
generated_ids_trimmed = [
out_ids[len(in_ids):] for in_ids, out_ids in zip(inputs.input_ids, generated_ids)
]
output_text = processor.batch_decode(
generated_ids_trimmed, skip_special_tokens=True, clean_up_tokenization_spaces=False
)

# Print the generated output
print(output_text)
Magic Hitch API를 사용하여 직접 호출 - 추론
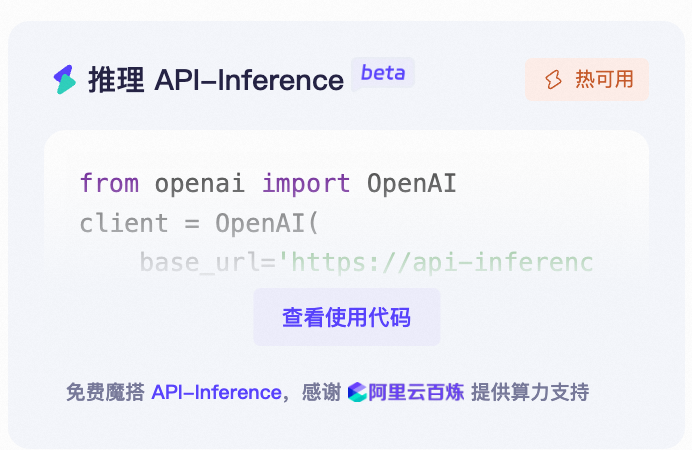
또한 Magic Match 플랫폼의 API-Inference는 Qwen2.5-VL 시리즈 모델에 대한 지원을 최초로 제공합니다. Magic Match 사용자는 API 호출을 통해 직접 사용할 수 있습니다. API-Inference의 구체적인 사용 방법은 모델 페이지(예: https://www.modelscope.cn/models/Qwen/Qwen2.5-VL-72B-Instruct)에서 확인할 수 있습니다:
또는 API-추론 문서를 참조하세요:
https://www.modelscope.cn/docs/model-service/API-Inference/intro
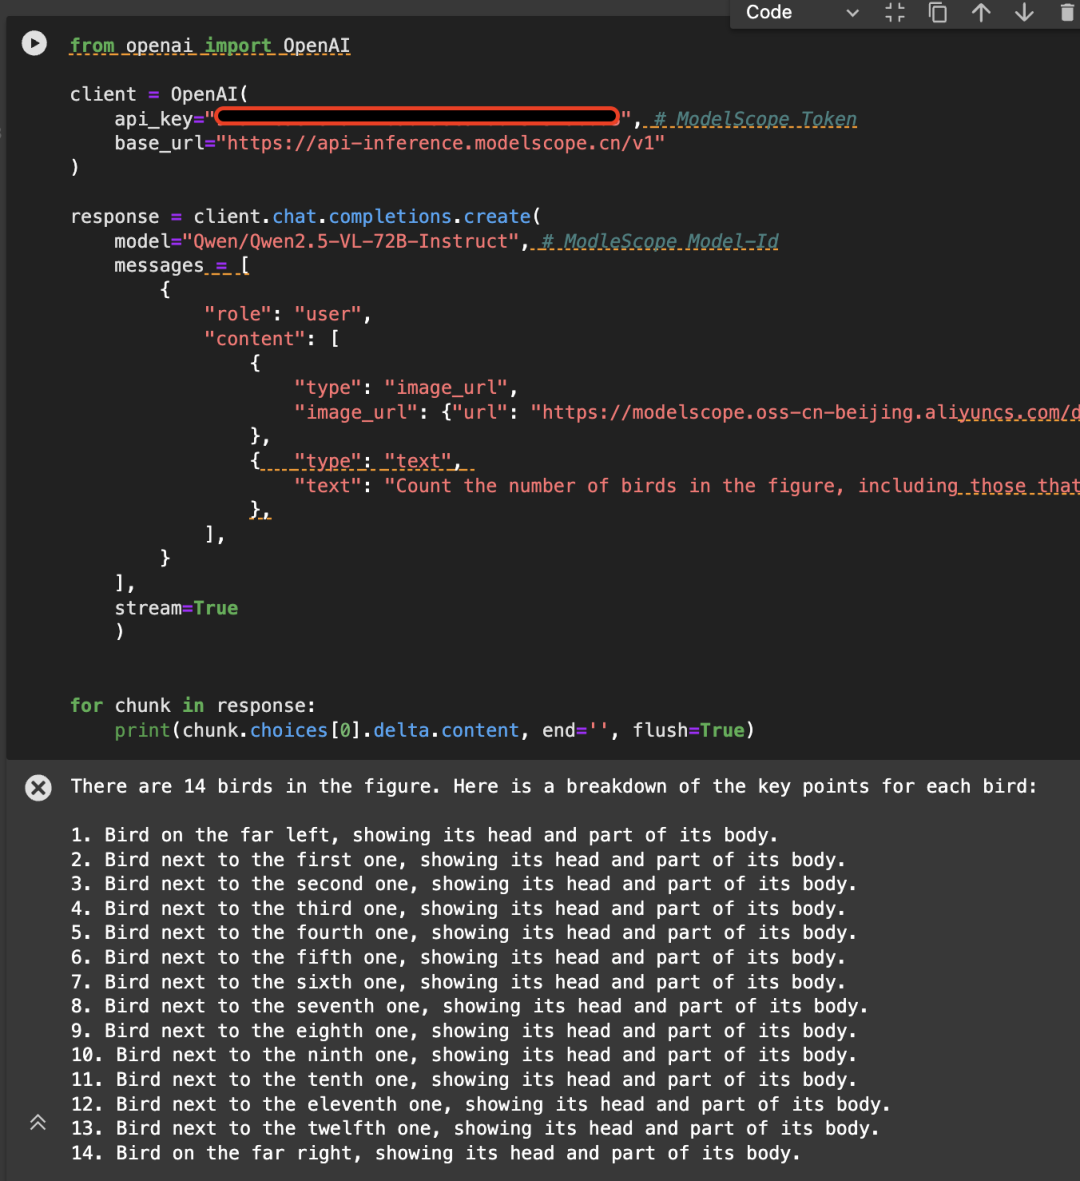
다음은 다음 이미지의 예시이며, Qwen/Qwen2.5-VL-72B-Instruct 모델을 사용하여 API를 호출합니다:

from openai import OpenAI

# Initialize the OpenAI client
client = OpenAI(
api_key="<MODELSCOPE_SDK_TOKEN>", # ModelScope Token
base_url="https://api-inference.modelscope.cn/v1"
)

# Create a chat completion request
response = client.chat.completions.create(
model="Qwen/Qwen2.5-VL-72B-Instruct", # ModelScope Model-Id
messages=[
{
"role": "user",
"content": [
{
"type": "image_url",
"image_url": {
"url": "https://modelscope.oss-cn-beijing.aliyuncs.com/demo/images/bird-vl.jpg"
}
},
{
"type": "text",
"text": (
"Count the number of birds in the figure, including those that "
"are only showing their heads. To ensure accuracy, first detect "
"their key points, then give the total number."
)
},
],
}
],
stream=True
)

# Stream the response
for chunk in response:
print(chunk.choices[0].delta.content, end='', flush=True)
4. 모델 미세 조정
대형 모델 및 멀티모달 대형 모델 미세 조정 배포 프레임워크에서 공식적으로 제공하는 매직 라이드 커뮤니티인 ms-swift에 대해 소개합니다. ms-swift 오픈 소스 주소:
https://github.com/modelscope/ms-swift
여기에서는 실행 가능한 미세 조정 데모를 보여주고 자체 정의된 데이터 세트의 형식을 제공합니다.
미세 조정을 시작하기 전에 환경이 준비되었는지 확인하세요.
git clone https://github.com/modelscope/ms-swift.git
cd ms-swift
pip install -e .
이미지 OCR 미세 조정 스크립트는 다음과 같습니다:
MAX_PIXELS=1003520 \
CUDA_VISIBLE_DEVICES=0 \
swift sft \
    --model Qwen/Qwen2.5-VL-7B-Instruct \
    --dataset AI-ModelScope/LaTeX_OCR:human_handwrite#20000 \
    --train_type lora \
    --torch_dtype bfloat16 \
    --num_train_epochs 1 \
    --per_device_train_batch_size 1 \
    --per_device_eval_batch_size 1 \
    --learning_rate 1e-4 \
    --lora_rank 8 \
    --lora_alpha 32 \
    --target_modules all-linear \
    --freeze_vit true \
    --gradient_accumulation_steps 16 \
    --eval_steps 50 \
    --save_steps 50 \
    --save_total_limit 5 \
    --logging_steps 5 \
    --max_length 2048 \
    --output_dir output \
    --warmup_ratio 0.05 \
    --dataloader_num_workers 4
비디오 메모리 리소스 교육:

동영상 미세 조정 스크립트는 아래와 같습니다:
# VIDEO_MAX_PIXELS等参数含义可以查看:
# https://swift.readthedocs.io/zh-cn/latest/Instruction/%E5%91%BD%E4%BB%A4%E8%A1%8C%E5%8F%82%E6%95%B0.html#id18

nproc_per_node=2
CUDA_VISIBLE_DEVICES=0,1 \
NPROC_PER_NODE=$nproc_per_node \
VIDEO_MAX_PIXELS=100352 \
FPS_MAX_FRAMES=24 \
swift sft \
    --model Qwen/Qwen2.5-VL-7B-Instruct \
    --dataset swift/VideoChatGPT:all \
    --train_type lora \
    --torch_dtype bfloat16 \
    --num_train_epochs 1 \
    --per_device_train_batch_size 1 \
    --per_device_eval_batch_size 1 \
    --learning_rate 1e-4 \
    --lora_rank 8 \
    --lora_alpha 32 \
    --target_modules all-linear \
    --freeze_vit true \
    --gradient_accumulation_steps $(expr 16 / $nproc_per_node) \
    --eval_steps 50 \
    --save_steps 50 \
    --save_total_limit 5 \
    --logging_steps 5 \
    --max_length 2048 \
    --output_dir output \
    --warmup_ratio 0.05 \
    --dataloader_num_workers 4 \
    --deepspeed zero2
비디오 메모리 리소스 교육:

사용자 지정 데이터 집합 형식은 다음과 같으며(시스템 필드는 선택 사항), `--데이터 집합 `를 지정하기만 하면 됩니다:
{"messages": [{"role": "user", "content": "浙江的省会在哪?"}, {"role": "assistant", "content": "浙江的省会在杭州。"}]}
{"messages": [{"role": "user", "content": "<image><image>两张图片有什么区别"}, {"role": "assistant", "content": "前一张是小猫,后一张是小狗"}], "images": ["/xxx/x.jpg", "xxx/x.png"]}
{"messages": [{"role": "system", "content": "你是个有用无害的助手"}, {"role": "user", "content": "<video>视频中是什么"}, {"role": "assistant", "content": "视频中是一只小狗在草地上奔跑"}], "videos": ["/xxx/x.mp4"]}
접지 작업 미세 조정 스크립트는 다음과 같습니다:
CUDA_VISIBLE_DEVICES=0 \
MAX_PIXELS=1003520 \
swift sft \
    --model Qwen/Qwen2.5-VL-7B-Instruct \
    --dataset 'AI-ModelScope/coco#20000' \
    --train_type lora \
    --torch_dtype bfloat16 \
    --num_train_epochs 1 \
    --per_device_train_batch_size 1 \
    --per_device_eval_batch_size 1 \
    --learning_rate 1e-4 \
    --lora_rank 8 \
    --lora_alpha 32 \
    --target_modules all-linear \
    --freeze_vit true \
    --gradient_accumulation_steps 16 \
    --eval_steps 100 \
    --save_steps 100 \
    --save_total_limit 2 \
    --logging_steps 5 \
    --max_length 2048 \
    --output_dir output \
    --warmup_ratio 0.05 \
    --dataloader_num_workers 4 \
    --dataset_num_proc 4
비디오 메모리 리소스 교육:

접지 작업 사용자 지정 데이터 세트 형식은 다음과 같습니다:
{"messages": [{"role": "system", "content": "You are a helpful assistant."}, {"role": "user", "content": "<image>描述图像"}, {"role": "assistant", "content": "<ref-object><bbox>和<ref-object><bbox>正在沙滩上玩耍"}], "images": ["/xxx/x.jpg"], "objects": {"ref": ["一只狗", "一个女人"], "bbox": [[331.5, 761.4, 853.5, 1594.8], [676.5, 685.8, 1099.5, 1427.4]]}}
{"messages": [{"role": "system", "content": "You are a helpful assistant."}, {"role": "user", "content": "<image>找到图像中的<ref-object>"}, {"role": "assistant", "content": "<bbox><bbox>"}], "images": ["/xxx/x.jpg"], "objects": {"ref": ["羊"], "bbox": [[90.9, 160.8, 135, 212.8], [360.9, 480.8, 495, 532.8]]}}
학습이 완료되면 다음 명령을 사용하여 학습의 유효성 검사 집합에 대해 추론이 수행됩니다.
여기서 `--adapters`는 학습에서 생성된 마지막 체크포인트 폴더로 대체해야 합니다. 어댑터 폴더에는 학습을 위한 파라미터 파일이 포함되어 있으므로 `--model`을 추가로 지정할 필요가 없습니다:
CUDA_VISIBLE_DEVICES=0swift infer--adapters output/vx-xxx/checkpoint-xxx--stream false--max_batch_size 1--load_data_args true--max_new_tokens 2048
모델을 ModelScope로 푸시합니다:
CUDA_VISIBLE_DEVICES=0swift export--adapters output/vx-xxx/checkpoint-xxx--push_to_hub true--hub_model_id '<your-model-id>'--hub_token '<your-sdk-token>'
© 저작권 정책
기사 저작권 AI 공유 서클 모두 무단 복제하지 마세요.
관련 문서

댓글 없음...


