소개
DashInfer-VLM은 시각적 멀티모달 대형 모델 VLM을 위한 추론 아키텍처로, 특히 Qwen VL 모델의 추론 가속에 최적화되어 있습니다. DashInfer-VLM과 다른 VLM용 추론 가속 프레임워크의 가장 큰 차이점은 VIT 부분과 LLM 부분을 분리하고 VIT와 LLM이 서로 간섭 없이 병렬로 실행된다는 점입니다. 서로 간섭하지 않고 병렬로 실행됩니다.
VLM의 이미지 및 비디오 전처리와 VIT의 특징 추출 부분이 LLM 생성을 방해하지 않으며, 오픈소스 커뮤니티에서 이 아키텍처를 사용하는 최초의 VLM 서비스 프레임워크인 VIT/LLM 분리형 아키텍처가 가능하다는 점이 특징입니다.
멀티 카드 배포의 경우 각 카드에 ViT 처리 장치가 있어 비디오, 다중 이미지 시나리오에서 매우 중요한 성능 이점을 제공합니다.
또한 ViT 부분의 경우 메모리 캐싱을 지원하므로 여러 번의 대화에서 반복적으로 ViT를 다시 계산할 필요가 없습니다.
아래는 4카드 파트 72B에 따른 아키텍처와 구성에 대한 다이어그램입니다.
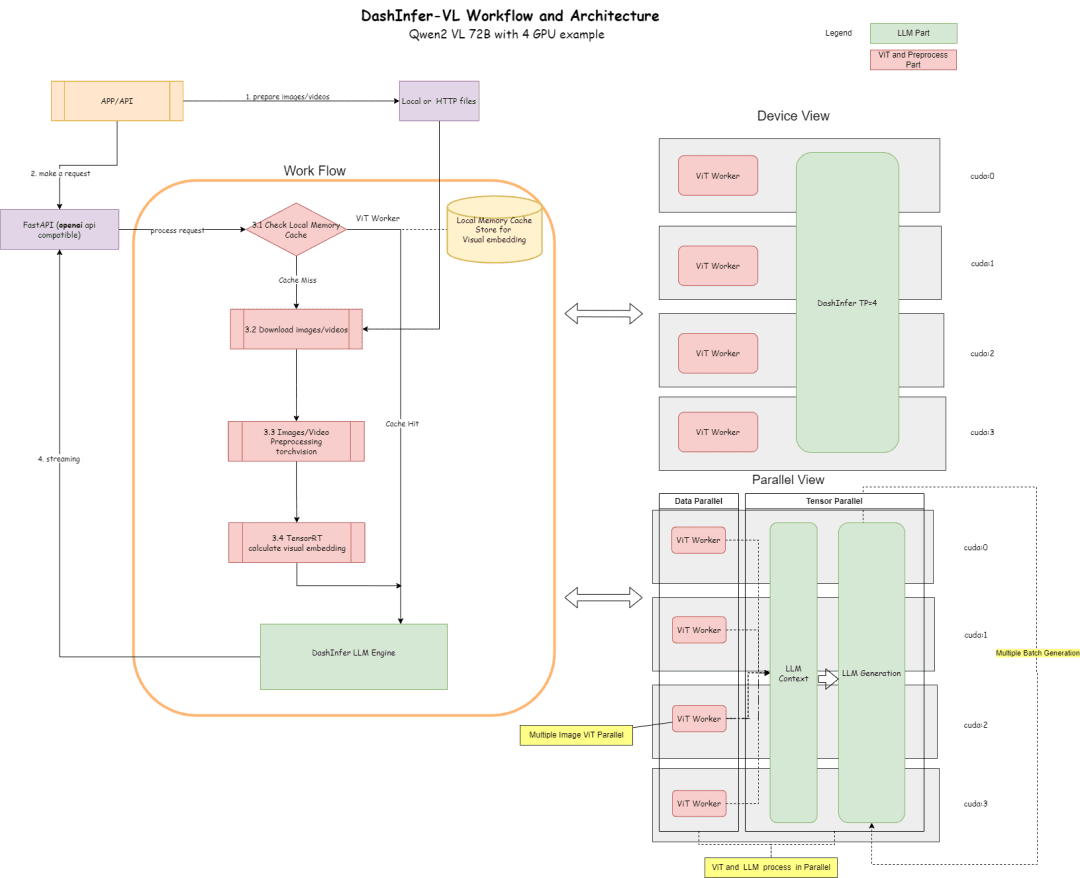
아키텍처 다이어그램은 프로세스 및 아키텍처를 설명합니다:
- ViT 부분에서는 추론에 TensorRT 또는 onnxruntime과 같은 다양한 추론 도출을 사용할 수 있습니다(프레임워크 내 모델의 ViT 부분에서는 onnx 모델 내보내기가 수행됩니다.) 현재 프레임워크에서는 기본적으로 TensorRT가 지원됩니다.
- LLM 섹션에서는 대시인퍼가 추론에 사용됩니다.
- 캐시 부분, ViT 결과 지원 메모리 캐시, LLM 부분 접두사 캐시, LLM 부분 멀티모달 접두사 캐시(기본적으로 활성화되지 않음)
코드 주소:
https://github.com/modelscope/dash-infer
문서 주소:
https://dashinfer.readthedocs.io/en/latest/vlm/vlm_offline_inference_en.html
모범 사례
매직 히치 커뮤니티의 무료 GPU 연산에서 DashInfer를 경험해 보세요:
首先是dashinfer-vlm和TensorRT的安装。

# 首先安装所需的 package
import os

# 下载并安装 dashinfer 2.0.0rc2 版本
# 如果需要,可以使用 wget 下载并解压 TensorRT 包
# pip 安装 dashinfer 2.0.0rc2
#!pip install https://github.com/modelscope/dash-infer/releases/download/v2.0.0-rc2/dashinfer-2.0.0rc2-cp310-cp310-manylinux_2_17_x86_64.manylinux2014_x86_64.whl
#!wget https://modelscope.oss-cn-beijing.aliyuncs.com/releases/TensorRT-10.6.0.26.Linux.x86_64-gnu.cuda-12.6.tar.gz
#!tar -xvzf TensorRT-10.6.0.26.Linux.x86_64-gnu.cuda-12.6.tar.gz

# 下载到本地并替换为 modelscope 对应的 URL
# 安装 dashinfer,因 package 较大,推荐下载到本地后安装
#!wget https://modelscope.oss-cn-beijing.aliyuncs.com/releases/dashinfer-2.0.0rc3-cp310-cp310-manylinux_2_17_x86_64.manylinux2014_x86_64.whl
#!pip install ./dashinfer-2.0.0rc3-cp310-cp310-manylinux_2_17_x86_64.manylinux2014_x86_64.whl

# 安装 dashinfer vlm
#!pip install dashinfer-vlm

# 安装 OpenAI 客户端
#!pip install openai==1.56.2

# 安装 TensorRT 的 Python 包,从下载的包中打开安装
#!pip install TensorRT-10.6.0.26/python/tensorrt-10.6.0-cp310-none-linux_x86_64.whl
TensorRT에는 환경 변수 구성이 필요합니다:
import os

# 获取 TensorRT 运行时库的路径
trt_runtime_path = os.getcwd() + "/TensorRT-10.6.0.26/lib/"

# 获取当前的 LD_LIBRARY_PATH 环境变量值
current_ld_library_path = os.environ.get('LD_LIBRARY_PATH', '')

# 将新路径添加到现有值中
if current_ld_library_path:
# 如果 LD
환경이 설치된 후, dashinfer vlm을 시작하여 모델을 추론하고 모델을 7B, 72B 등으로 변경할 수 있는 openai 호환 서버를 구성합니다.
환경의 모든 GPU 메모리는 기본적으로 사용됩니다.
!dashinfer_vlm_serve --model qwen/Qwen2-VL-2B-Instruct --port 8000 --host 127.0.0.1
이 프로세스는 대시인퍼와 ViT에서 사용하는 외부 엔진(이 경우 텐서RT)을 초기화하며, 오픈AI 서비스를 시작합니다.
이러한 로그를 확인하면 TRT가 성공적으로 초기화되었음을 알 수 있습니다:

이러한 로그를 보면 DashInfer가 성공적으로 초기화되었음을 알 수 있습니다:

이러한 로그를 보면 openai 서비스가 성공적으로 초기화되었음을 알 수 있습니다:

여기서 모든 초기화가 완료되면 클라이언트 및 벤치마킹을 위해 다른 노트북을 열 수 있습니다.
노트북 주소:https://modelscope.cn/notebook/share/ipynb/6ea987c5/vl-start-server.ipynb
이미지 이해 데모
여러 이미지로 이미지 이해 데모를 시연합니다:
# Install the required OpenAI client version
!pip install openai==1.56.2 # VL support requires a recent OpenAI client.

from openai import OpenAI

# Initialize the OpenAI client
client = OpenAI(
base_url="http://localhost:8000/v1",
api_key="EMPTY"
)

# Prepare the API call for a chat completion
response = client.chat.completions.create(
model="model",
messages=[
{
"role": "user",
"content": [
{"type": "text", "text": "Are these images different?"},
{
"type": "image_url",
"image_url": {
"url": "https://farm4.staticflickr.com/3075/3168662394_7d7103de7d_z_d.jpg",
}
},
{
"type": "image_url",
"image_url": {
"url": "https://farm2.staticflickr.com/1533/26541536141_41abe98db3_z_d.jpg",
}
},
],
}
],
stream=True,
max_completion_tokens=1024,
temperature=0.1,
)

# Process the streamed response
full_response = ""
for chunk in response:
# Append the delta content to the full response
full_response += chunk.choices[0].delta.content
print(".", end="") # Print a dot for each chunk received

# Print the full response
print(f"\nImage: Full Response:\n{full_response}")
비디오 이해력 데모
오픈AI는 표준 비디오 인터페이스를 정의하지 않기 때문에 이 백서에서는 자동으로 비디오를 다운로드하고 프레임을 추출하여 분석하는 video_url 유형을 제공합니다.
# video example
!pip install openai==1.56.2 # Ensure the OpenAI client supports video link features.

from openai import OpenAI

# Initialize the OpenAI client
client = OpenAI(
base_url="http://localhost:8000/v1",
api_key="EMPTY"
)

# Create a chat completion request with a video URL
response = client.chat.completions.create(
model="model",
messages=[
{
"role": "user",
"content": [
{
"type": "text",
"text": "Generate a compelling description that I can upload along with the video."
},
{
"type": "video_url",
"video_url": {
"url": "https://cloud.video.taobao.com/vod/JCM2awgFE2C2vsACpDESXZ3h5_iQ5yCZCypmjtEs2Ck.mp4",
"fps": 2
}
}
]
}
],
max_completion_tokens=1024,
top_p=0.5,
temperature=0.1,
frequency_penalty=1.05,
stream=True,
)

# Process the streaming response
full_response = ""
for chunk in response:
# Append the delta content from the chunk to the full response
full_response += chunk.choices[0].delta.content
print(".", end="") # Indicate progress with dots

# Print the complete response
print(f"\nFull Response: \n{full_response}")
벤치마크
위의 이미지를 사용하여 예제를 이해하고 처리량 테스트를 위한 다중 동시 테스트를 간단히 수행하세요.
# benchmark!pip install openai==1.56.2
import time
import concurrent.futures
from openai import OpenAI

# 初始化 OpenAI 客户端
client = OpenAI(
base_url="http://localhost:8000/v1",
api_key="EMPTY"
)

# 请求参数
model = "model"
messages = [
{
"role": "user",
"content": [
{"type": "text", "text": "Are these images different?"},
{
"type": "image_url",
"image_url": {
"url": "https://farm4.staticflickr.com/3075/3168662394_7d7103de7d_z_d.jpg",
}
},
{
"type": "image_url",
"image_url": {
"url": "https://farm2.staticflickr.com/1533/26541536141_41abe98db3_z_d.jpg",
}
},
],
}
]

# 并发请求函数
def send_request():
start_time = time.time()
response = client.chat.completions.create(
model=model,
messages=messages,
stream=False,
max_completion_tokens=1024,
temperature=0.1,
)
end_time = time.time()
latency = end_time - start_time
return latency

# 基准测试函数
def benchmark(num_requests, num_workers):
latencies = []
start_time = time.time()

with concurrent.futures.ThreadPoolExecutor(max_workers=num_workers) as executor:
futures = [executor.submit(send_request) for _ in range(num_requests)]
for future in concurrent.futures.as_completed(futures):
latencies.append(future.result())

end_time = time.time()
total_time = end_time - start_time
qps = num_requests / total_time
average_latency = sum(latencies) / len(latencies)
throughput = num_requests * 1024 / total_time # 假设每个请求的响应大小为 1024 字节

print(f"Total Time: {total_time:.2f} seconds")
print(f"QPS: {qps:.2f}")
print(f"Average Latency: {average_latency:.2f} seconds")

# 主程序入口
if __name__ == "__main__":
num_requests = 100 # 总请求数
num_workers = 10 # 并发工作线程数
benchmark(num_requests, num_workers)
테스트 결과:

노트북 주소:https://modelscope.cn/notebook/share/ipynb/5560603a/vl-test-and-benchmark.ipynb
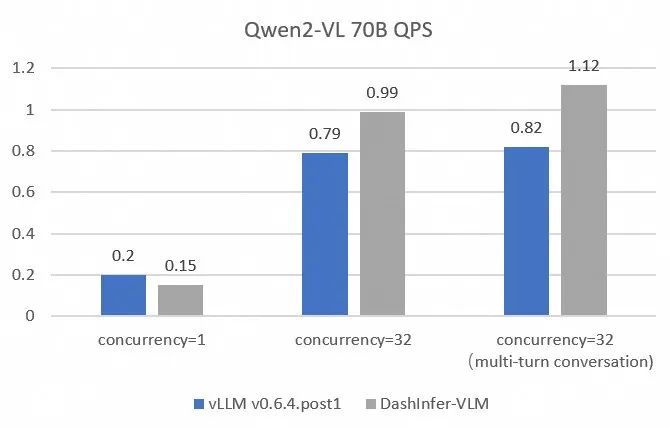
포괄적인 vLLM 성능 비교:
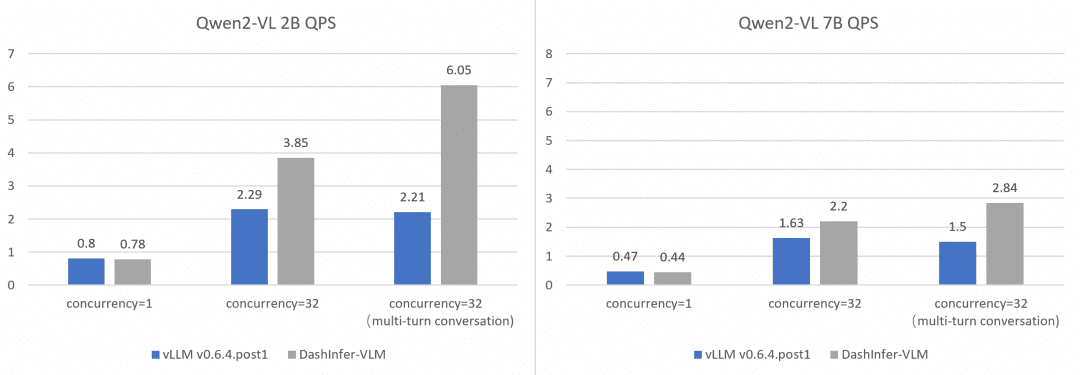
보다 포괄적이고 정확하게 vLLM의 성능을 비교하고 대조하기 위해 OpenGVLab/InternVL-Chat-V1-2-SFT-Data를 사용하여 다양한 크기의 모델에서 단일 동시, 다중 동시 및 다중 라운드 대화를 벤치마킹했으며, 자세한 재현 스크립트는 링크에 제공되며 결과는 다음과 같습니다:
대시인퍼는 모든 경우, 특히 다중 라운드 대화에서 약간의 성능 이점을 가지고 있음을 알 수 있습니다.
© 저작권 정책
기사 저작권 AI 공유 서클 모두 무단 복제하지 마세요.
관련 문서

댓글 없음...


