Breaking through information silos: Dify adds connected search to localized DeepSeek AI assistant

Imagine what it would be like to have a private AI application that is self-contained, confidential, and able to analyze local text, provide accurate conversations at any time, and have networked search capabilities. In this article, we'll take you step-by-step through the process of building one. DeepSeek + Ollama + Dify Rapidly deploy a full-featured, privatized AI assistant.
DeepSeek It is a breakthrough open-source large language model, its advanced algorithmic architecture and "reflective chain" ability, so that AI dialog interaction becomes more intelligent and natural. With private deployment, you can fully control the security of your data, and flexibly adjust the deployment scheme according to your needs to create your own "AI Operating System" The
Dify As the same open source AI application development platform, it also provides a complete private deployment solution and powerful third-party tool support. Includes network search, document analysis functions, etc. Dify supports 1000+ open-source or closed-source models from around the world.) At the same time, Dify supports 1000+ open-source or closed-source models around the world, so you can call any model capability to empower your AI application.
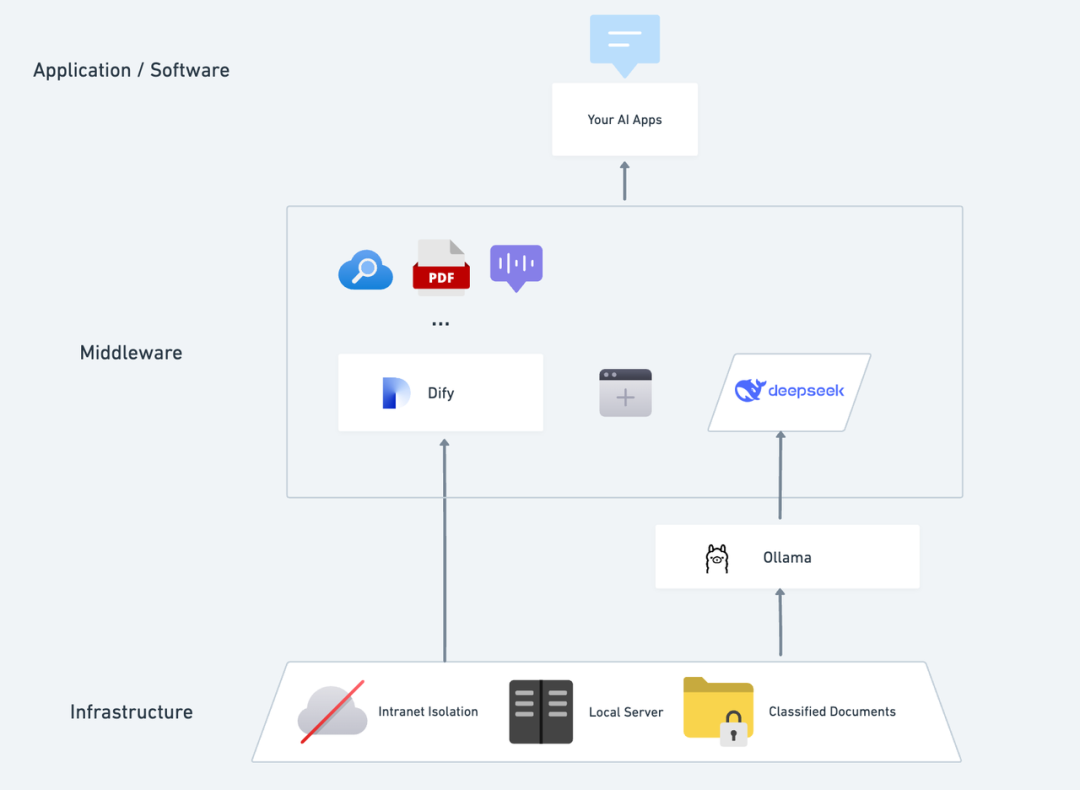
Seamlessly integrating DeepSeek into the Dify platform not only ensures data privacy, but also makes it easy for developers to get started and build powerful AI apps on their local servers, allowing organizations or teams to truly realize the power and value of DeepSeek. "Data autonomy" and "flexible customization" . If you have deployed betweenPrivate Deployment of DeepSeek + Dify: Building a Secure and Controllable Local AI Assistant System , you can jump directly to the networking search section.
Dify X DeepSeek Advantages of private deployment:
- Call 1000+ model capabilities: Dify is a model-neutral platform that makes full use of the reasoning power of different big models (PS: can be called using multiple third MaaS platforms supported by Dify) DeepSeek R1 model to solve the problem of unstable official API calls, please see the end of the detailed configuration method)
- Excellent performance: A conversation experience comparable to a business model that easily handles a variety of complex scenarios.
- Environmental isolation: Runs completely offline, eliminating any risk of data leakage.
- Data can be controlled: You call the shots, have full control of the data and meet industry compliance requirements.
 pre-positioningAcquire a server (VPS or VDS) that meets the following criteria:Hardware Environment:
- CPU >= 2 Core
- Video Memory/RAM ≥ 16 GiB (recommended)
Software environment:
- Docker
- Docker Compose
- Ollama
- Dify Community Edition
Starting Deployment 1. Install Ollama
Just as a cell phone usually has an app store to help you quickly find and download apps, AI models have their own dedicated "app store".
Ollama is a cross-platform, open-source large model management client (macOS, Windows, Linux) designed to seamlessly deploy large language models (LLMs) such as DeepSeek, Llama, Mistral, and others.
Large models can be installed and deployed with a single command, and all of LLM's usage data is stored locally on the machine, providing full data privacy and security to meet compliance requirements.
Visit the official Ollama website (https://ollama.com/) and follow the webpage prompts to download and install the Ollama client. After installation, run ollama -v in the terminal to output the version number.
~ ollama -v
ollama version is 0.5.5
Select the appropriate DeepSeek size model for deployment based on your actual environment configuration. The 7B size model is recommended for initial installation.
The B suffix indicates the training parameters of the model. Theoretically, the higher the parameter, the smarter the model's performance and the higher the graphics memory required.
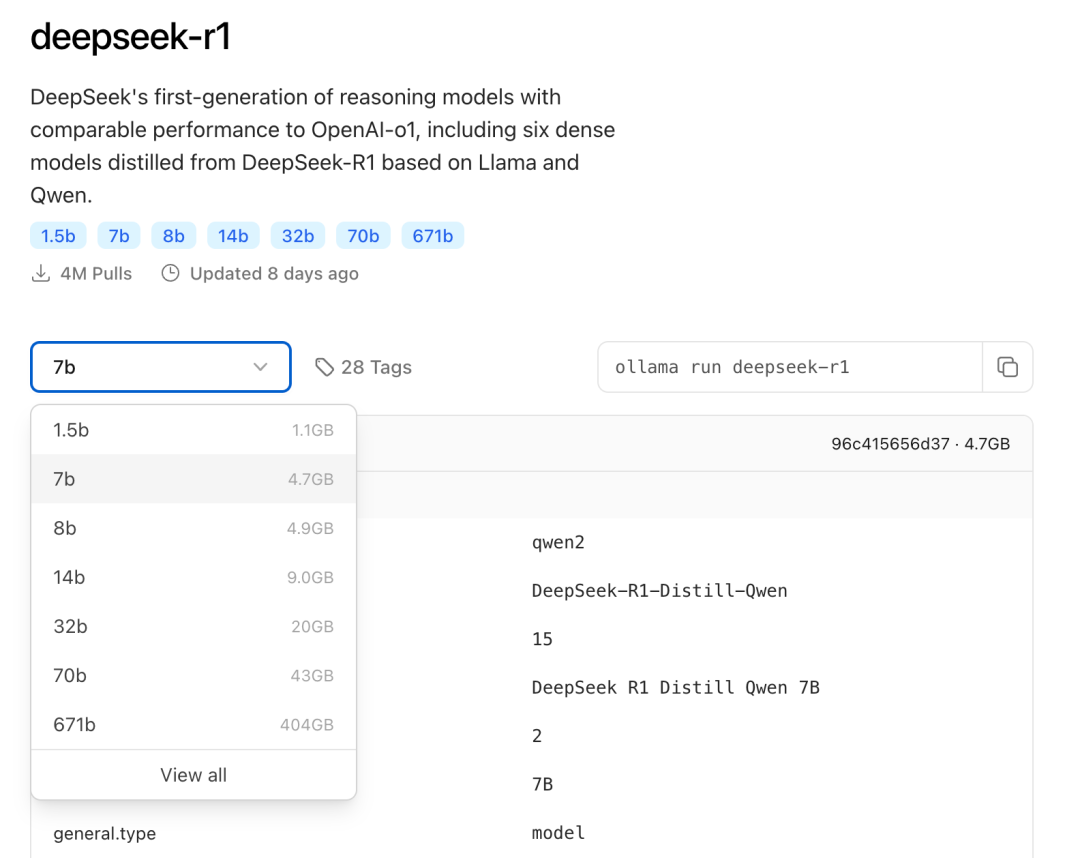
Run command ollama run deepseek-r1:7b Install the DeepSeek R1 model. 
2. Install Dify Community Edition
Just as a house needs plumbing and electricity, it also needs a functioning kitchen for the chef to produce delicious food, and that's where Dify comes in. As a popular GitHub open source project, Dify has a built-in toolchain for building AI applications. With DeepSeek's powerful modeling capabilities, anyone can quickly build the AI app of their choice without the need for complex code knowledge.
Visit the Dify GitHub project address and run the following commands to complete the pull code repository and installation process.
git clone https://github.com/langgenius/dify.git
cd dify/docker
cp .env.example .env
docker compose up -d # 如果版本是 Docker Compose V1,使用以下命令:docker-compose up -d
After running the command, the terminal will automatically output the status and port mapping of all containers. If there are any interruptions or errors, please make sure that Docker and Docker Compose are installed. for detailed instructions, please refer to the following.
Deploy Dify Community Edition:
https://docs.dify.ai/zh-hans/getting-started/install-self-hosted/docker-compose
Dify Community Edition uses port 80 by default, and your privatized Dify platform can be accessed by linking to http://your_server_ip.
To switch access ports, please refer to this document: https://docs.dify.ai/zh-hans/getting-started/install-self-hosted/faq#id-5.-ru-he-xiu-gai-ye-mian-duan-kou
3. Connecting DeepSeek to Dify
After deploying the DeepSeek model with Dify Community Edition, click on the link http://your_server_ip to enter the Dify platform and then click on the top right corner Avatar → Settings → Model Provider Select Ollama and tap Add Model.
Select the LLM model type.
- Model Name, fill in the model name of the deployed model. The model model deployed above is deepseek-r1 7b, so fill in: deepseek-r1:7b.
- Base URL, fill in the address where the Ollama client is running, usually http://your_server_ip:11434. In case of connection problems, please read the FAQ at the end of this article.
- The other options are left at their default values. According to the DeepSeek model description, the maximum generated length is 32,768 Tokens.
Start building AI applications
The following sections will show you how to build different types of AI applications:
- Simple Dialog Application
- Simple dialog applications with document analysis capabilities
- Programmable applications with networked search
DeepSeek AI Chatbot (simple application)
- Tap "Create a Blank App" on the left side of the Dify platform homepage, select the "Chat Assistant" type of app and name it simply.
- In the upper right hand corner, under Application Type, select Ollama Framework within the
deepseek-r1:7bModel.
- Verify that the AI application works by entering content in the preview dialog box. Generating a response means that the AI application build is complete.
- Tap the Publish button at the top right of the app to get a link to the AI app and share it with others or embed it in another website.
DeepSeek AI Chatbot + Knowledge Base
An important challenge for large-scale language modeling (LLM) is that the training data is not updated in real time and the amount of data may be insufficient, which can lead to the model generating "phantom" responses.
In order to solve this problem, Retrieval Augmented Generation (RAG) technology has emerged. By retrieving relevant knowledge, it provides the model with the necessary contextual information, which is incorporated into the content generation process to enhance the accuracy and professionalism of the answers.
In practice, when you upload internal documents or professional information, Dify's knowledge base function can take on the role of RAG role in helping LLM provide more targeted answers based on specialized information, effectively bridging the gap in model training data.
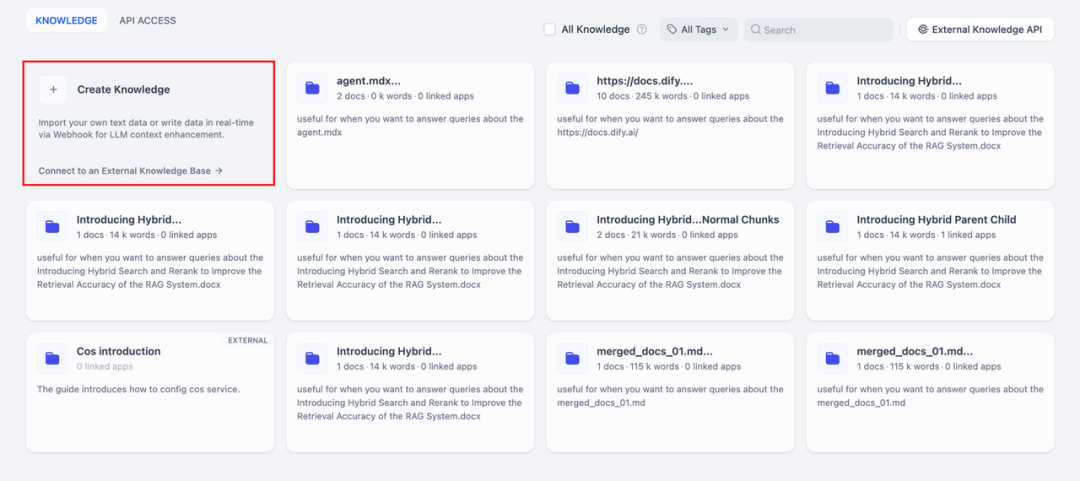
1. Creating a knowledge base
Upload documents to the Knowledge Base that need to be analyzed by AI. To ensure that the DeepSeek model accurately understands the content of the document, it is recommended that the text be processed using a "parent-child segmentation" model - this model better preserves the hierarchical structure and context of the document.
For detailed configuration steps, please refer to this document:
https://docs.dify.ai/zh-hans/guides/knowledge-base/create-knowledge-and-upload-documents
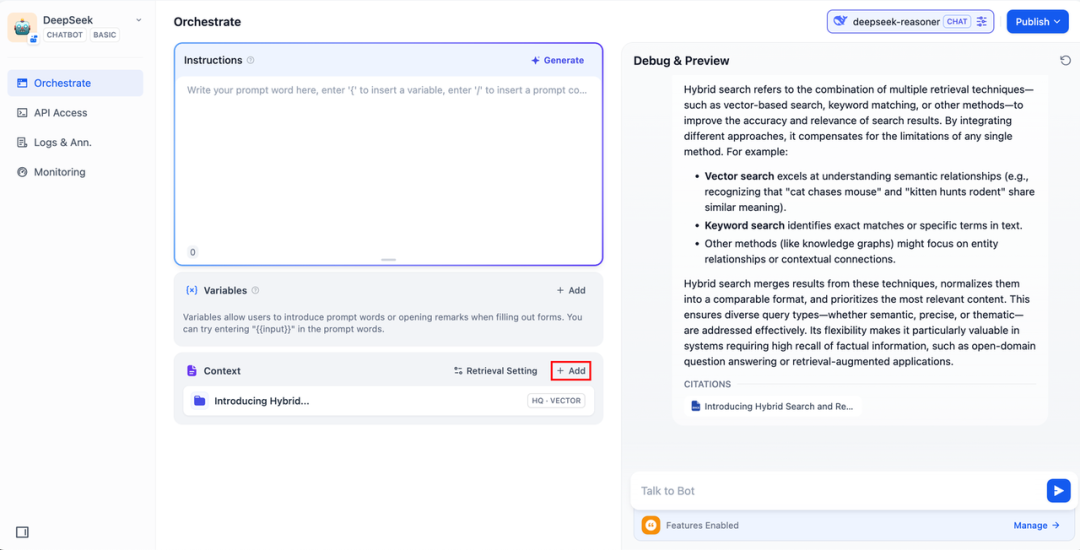
2. Integration of knowledge bases into AI applications
Add a knowledge base to the "context" of the AI application and enter a relevant question in the dialog box. lLM will first take the context of the question from the knowledge base, summarize it, and provide a higher quality answer.
DeepSeek AI Chatflow / Workflow (Networked Search)
Chatflow / Workflow Apps can help you orchestrate and build AI apps with more complex functionality, such as giving DeepSeek the ability to perform networked search, file recognition, speech recognition, and more. For space considerations, the following sections show you how to program and build more sophisticated AI applications for DeepSeek. Enable networked search capabilities The
To use the app directly, you can download the DSL file and import it into the Dify platform by clicking the link below.
Application DSL file download address:
https://assets-docs.dify.ai/2025/02/41a3564694dd3f2803ad06a29f5b3fef.yml
- Tap "Create a Blank App" on the left side of the Dify platform homepage, select a "Chatflow" or "Workflow" type app and simply name it.
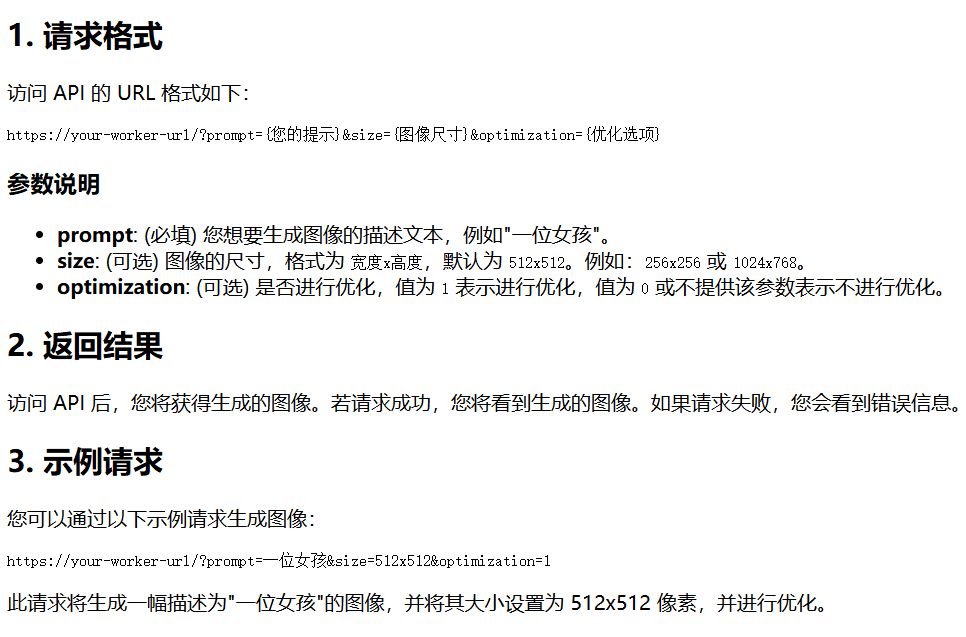
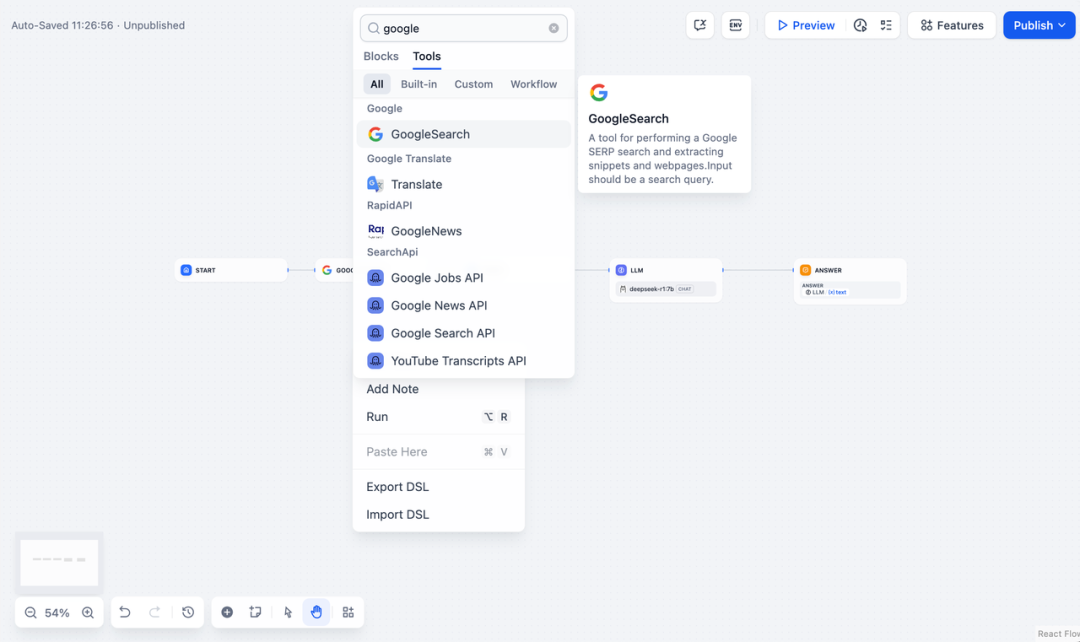
2. AddInternet searchnode, fill in the API Key to activate the node functionality. Fill in the Query field with the API key provided by the initial node. {{#sys.query#}} Variables.
Visit the following website to obtain an API Key:
https://serpapi.com/users/sign_in
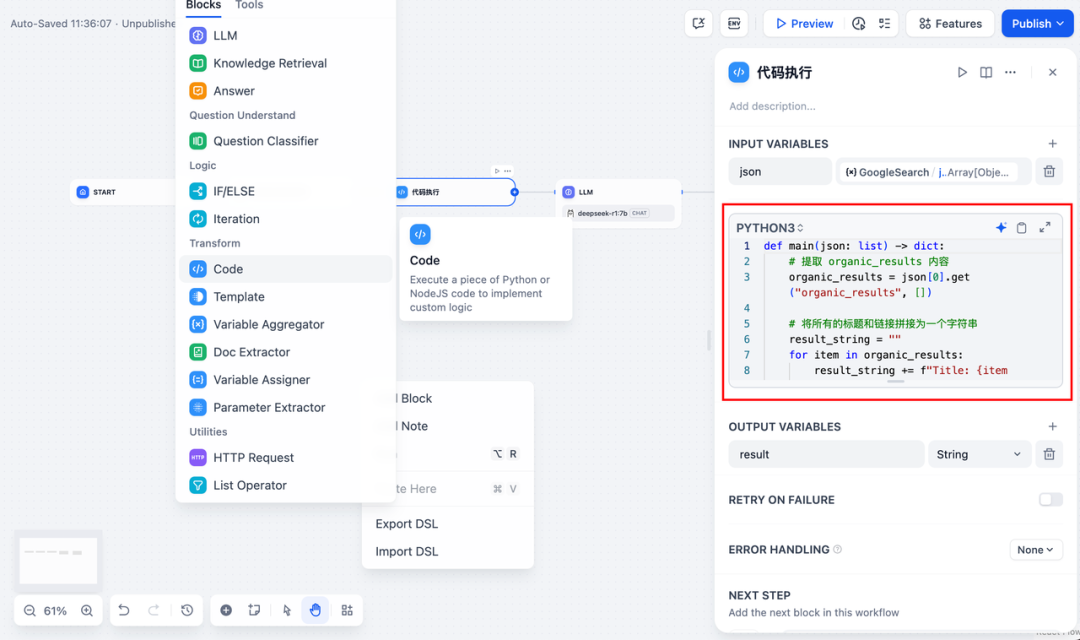
3. Addcode executionnode. Since the output of the search tool is a piece of JSON code, you need to add a code execution node to extract the necessary content. Fill in the JSON output variable of the search tool with the input variable, and fill in the following code in the code execution node:
def main(json: list) -> dict:
# 提取 organic_results 内容
organic_results = json[0].get("organic_results", [])
# 将所有的标题和链接拼接为一个字符串
result_string = ""
for item in organic_results:
result_string += (
f"Title: {item['title']}\n"
f"Link: {item['link']}\n"
f"Snippet: {item['snippet']}\n\n"
)
# 返回拼接后的字符串作为 result
return {
"result": result_string,
}
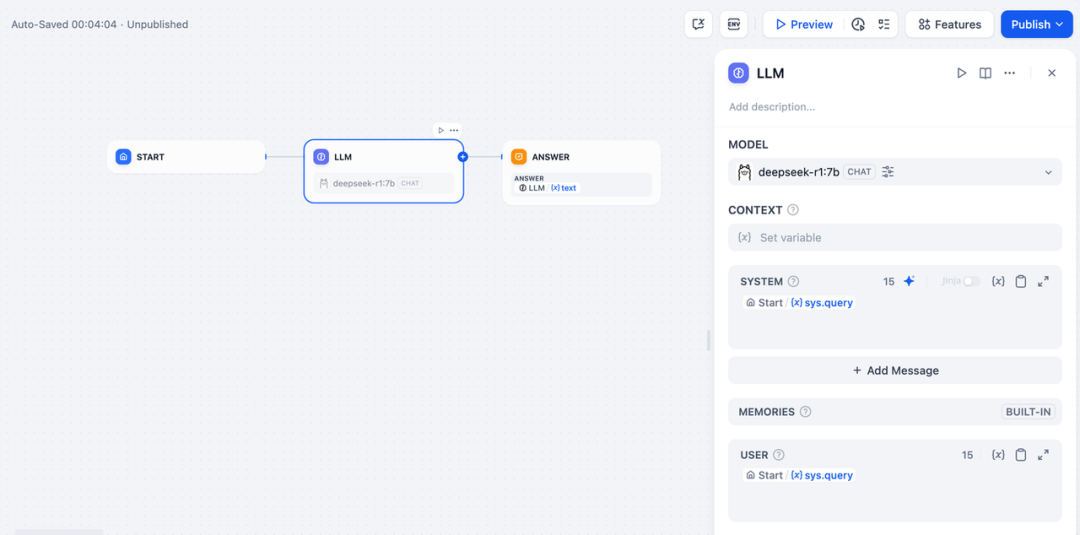
- To add an LLM node, select the Ollama framework within the
deepseek-r1:7bmodel and add the system prompt word within the{{#sys.query#}}variable to process commands from the start node that are entered by the user.
In case of API anomalies, they can be handled flexibly by the load balancing function or the anomaly handling node.
load balancingAPI requests can be distributed among multiple API endpoints as described at https://docs.dify.ai/zh-hans/guides/model-configuration/load-balancing
Exception handling mechanismAbility to throw fault messages in case of node errors without interrupting the main process. For a detailed description, please refer to: https://docs.dify.ai/zh-hans/guides/workflow/error-handling
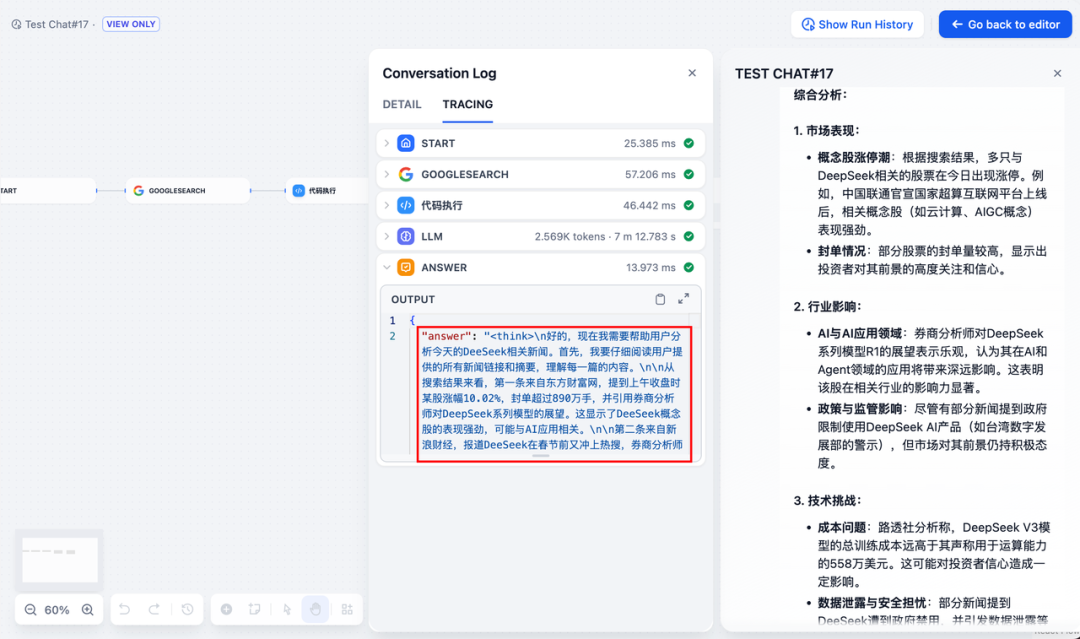
- Add the end node, reference the output variables of the LLM node and complete the configuration. You can enter content in the preview box for testing. Generating a response means that the AI application build is complete and you can view the LLM reasoning process within the log.
common problems
1. Connection errors during Docker deployment
When deploying Dify and Ollama with Docker, the following errors may be encountered:
HTTPConnectionPool(host=127.0.0.1, port=11434): Max retries exceeded with URL: /cpi/chat
(Caused by NewConnectionError('<urllib3.connection.HTTPConnection object at 0x7f8562812c20>:
Failed to establish a new connection: [Errno 111] Connection refused'))
HTTPConnectionPool(host=localhost, port=11434): Max retries exceeded with URL: /cpi/chat
(Caused by NewConnectionError('<urllib3.connection.HTTPConnection object at 0x7f8562812c20>:
Failed to establish a new connection: [Errno 111] Connection refused'))
Cause of the error: This error occurs because the Ollama service is not accessible in the Docker container. localhost usually points to the container itself, not the host or another container. To resolve this issue, you need to expose the Ollama service to the network.
macOS environment configuration method:
If Ollama is running as a macOS application, you need to set the environment variable using launchctl:
- Set the environment variables by calling launchctl setenv:
launchctl setenv OLLAMA_HOST "0.0.0.0" - Restart the Ollama application.
- If the above steps don't work, you can use the following method: the problem is that inside docker, you should connect to host.docker.internal to access the docker's hosts, so replacing localhost with host.docker.internal service will work: http://host. docker.internal:11434
Linux environment configuration method: If Ollama is running as a systemd service, you should use the s ystemctl Setting environment variables:
- This is accomplished by calling the
systemctl edit ollama.serviceEdit the systemd service. This will open an editor. - For each environment variable, the
[Service]Add a line under the sectionEnvironment::[Service] Environment="OLLAMA_HOST=0.0.0.0" - Save and exit.
- Reload systemd and restart Ollama:
systemctl daemon-reload
systemctl restart ollama
Windows environment configuration method:
On Windows, Ollama inherits your user and system environment variables.
- First exit the program by clicking on Ollama in the taskbar.
- Edit system environment variables from the control panel
- Edit or create new variables for your user account, such as
OLLAMA_HOST,OLLAMA_MODELSetc. - Click OK / Apply Save
- In a new terminal window, run
ollama
2. How do I change the Ollama service address and port number?
Ollama Default Binding 127.0.0.1 port 11434, which you can access via the OLLAMA_HOST Environment variables change the binding address.
© Copyright notes
Article copyright AI Sharing Circle All, please do not reproduce without permission.
Related posts


No comments...