Use the Glif Browser plugin with built-in rich workflows to generate a variety of creative images
Glif this tool we have introduced many times before, built-in rich image creative workflow, a lot of small red book pop-up creative images are derived from this tool. Using Glif you do not need to carry out complex configuration, because the author has encapsulated the entire process, you only need to fill in the input box text or image, the subsequent process automation to help you complete.
Recently there are quite a few new creative image blending tools on Glif, especially for naturally blending logos into any image. But today the focus is not on the specific workflow, but rather recommending you this Glif Chrome plugin.
How to install the Glif extension:
leave forGlif Extension in Chrome Web Store
Click "Add to Chrome " button to install the extension.
As we all know, you can't download Chrome extensions directly from China, so use bing to search for "Download Chrome extensions/plug-ins from China" to find the relevant sites to download.

What Glif can do:
- Once the extension is installed, right-click on any image and select " Glif it! ". (Alternatively, you can click the Extensions icon in the toolbar and paste any image.)
- Select the Glif effect you want to run from the drop down menu - test all effects!
- Enter your own prompts or click "✨".Generate tips for me" button for an AI-generated example prompt.
- Click " Glif it! "Button.
- That's it! Your blended image will be generated in about 30 seconds.
- Bonus: Using the buttons in the gallery below, you can share, download, and even exchange your images on the web!
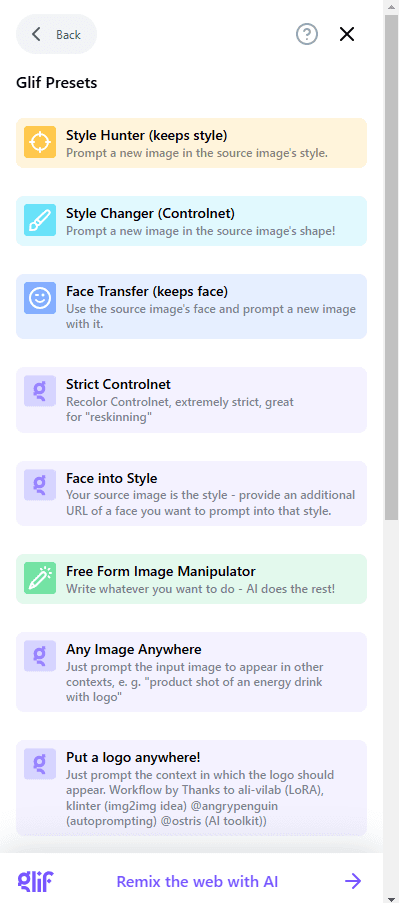
Let's try Put a logo anywhere from the recent process:

For advanced use, the plugin can use the locally installed Comfy UI to process network images:
Step 1: Linking Comfy Tags
- Open Comfy in the Chrome tab.
- If you use the default Comfy URL http://127.0.0.1:8188/It will automatically connect with Glif.
- Check the Glif logo at the bottom of the Comfort Toolbar to see if it is connected.
- Glif requires Comfort Developer Mode to be enabled. If not, simply click on the warning message to enable it.
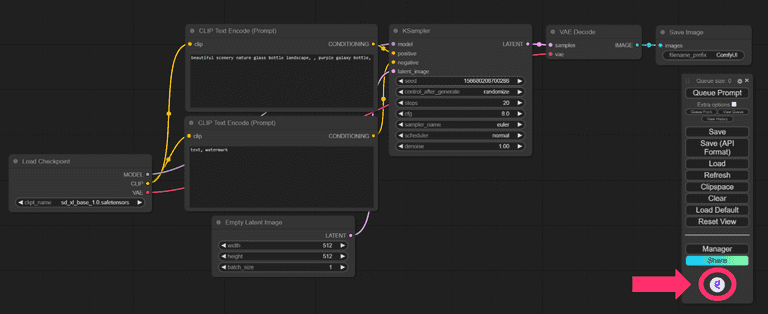
Step 2: Configure the workflow
- Load or create a comfortable workflow that accepts input images and text prompts.
- Modify the image node title to include text anywhere in the title " GLIF"(Modify the node title by right-clicking and selecting the Properties Panel.) Then do the same for the Text Hints node. (Modify the node title by right-clicking and selecting the Properties Panel.) This tells the Glif extension where to deliver images and prompts from the network.
- In short, you need a text node with "GLIF" in its titlecap (a poem)An image input node with "GLIF" in its title.

Step 3: Run the workflow
Run the workflow at least once using the new title, any images or prompts.
If you open View History, you will see a Glif icon next to the workflow run that the extension will use.
Step 4: Using Workflow on Web Images
Open a new tab and find an interesting picture.
Important: Keep the Comfort tab open!. Your process will be executed here.
As usual, right-click on the image and select "Glif It! Click on the preset selector and scroll to the bottom to find the special preset called "Local Comfy".
 Then enter the prompt and click "Glif It!" to view the images and prompts processed by your local Comfy workflow!
Step 5: Convert your workflow to glif (optional)
If you want to save your workflow for later use and share your workflow with the wider Glif community, you can convert it to a glif by selecting "Create Glif from Comfort" on the resulting image.
This will be in the glif.appCreate a draft glif on the You will need to click "Publish" here to complete the creation of the glif.
© Copyright notes
Article copyright AI Sharing Circle All, please do not reproduce without permission.
Related posts

No comments...


