FaceFusion: Video Face Swap Enhancement Tool | Voice Synchronized Video Mouth Moves
General Introduction
FaceFusion is an advanced cloud platform that integrates facial exchange and enhancement features, optimizing the "image-to-video" and "image-to-image" exchange process with 5 professional models to ensure flawless output. In addition, it performs facial enhancement with 7 models, improves video and image quality with 3 different models, and offers a range of powerful features including face replacement, face enhancement, lip synchronization, and more.
The goal of FaceFusion is to provide users with an easy-to-use, efficient and feature-rich AI face replacement solution. It also supports online running and multi-model face detection, etc. The GitHub project contains installation and usage guidelines, and requires related technical knowledge.
FaceFusion has been updated to 3.0 with more optimizations, so it is recommended to update it, and a variety of FaceFusion one-click installers are available at the end of the article. Computer configuration can not run, please choose more excellent free to run online! face transplant toolThe
FaceFusion Usage Tutorial:AI face swap the strongest tool: FaceFusion detailed use tutorials
Function List
- Multi-model support: Provide a variety of face swapping and enhancement models, such as InSwapper_128, GFPGAN and so on.
- High Definition Processing: Supports high resolution image and video processing to ensure the clarity and quality of the output results.
- Occlusion processing: Through advanced occlusion detection and processing technology, it effectively solves the problem of face changing in the case of partial occlusion.
- Multi-platform compatibility: Supports mainstream graphics platforms such as NVIDIA and AMD.
- Lip Sync: Provides lip sync from audio to video.
- Open source and free: allows users to use and customize freely.
Using Help
Installation Guide
Win11 local deployment FaceFusion3 strongest AI face swap, integrated Tensorrt10.4 inference acceleration
The installation of FaceFusion requires a certain level of technical knowledge. For users who are familiar with command line operations, you can follow the steps below to install:

FaceFusion3.0.0 is by and large the strongest AI face-swapping project right now, sharing how to locally deploy the FaceFusion3.0.0 project in Win11 system, based on the latest cuda12.6 with the latest cudnn9.4, and with Tensorrt10.4, to improve the inference speed and efficiency, so that dessert-grade graphics cards can also explode the productivity.
Install the latest version of Cuda 12.6 and Cudnn 9.4.
CUDA is a technology developed by NVIDIA that allows GPUs to be programmed like CPUs, allowing GPUs to participate in the computation, thus accelerating the computation process. You can think of it as a "language" that allows programmers to direct GPU "workers" to work together.
cuDNN is a "toolbox" designed specifically for deep learning. Deep learning is like building a house, which requires a lot of "blocks", such as convolution, pooling, etc. cuDNN provides these pre-optimized "blocks", so that programmers can use them directly without having to write these complex codes from scratch, thus greatly improving the speed of training and inference of deep learning models. This greatly improves the training and inference speed of deep learning models. It is like an experienced construction worker who can quickly and efficiently complete the work of building a house.
The installer can be downloaded from the official Nvidia website, but you must be logged in to your Nvidia account, and the latest installer has been downloaded here for you:
https://pan.quark.cn/s/bc3ab3494596
First double-click cuda_12.6.1_560.94_windows.exe to install, pay attention to do not install to the C disk, because too much space, it is recommended to create a 12.6 directory in other disk drive, and then install it.
After successful installation, run the command to check:
(base) PS C:\Users\zcxey> nvcc -V
nvcc: NVIDIA (R) Cuda compiler driver
Copyright (c) 2005-2024 NVIDIA Corporation
Built on Wed_Aug_14_10:26:51_Pacific_Daylight_Time_2024
Cuda compilation tools, release 12.6, V12.6.68
Build cuda_12.6.r12.6/compiler.34714021_0
(base) PS C:\Users\zcxey>
You can see that the version displayed is 12.6
Then open the cudnn-windows-x86_64-9.4.0.58_cuda12-archive directory, and copy and overwrite the bin, include, and lib directories directly into the cuda installation directory. At this point, cuda12.6 and its corresponding cudnn9.4 are installed, note that the version numbers must match.
Installing Tensorrt 10.4
Regarding Tensorrt, imagine you have trained a very smart dog (your deep learning model) that has learned to recognize various pictures of cats and dogs. However, the dog takes a long time to recognize the pictures each time, which is not very efficient.
TensorRT is like a trainer that will help you train this dog to be more efficient. It will optimize the dog so that it can recognize images faster and more accurately and consume less energy. So, with TensorRT optimized models, it will be able to reason (recognize pictures) faster on your computer or server, thus saving time and resources.
Tensorrt focuses on models that have already been trained, rather than training the model itself. It's like a professional optimizer that makes your models run faster and with less effort in real-world applications.
Open the TensorRT-10.4.0.26 directory and copy all the dynamic library dll files in the lib directory to the bin directory of the cuda12.6 installation directory:
Directory of D:\12.6\bin
2024/09/27  11:08    <DIR>          .
2024/09/27  10:48    <DIR>          ..
2024/08/15  02:14           228,352 bin2c.exe
2024/08/15  02:01                66 compute-sanitizer.bat
2024/09/27  10:48    <DIR>          crt
2024/08/15  02:11           202,752 cu++filt.exe
2024/08/15  02:34       100,806,656 cublas64_12.dll
2024/08/15  02:34       510,903,296 cublasLt64_12.dll
2024/08/15  02:14         7,739,904 cudafe++.exe
2024/08/15  02:11           556,544 cudart64_12.dll
2023/11/30  16:26           288,296 cudnn64_8.dll
2024/09/01  04:24           265,272 cudnn64_9.dll
2024/09/01  04:24       243,945,512 cudnn_adv64_9.dll
2023/11/30  16:26       125,217,320 cudnn_adv_infer64_8.dll
2023/11/30  16:26       116,558,888 cudnn_adv_train64_8.dll
2024/09/01  04:24         4,002,872 cudnn_cnn64_9.dll
2023/11/30  16:26       582,690,344 cudnn_cnn_infer64_8.dll
2023/11/30  16:26       122,242,104 cudnn_cnn_train64_8.dll
2024/09/01  04:24       432,804,904 cudnn_engines_precompiled64_9.dll
2024/09/01  04:24        16,297,000 cudnn_engines_runtime_compiled64_9.dll
2024/09/01  04:25         2,063,400 cudnn_graph64_9.dll
2024/09/01  04:25        44,681,784 cudnn_heuristic64_9.dll
2024/09/01  04:25       107,492,904 cudnn_ops64_9.dll
2023/11/30  16:26        89,759,272 cudnn_ops_infer64_8.dll
2023/11/30  16:26        70,162,472 cudnn_ops_train64_8.dll
2024/08/15  03:03       275,258,368 cufft64_11.dll
2024/08/15  03:03           163,328 cufftw64_11.dll
2024/08/15  02:45         1,513,984 cuinj64_126.dll
2024/08/15  02:11        11,713,024 cuobjdump.exe
2024/08/15  02:25        63,279,104 curand64_10.dll
2024/08/15  04:12       116,768,256 cusolver64_11.dll
2024/08/15  04:11        77,813,248 cusolverMg64_11.dll
2024/08/15  03:09       287,497,216 cusparse64_12.dll
2024/08/15  02:14           881,664 fatbinary.exe
2024/08/15  03:20           292,352 nppc64_12.dll
2024/08/15  03:20        16,235,008 nppial64_12.dll
2024/08/15  03:20         6,234,624 nppicc64_12.dll
2024/08/15  03:20         9,865,728 nppidei64_12.dll
2024/08/15  03:20        96,892,416 nppif64_12.dll
2024/08/15  03:20        39,228,416 nppig64_12.dll
2024/08/15  03:20         9,341,952 nppim64_12.dll
2024/08/15  03:20        36,831,232 nppist64_12.dll
2024/08/15  03:20           265,728 nppisu64_12.dll
2024/08/15  03:20         4,221,440 nppitc64_12.dll
2024/08/15  03:20        12,687,872 npps64_12.dll
2024/08/15  02:34           331,776 nvblas64_12.dll
2024/08/15  02:14        14,029,824 nvcc.exe
2024/08/15  02:14               343 nvcc.profile
2024/08/15  02:11        50,708,480 nvdisasm.exe
2024/08/15  02:14           838,656 nvfatbin_120_0.dll
2024/08/30  19:47       215,426,088 nvinfer_10.dll
2024/08/30  19:46             5,688 nvinfer_10.lib
2024/08/30  19:48     1,436,593,704 nvinfer_builder_resource_10.dll
2024/08/30  19:47           616,488 nvinfer_dispatch_10.dll
2024/08/30  19:46             4,362 nvinfer_dispatch_10.lib
2024/08/30  19:46        29,457,448 nvinfer_lean_10.dll
2024/08/30  19:46             5,104 nvinfer_lean_10.lib
2024/08/30  19:47        30,986,792 nvinfer_plugin_10.dll
2024/08/30  19:46             2,564 nvinfer_plugin_10.lib
2024/08/30  19:47           565,288 nvinfer_vc_plugin_10.dll
2024/08/30  19:46             2,374 nvinfer_vc_plugin_10.lib
2024/08/15  02:13        38,856,192 nvJitLink_120_0.dll
2024/08/15  02:23         4,901,888 nvjpeg64_12.dll
2024/08/15  02:14        20,608,000 nvlink.exe
2024/08/30  19:47         3,064,872 nvonnxparser_10.dll
2024/08/30  19:46             2,524 nvonnxparser_10.lib
2024/08/15  02:45         2,210,304 nvprof.exe
2024/08/15  02:11           254,464 nvprune.exe
2024/08/15  02:11         5,345,792 nvrtc-builtins64_126.dll
2024/08/15  02:11        45,535,744 nvrtc64_120_0.alt.dll
2024/08/15  02:11        45,475,328 nvrtc64_120_0.dll
2024/08/15  03:45               129 nvvp.bat
2024/08/15  02:14        20,220,416 ptxas.exe
2024/08/15  02:14            84,480 __nvcc_device_query.exe
71 File(s)  5,612,029,986 bytes
3 Dir(s)  128,267,644,928 bytes free
This completes the installation of Tensorrt 10.4.
Installation and Deployment of FaceFusion 3.0.0
First, make sure you have a local installation of Python 3.11, and then clone the official project.
git clone https://github.com/facefusion/facefusion.git
cd facefusion
Installation of basic dependencies.
pip3 install -r requirements.txt
Then install onnxruntime-gpu.
pip3 install onnxruntime-gpu
The ONNX Runtime-GPU is a high-performance inference engine capable of running machine learning models represented in the ONNX (Open Neural Network Exchange) format. The key is the "GPU" part, which means that it is optimized specifically for NVIDIA's graphics processing units (GPUs) to run models faster and more efficiently than on a CPU.
Note that the default onnxruntime-gpu version installed is 19.2, which is specifically adapted for cuda12.
Install the tensorrt library:
pip3 install tensorrt==10.4.0 --extra-index-url https://pypi.nvidia.com
Here is the python 3.11 runtime library for tensorrt installation
Lastly, install torch.
pip3 install torch torchvision torchaudio --index-url https://download.pytorch.org/whl/cu124
Note that the suffix is cu124, not cu118 or cu121
After successful installation, go to the python 3.11 terminal:
>>> import onnxruntime as ort
>>> print(ort.get_available_providers())
['TensorrtExecutionProvider', 'CUDAExecutionProvider', 'CPUExecutionProvider']
If all three backend supports are printed, cpu, cuda, and Tensorrt, then the configuration and installation were successful.
Run command.
python3 facefusion.py run
Go to the main screen of the face swap.
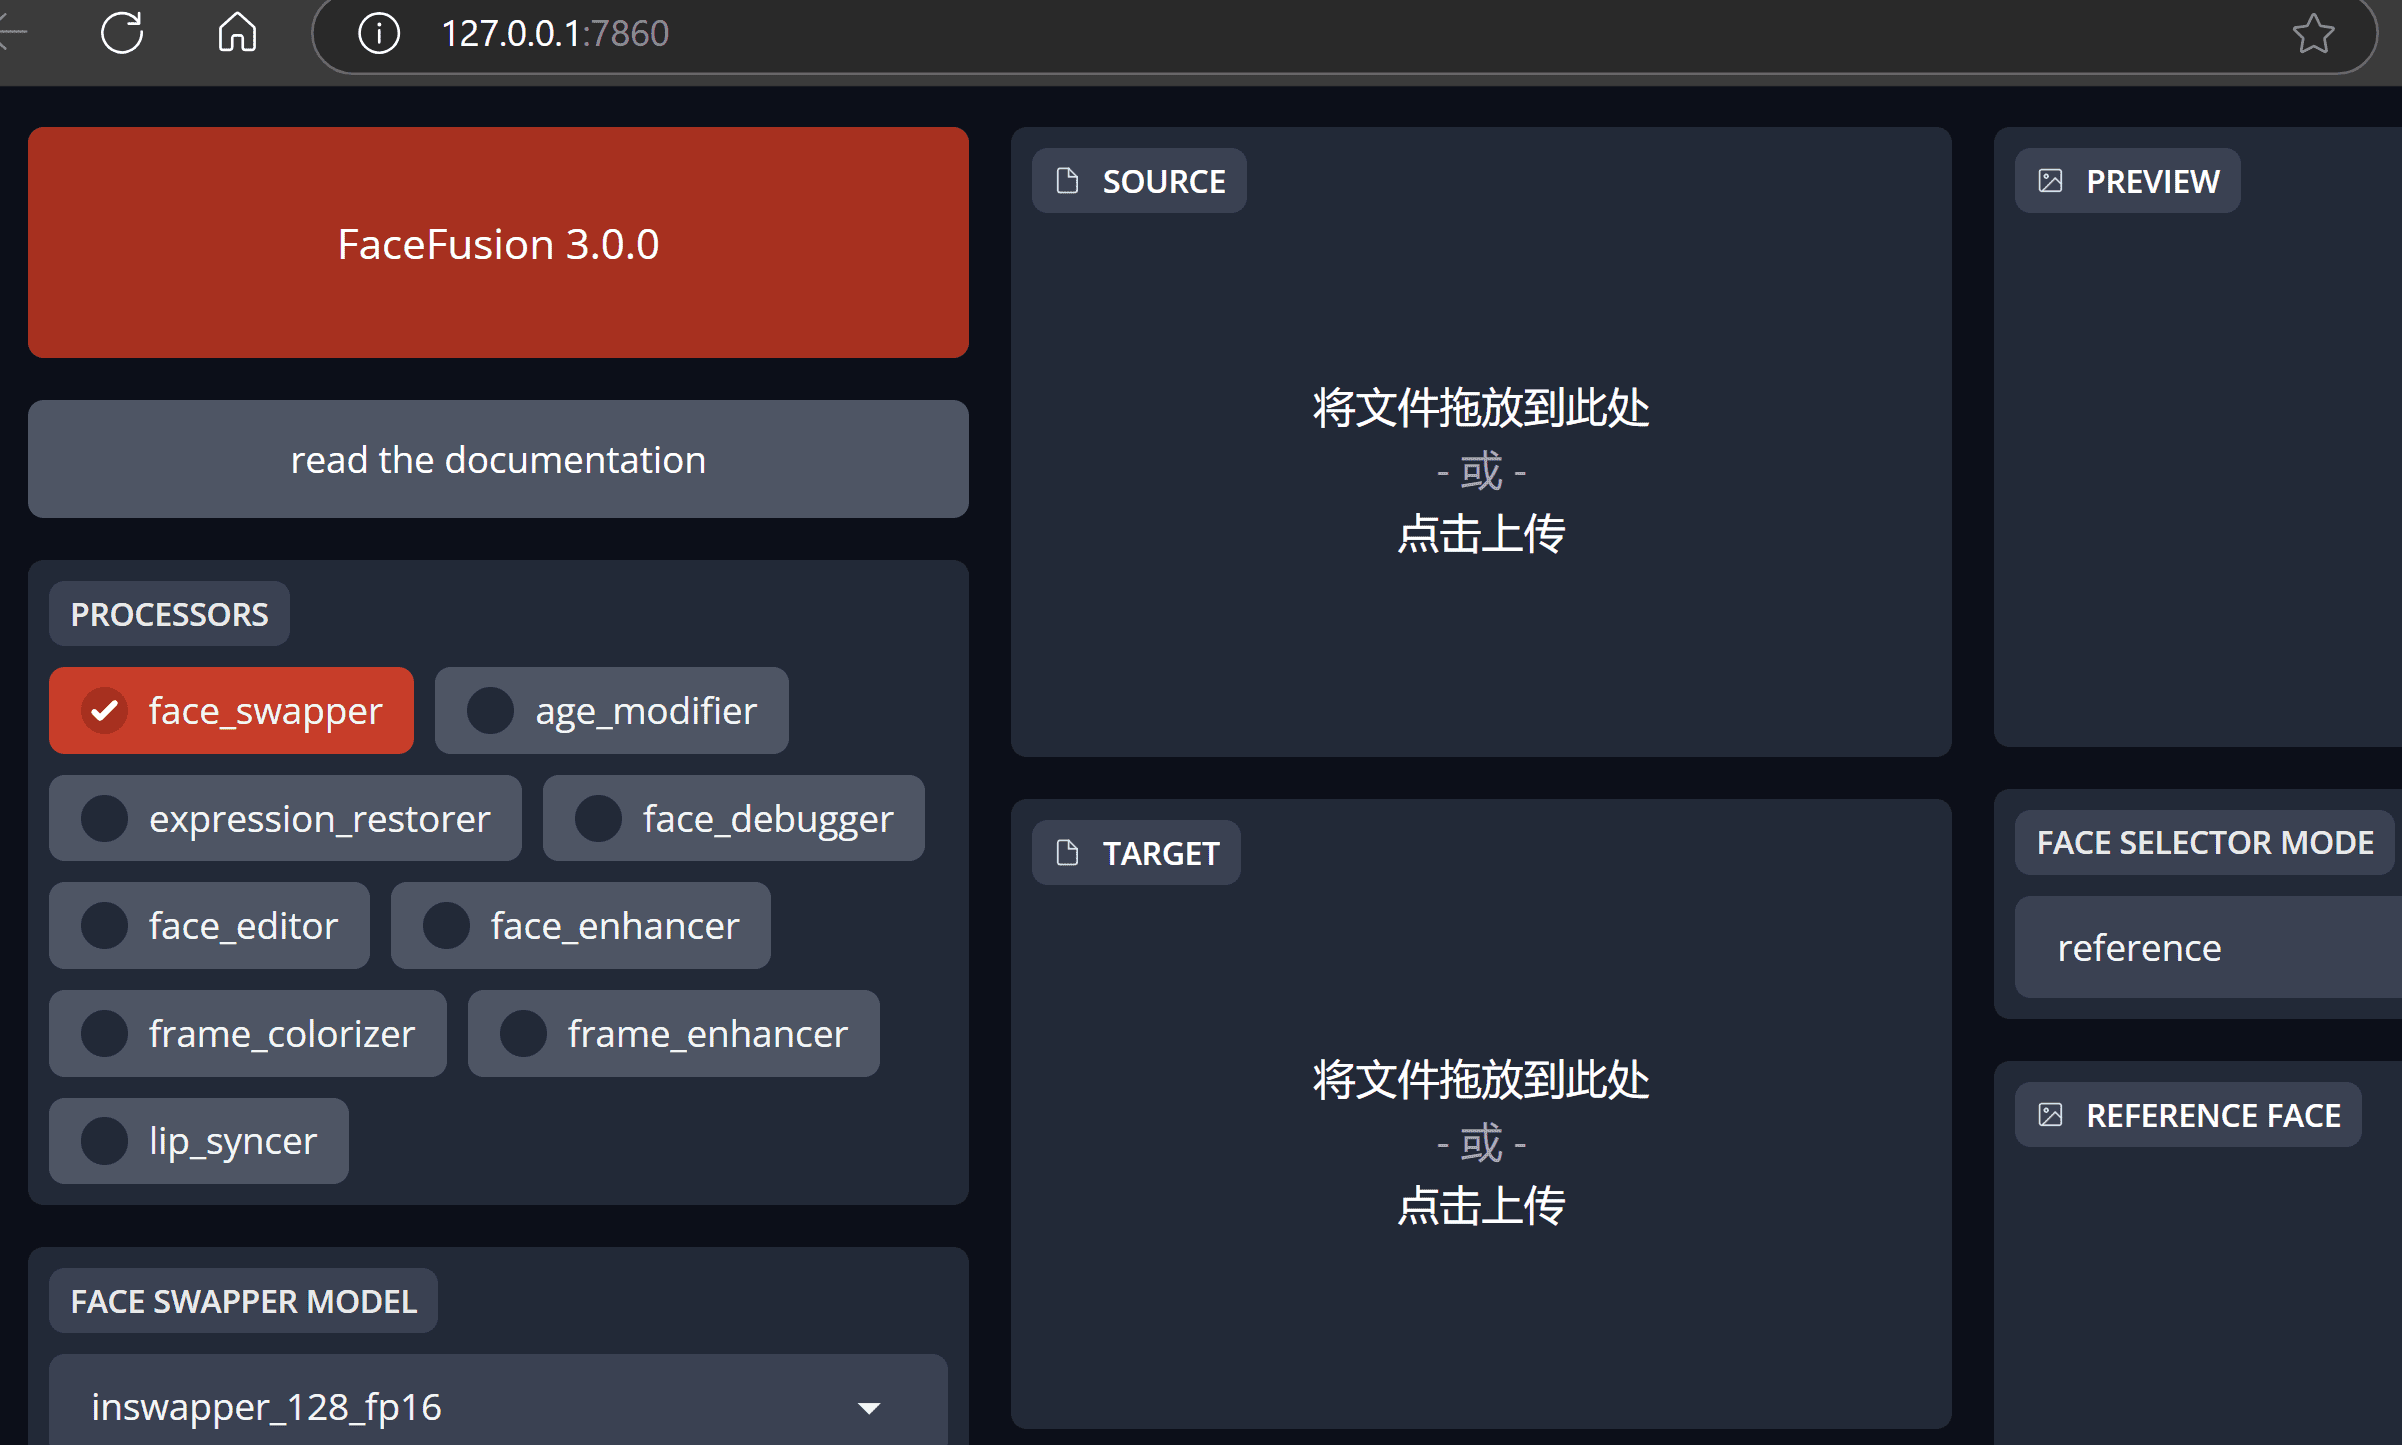
Thanks to Tensorrt, it also supports real-time face changing, enter the camera face changing interface:
python3 facefusion.py run --ui-layouts webcam
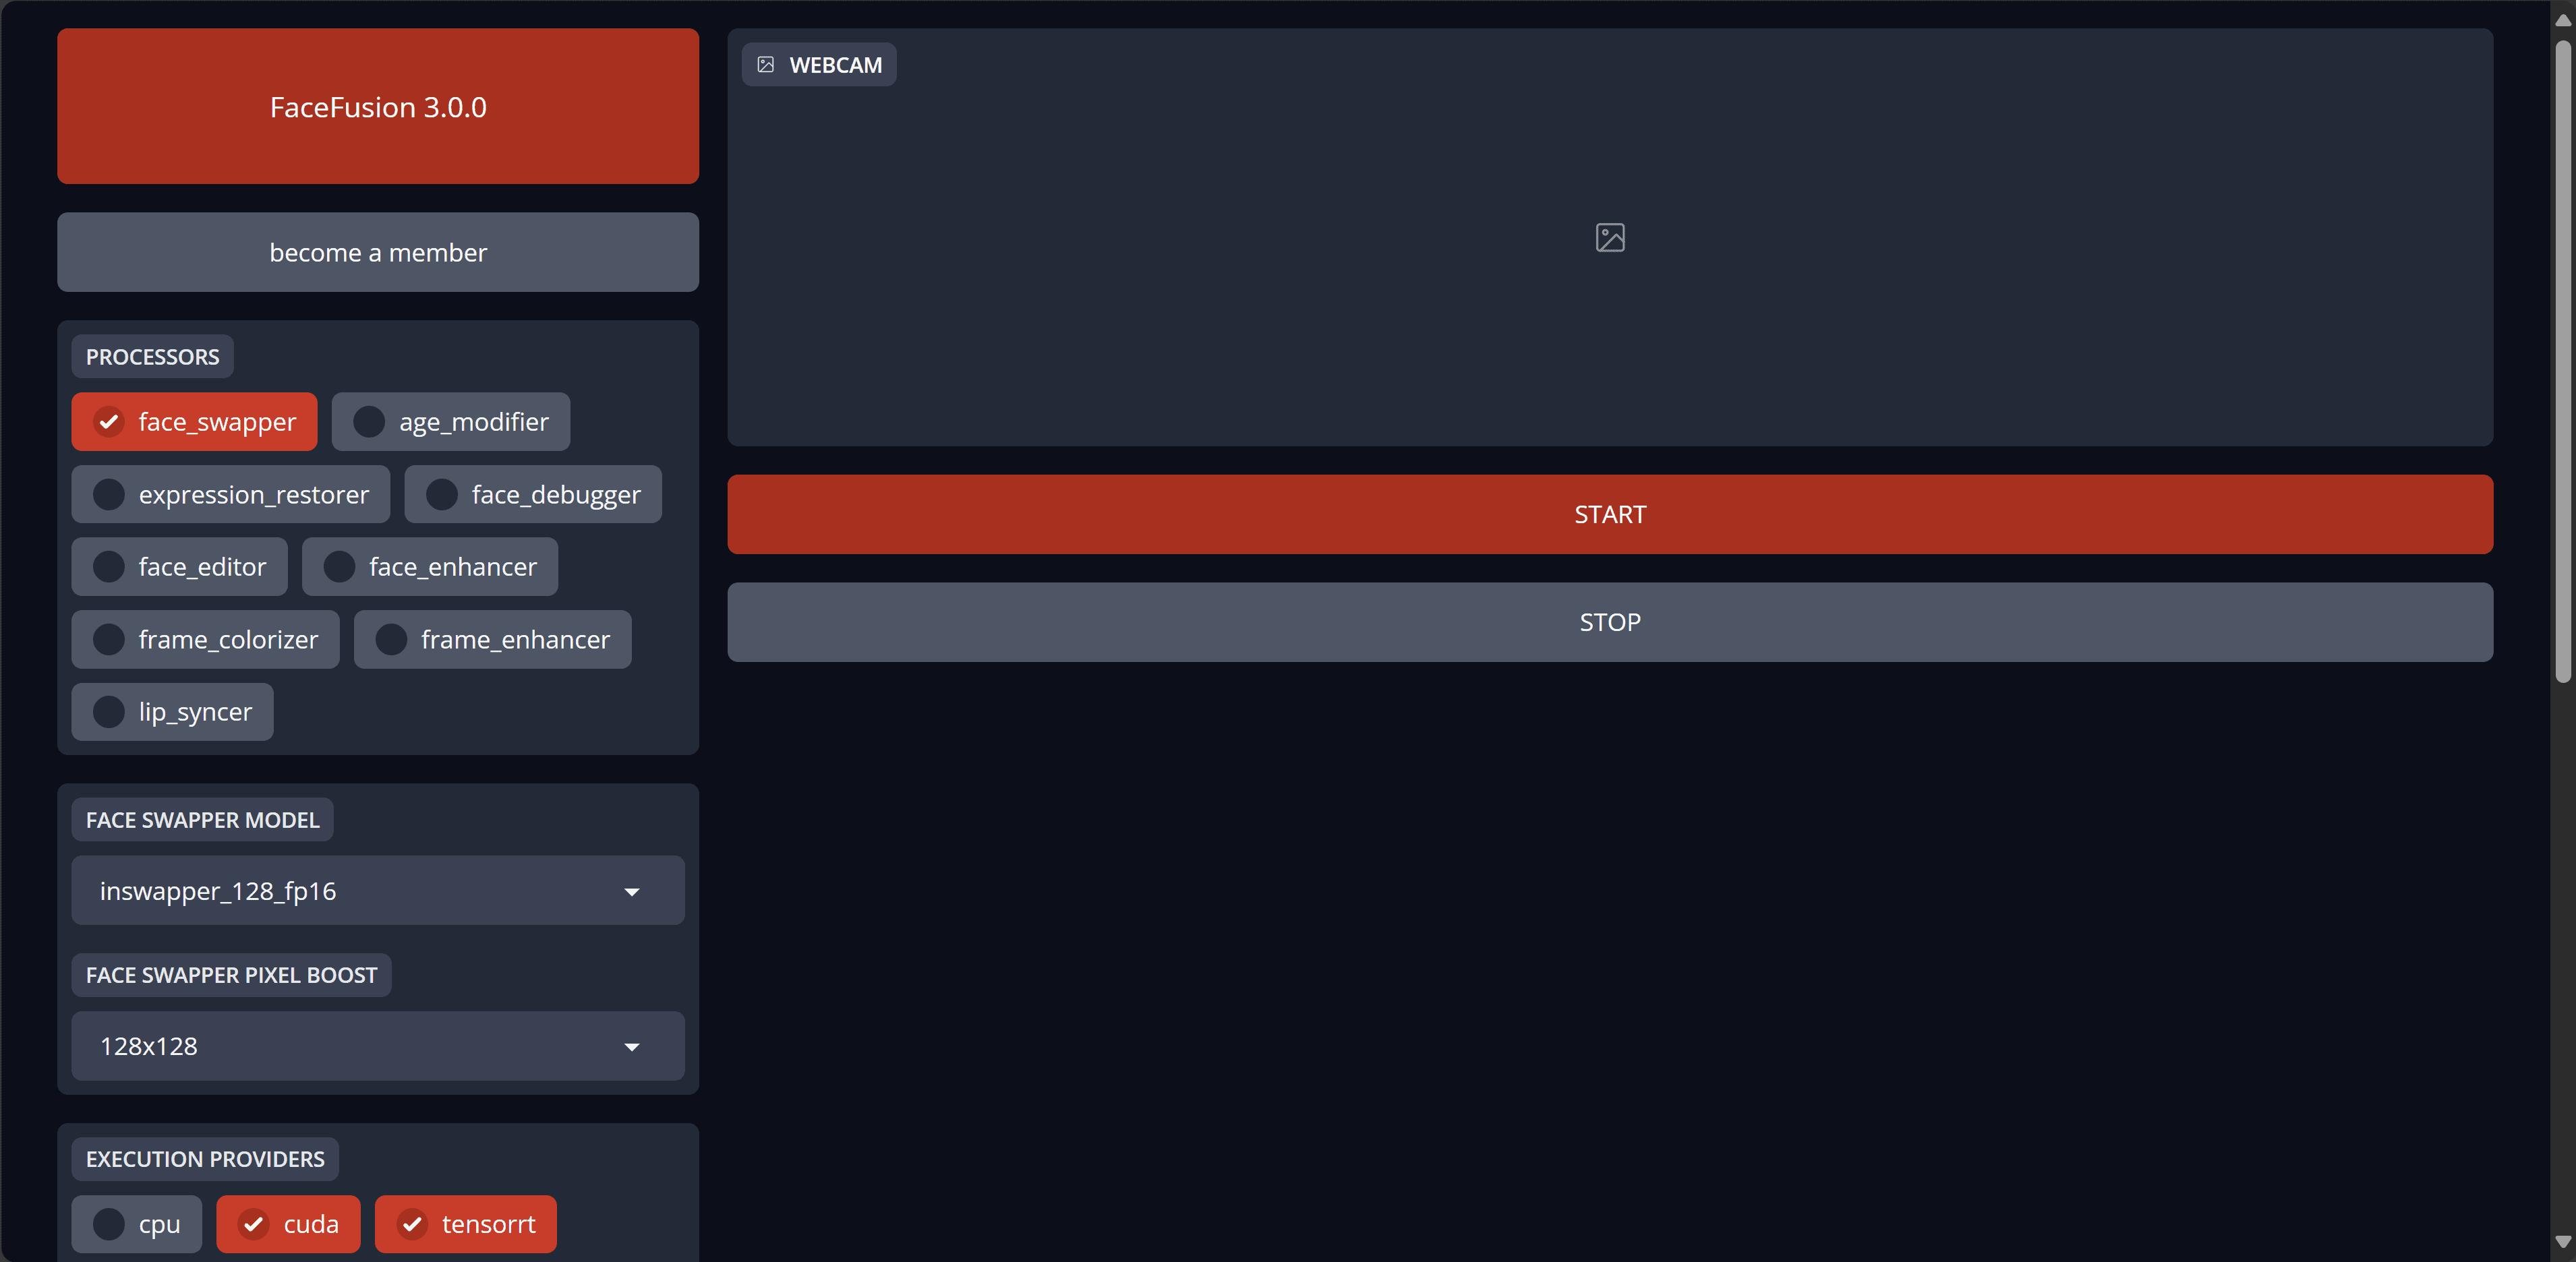
Camera face swap effect:

Finally, note that FaceFusion 3.0.0 requires a local installation of ffmpeg software:
winget install -e --id Gyan.FFmpeg
For users unfamiliar with the command line, FaceFusion provides a Windows installer to quickly complete the installation process.
Guidelines for use
basic operation
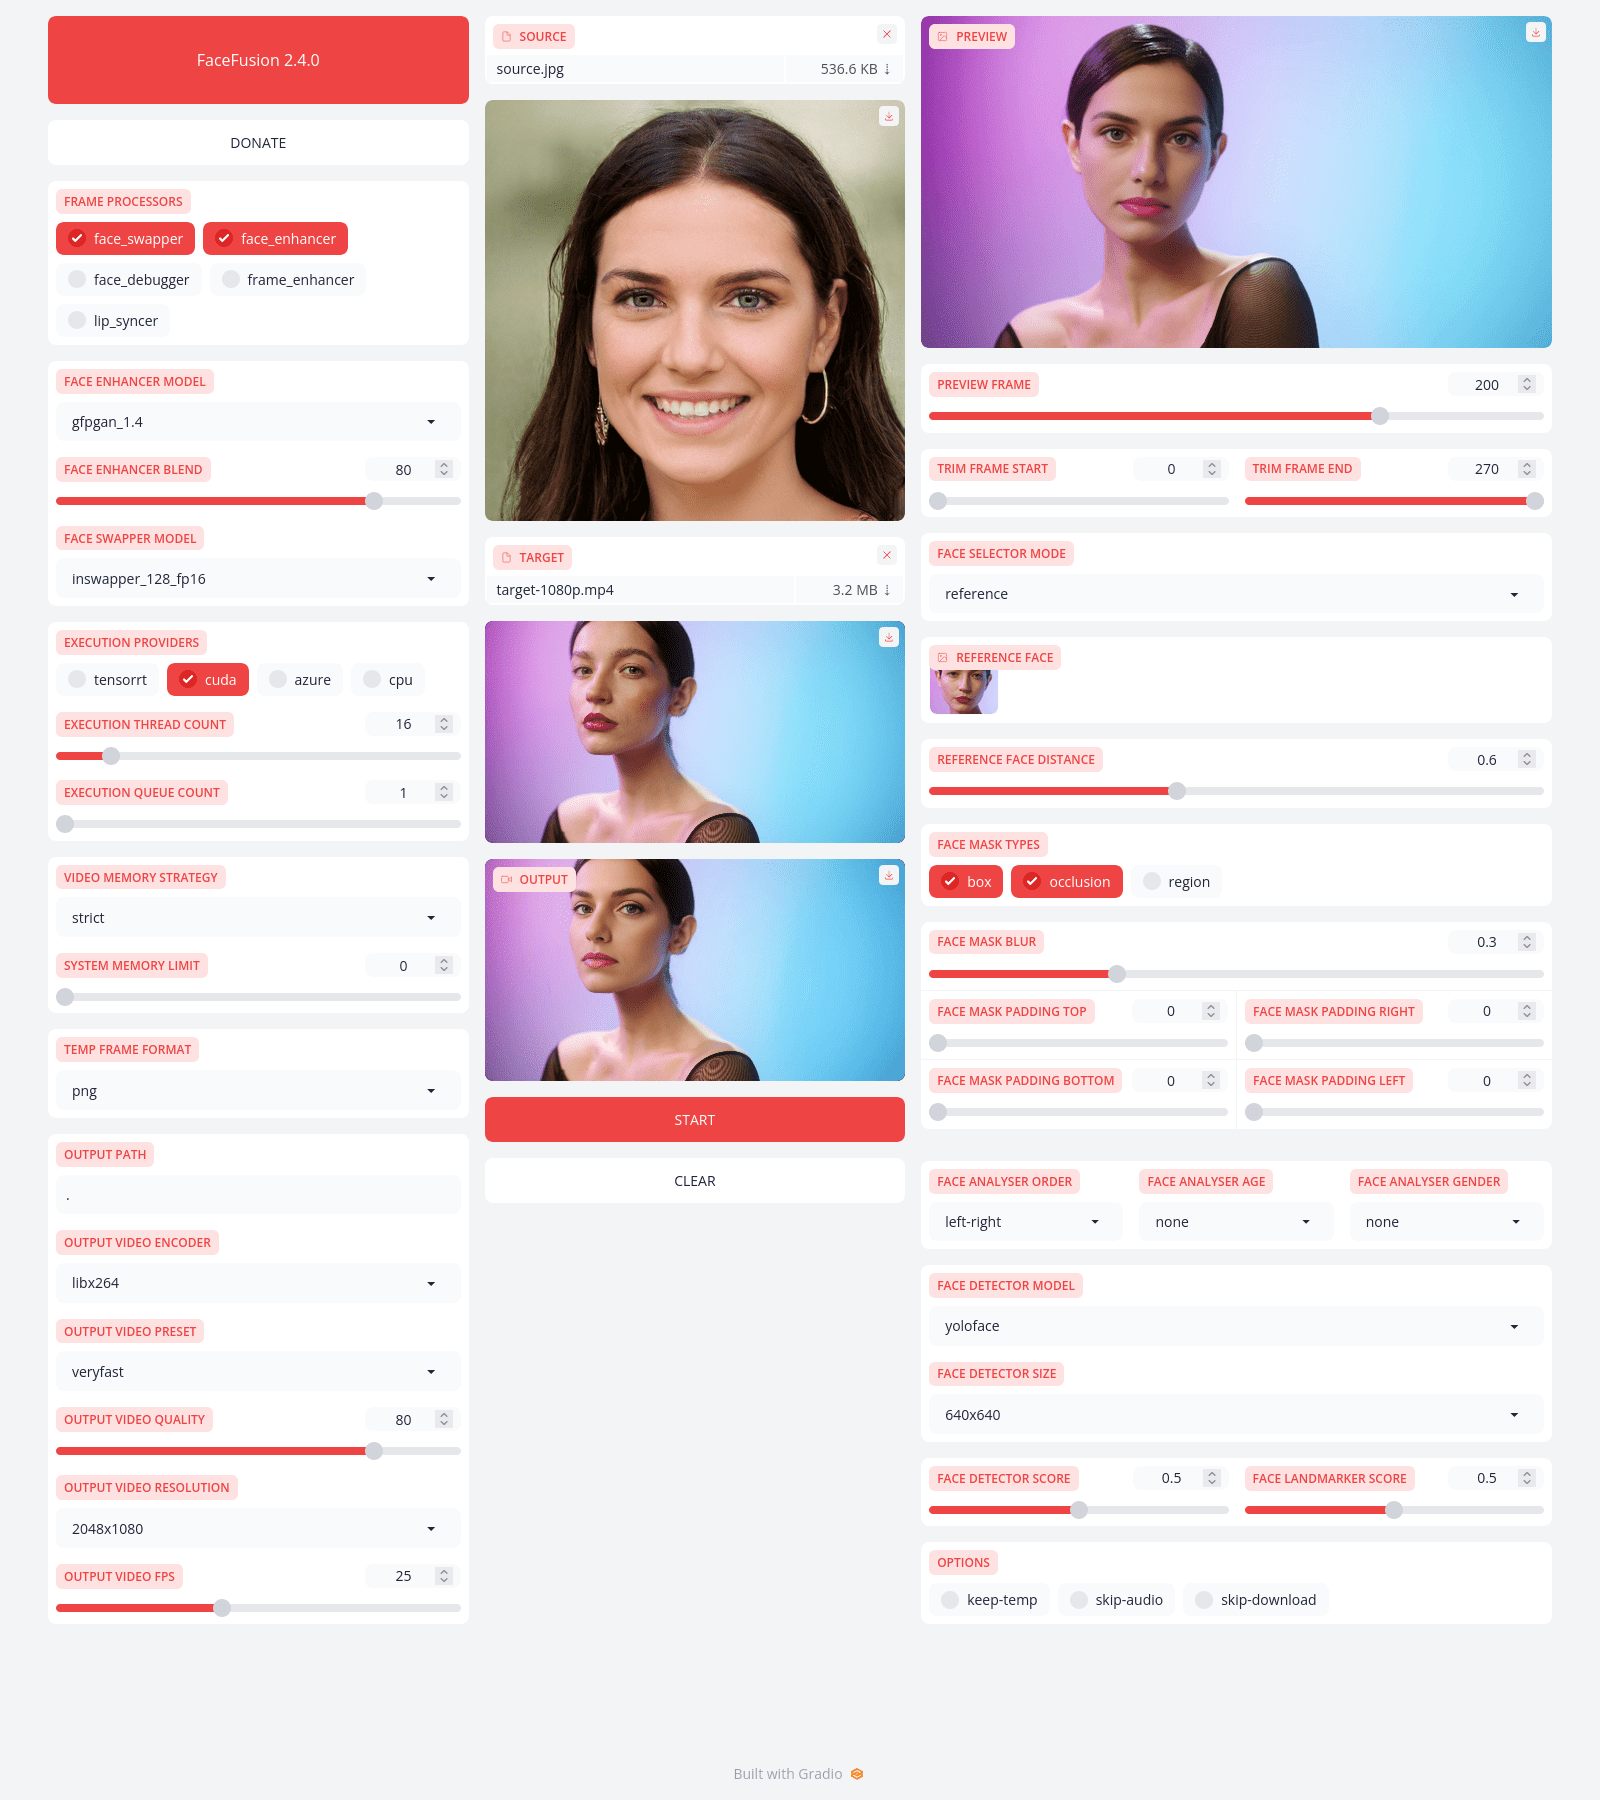
- Start FaceFusion:
python run.py - Select Source Image: Upload an image that contains the face you want to replace.
- Select target image or video: Upload an image or video of the face to be replaced.
- Adjustment parameters: Adjust parameters such as face detection, exchange model, enhancement settings, etc. as needed.
- Start Processing: Click the "Start" button and wait for processing to complete.
Advanced Features
- Masking treatment:
- start using
face_debuggerOptions. - Select the appropriate masking mode (box, occlusion, region).
- align
Face Mask Blurparameter to optimize the occlusion effect.
- start using
- HD processing:
- start using
face_enhancerOptions. - Choose a suitable enhancement model such as GFPGAN1.4 or codeformer.
- align
Face Detector Sizeto improve detailing skills.
- start using
- Lip synchronization:
- start using
lip_syncerOptions. - Upload audio files.
- Select the appropriate lip synchronization model.
- start using
practical skill
- Performance Optimization:
- Choose the right one based on the type of graphics card
Execution Provider(NVIDIA uses CUDA, AMD uses DirectML). - align
Execution Thread Countto balance processing speed and memory usage.
- Choose the right one based on the type of graphics card
- Multi-face processing:
- utilization
Face Selector ModeChoose to process single or multiple faces. - align
Reference Face Distanceparameters to improve the matching accuracy of multi-angle faces.
- utilization
- Cartoon face processing:
- utilization
simswap_256model for cartoon face replacement. - start using
face_enhancerAnd focus on enhancing the eyes, nose and mouth area.
- utilization
Frequently Asked Questions
- Does FaceFusion support real-time processing? FaceFusion is currently optimized for offline processing, but processing speed can be increased by adjusting parameters.
- How can I improve the naturalness of my face transplant results? Adjustments can be attempted
Face Mask Blurparameter and use a high-quality source image. Also, enable theface_enhancerThe results can be further improved. - Does FaceFusion support batch processing? Yes, FaceFusion supports batch processing of images and videos. This can be set via command line parameters or the graphical interface.
Local one-click installer/online experience
Local: Universal Jun One-Click Installer (integrated multi-tool)
Local: Sword 72 Installer (Pure) The zip unpacking password is jian27 or jian27.com
Local: Tootsie Labs Baiduquark (particle physics)
RunDiffusion (cloud-based service, billed by GPU specification and minute)
ThinkDiffusion (cloud-based service, billed by GPU specification and minute)
Pinokio (local one-click deployment)
© Copyright notes
Article copyright AI Sharing Circle All, please do not reproduce without permission.
Related articles

No comments...

