DashInfer-VLM, マルチモーダルSOTA推論性能, ultra-vLLM!
紹介
DashInfer-VLMは、視覚的なマルチモーダル大規模モデルVLMのための推論アーキテクチャであり、特にQwen VLモデルの推論高速化のために最適化されている。 DashInfer-VLMと他のVLM用推論高速化フレームワークとの最大の違いは、VIT部分とLLM部分を分離し、VITとLLMが互いに干渉することなく並列に実行されることである。互いに干渉することなく。
これは、VITの特徴抽出部分だけでなく、VLMにおける画像や映像の前処理がLLMの生成を妨げないことが特徴であり、VIT/LLM分離型アーキテクチャとすることも可能で、オープンソースコミュニティで初めてこのアーキテクチャを採用したVLMサービスフレームワークである。
マルチカード展開では、各カードにViTプロセッシングユニットを搭載しており、ビデオやマルチイメージシナリオで非常に大きなパフォーマンスアドバンテージを発揮する。
また、ViTの部分はメモリキャッシュに対応しており、複数回の対話でViTを何度も再計算する必要がない。
以下は、そのアーキテクチャー図と、4カード・パート72Bによる構成図である。
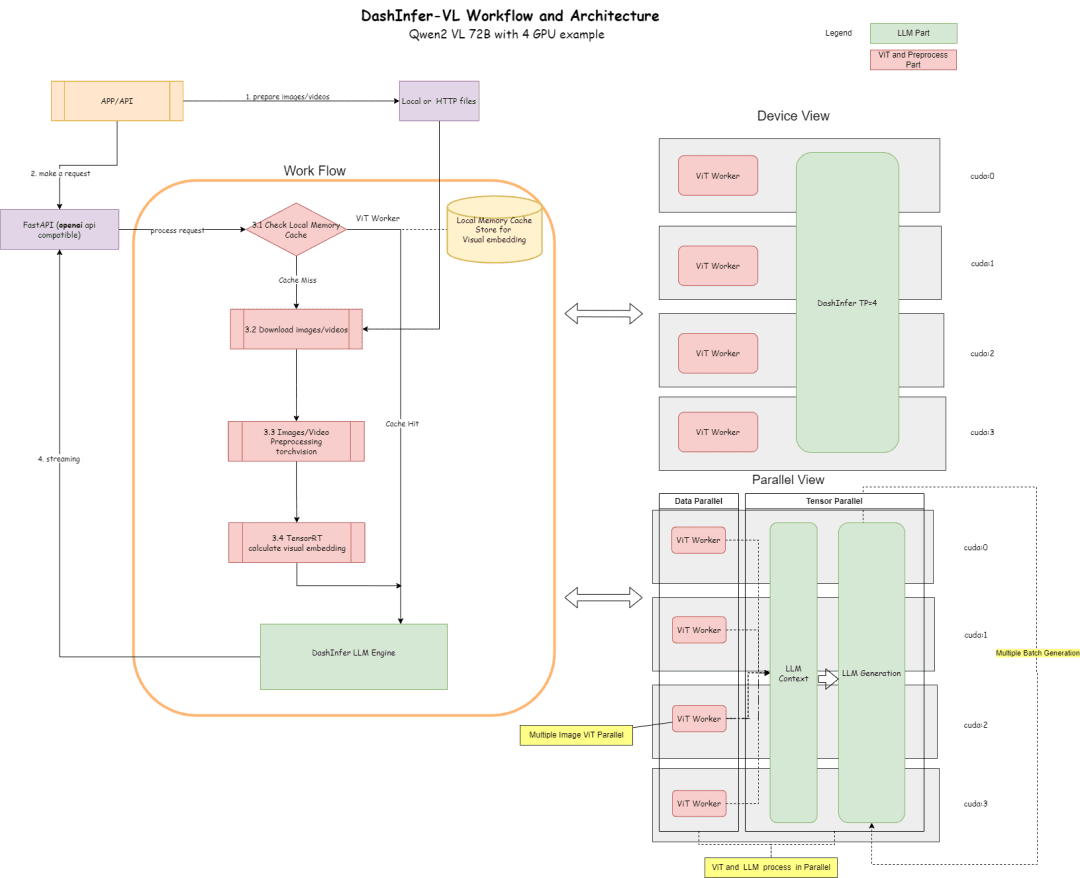
アーキテクチャ図は、プロセスとアーキテクチャを説明している:
- ViTパートでは、推論にTensorRTやonnxruntime(onnxモデルエクスポートは、フレームワーク内のモデルのViTパートで実行される)のような多くの推論エリシテーションを使用することができます、TensorRTは現在、デフォルトでフレームワークでサポートされています。
- LLMセクションでは、DashInferが推論に使われる。
- キャッシュ部、サポートViT結果メモリキャッシュ、LLM部プリフィックスキャッシュ、LLM部マルチモーダルプリフィックスキャッシュ(デフォルトでは有効になっていない)
コード・アドレス
https://github.com/modelscope/dash-infer
書類の住所
https://dashinfer.readthedocs.io/en/latest/vlm/vlm_offline_inference_en.html
ベストプラクティス
Magic Hitchコミュニティの無料GPU演算でDashInferを体験してください:
首先是dashinfer-vlm和TensorRT的安装。

# 首先安装所需的 package
import os

# 下载并安装 dashinfer 2.0.0rc2 版本
# 如果需要,可以使用 wget 下载并解压 TensorRT 包
# pip 安装 dashinfer 2.0.0rc2
#!pip install https://github.com/modelscope/dash-infer/releases/download/v2.0.0-rc2/dashinfer-2.0.0rc2-cp310-cp310-manylinux_2_17_x86_64.manylinux2014_x86_64.whl
#!wget https://modelscope.oss-cn-beijing.aliyuncs.com/releases/TensorRT-10.6.0.26.Linux.x86_64-gnu.cuda-12.6.tar.gz
#!tar -xvzf TensorRT-10.6.0.26.Linux.x86_64-gnu.cuda-12.6.tar.gz

# 下载到本地并替换为 modelscope 对应的 URL
# 安装 dashinfer,因 package 较大,推荐下载到本地后安装
#!wget https://modelscope.oss-cn-beijing.aliyuncs.com/releases/dashinfer-2.0.0rc3-cp310-cp310-manylinux_2_17_x86_64.manylinux2014_x86_64.whl
#!pip install ./dashinfer-2.0.0rc3-cp310-cp310-manylinux_2_17_x86_64.manylinux2014_x86_64.whl

# 安装 dashinfer vlm
#!pip install dashinfer-vlm

# 安装 OpenAI 客户端
#!pip install openai==1.56.2

# 安装 TensorRT 的 Python 包,从下载的包中打开安装
#!pip install TensorRT-10.6.0.26/python/tensorrt-10.6.0-cp310-none-linux_x86_64.whl
TensorRTは環境変数の設定を必要とする:
import os

# 获取 TensorRT 运行时库的路径
trt_runtime_path = os.getcwd() + "/TensorRT-10.6.0.26/lib/"

# 获取当前的 LD_LIBRARY_PATH 环境变量值
current_ld_library_path = os.environ.get('LD_LIBRARY_PATH', '')

# 将新路径添加到现有值中
if current_ld_library_path:
# 如果 LD
環境がインストールされたら、dashinfer vlmを起動してモデルを推論し、openai互換のサーバーを形成する。
デフォルトでは、環境内のすべてのGPUメモリが使用されます。
!dashinfer_vlm_serve --model qwen/Qwen2-VL-2B-Instruct --port 8000 --host 127.0.0.1
このプロセスは、DashInferと、ViTが使用する外部エンジン(この場合はTensorRT)を初期化し、openaiサービスを開始する。
これらのログは、TRTが正常に初期化されたことを示している:

これらのログを見る限り、DashInferは正常に初期化されたようだ:

これらのログを見ると、openaiサービスが正常に初期化されたことがわかる:

ここですべての初期化が成功すると、クライアントとベンチマーク用に別のノートブックを開くことができる。
手帳のアドレスhttps://modelscope.cn/notebook/share/ipynb/6ea987c5/vl-start-server.ipynb
画像理解のデモ
複数の画像を使った画像理解のデモを行う:
# Install the required OpenAI client version
!pip install openai==1.56.2 # VL support requires a recent OpenAI client.

from openai import OpenAI

# Initialize the OpenAI client
client = OpenAI(
base_url="http://localhost:8000/v1",
api_key="EMPTY"
)

# Prepare the API call for a chat completion
response = client.chat.completions.create(
model="model",
messages=[
{
"role": "user",
"content": [
{"type": "text", "text": "Are these images different?"},
{
"type": "image_url",
"image_url": {
"url": "https://farm4.staticflickr.com/3075/3168662394_7d7103de7d_z_d.jpg",
}
},
{
"type": "image_url",
"image_url": {
"url": "https://farm2.staticflickr.com/1533/26541536141_41abe98db3_z_d.jpg",
}
},
],
}
],
stream=True,
max_completion_tokens=1024,
temperature=0.1,
)

# Process the streamed response
full_response = ""
for chunk in response:
# Append the delta content to the full response
full_response += chunk.choices[0].delta.content
print(".", end="") # Print a dot for each chunk received

# Print the full response
print(f"\nImage: Full Response:\n{full_response}")
ビデオ理解デモ
openaiは標準的なビデオインターフェースを定義していないため、本稿では自動的にビデオをダウンロードし、フレームを抽出し、分析するvideo_url型を提供する。
# video example
!pip install openai==1.56.2 # Ensure the OpenAI client supports video link features.

from openai import OpenAI

# Initialize the OpenAI client
client = OpenAI(
base_url="http://localhost:8000/v1",
api_key="EMPTY"
)

# Create a chat completion request with a video URL
response = client.chat.completions.create(
model="model",
messages=[
{
"role": "user",
"content": [
{
"type": "text",
"text": "Generate a compelling description that I can upload along with the video."
},
{
"type": "video_url",
"video_url": {
"url": "https://cloud.video.taobao.com/vod/JCM2awgFE2C2vsACpDESXZ3h5_iQ5yCZCypmjtEs2Ck.mp4",
"fps": 2
}
}
]
}
],
max_completion_tokens=1024,
top_p=0.5,
temperature=0.1,
frequency_penalty=1.05,
stream=True,
)

# Process the streaming response
full_response = ""
for chunk in response:
# Append the delta content from the chunk to the full response
full_response += chunk.choices[0].delta.content
print(".", end="") # Indicate progress with dots

# Print the complete response
print(f"\nFull Response: \n{full_response}")
ベンチマーク
上の例題を理解し、単純にスループットテスト用のマルチコンカレントテストを行うには、上の画像を使用してください。
# benchmark!pip install openai==1.56.2
import time
import concurrent.futures
from openai import OpenAI

# 初始化 OpenAI 客户端
client = OpenAI(
base_url="http://localhost:8000/v1",
api_key="EMPTY"
)

# 请求参数
model = "model"
messages = [
{
"role": "user",
"content": [
{"type": "text", "text": "Are these images different?"},
{
"type": "image_url",
"image_url": {
"url": "https://farm4.staticflickr.com/3075/3168662394_7d7103de7d_z_d.jpg",
}
},
{
"type": "image_url",
"image_url": {
"url": "https://farm2.staticflickr.com/1533/26541536141_41abe98db3_z_d.jpg",
}
},
],
}
]

# 并发请求函数
def send_request():
start_time = time.time()
response = client.chat.completions.create(
model=model,
messages=messages,
stream=False,
max_completion_tokens=1024,
temperature=0.1,
)
end_time = time.time()
latency = end_time - start_time
return latency

# 基准测试函数
def benchmark(num_requests, num_workers):
latencies = []
start_time = time.time()

with concurrent.futures.ThreadPoolExecutor(max_workers=num_workers) as executor:
futures = [executor.submit(send_request) for _ in range(num_requests)]
for future in concurrent.futures.as_completed(futures):
latencies.append(future.result())

end_time = time.time()
total_time = end_time - start_time
qps = num_requests / total_time
average_latency = sum(latencies) / len(latencies)
throughput = num_requests * 1024 / total_time # 假设每个请求的响应大小为 1024 字节

print(f"Total Time: {total_time:.2f} seconds")
print(f"QPS: {qps:.2f}")
print(f"Average Latency: {average_latency:.2f} seconds")

# 主程序入口
if __name__ == "__main__":
num_requests = 100 # 总请求数
num_workers = 10 # 并发工作线程数
benchmark(num_requests, num_workers)
テスト結果

手帳のアドレスhttps://modelscope.cn/notebook/share/ipynb/5560603a/vl-test-and-benchmark.ipynb
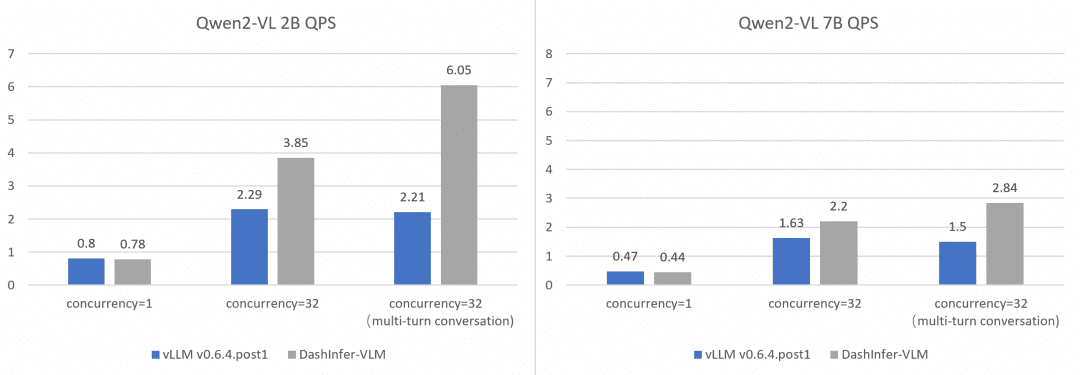
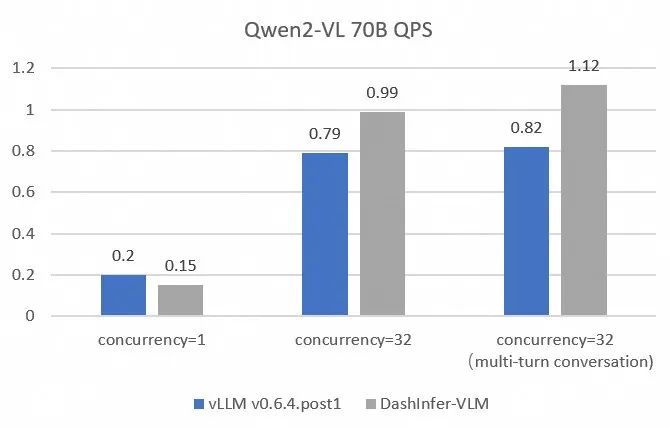
総合とvLLMの性能比較:
vLLMの性能をより包括的かつ正確に比較対照するために、OpenGVLab/InternVL-Chat-V1-2-SFT-Dataを使用して、異なるサイズのモデルで単一同時会話、複数同時会話、複数ラウンド会話のベンチマークを行った。詳細な再現スクリプトはリンク先に記載されており、結果は以下の通りである:
DashInferは、特に多ラウンド対話において、すべてのケースで性能上の優位性があることがわかる。
© 著作権表示
記事の著作権 AIシェアリングサークル 無断転載はご遠慮ください。
関連記事

コメントはありません

