MedRAX: A Smart Body for Chest X-ray Analysis Using Multimodal Large Models
General Introduction
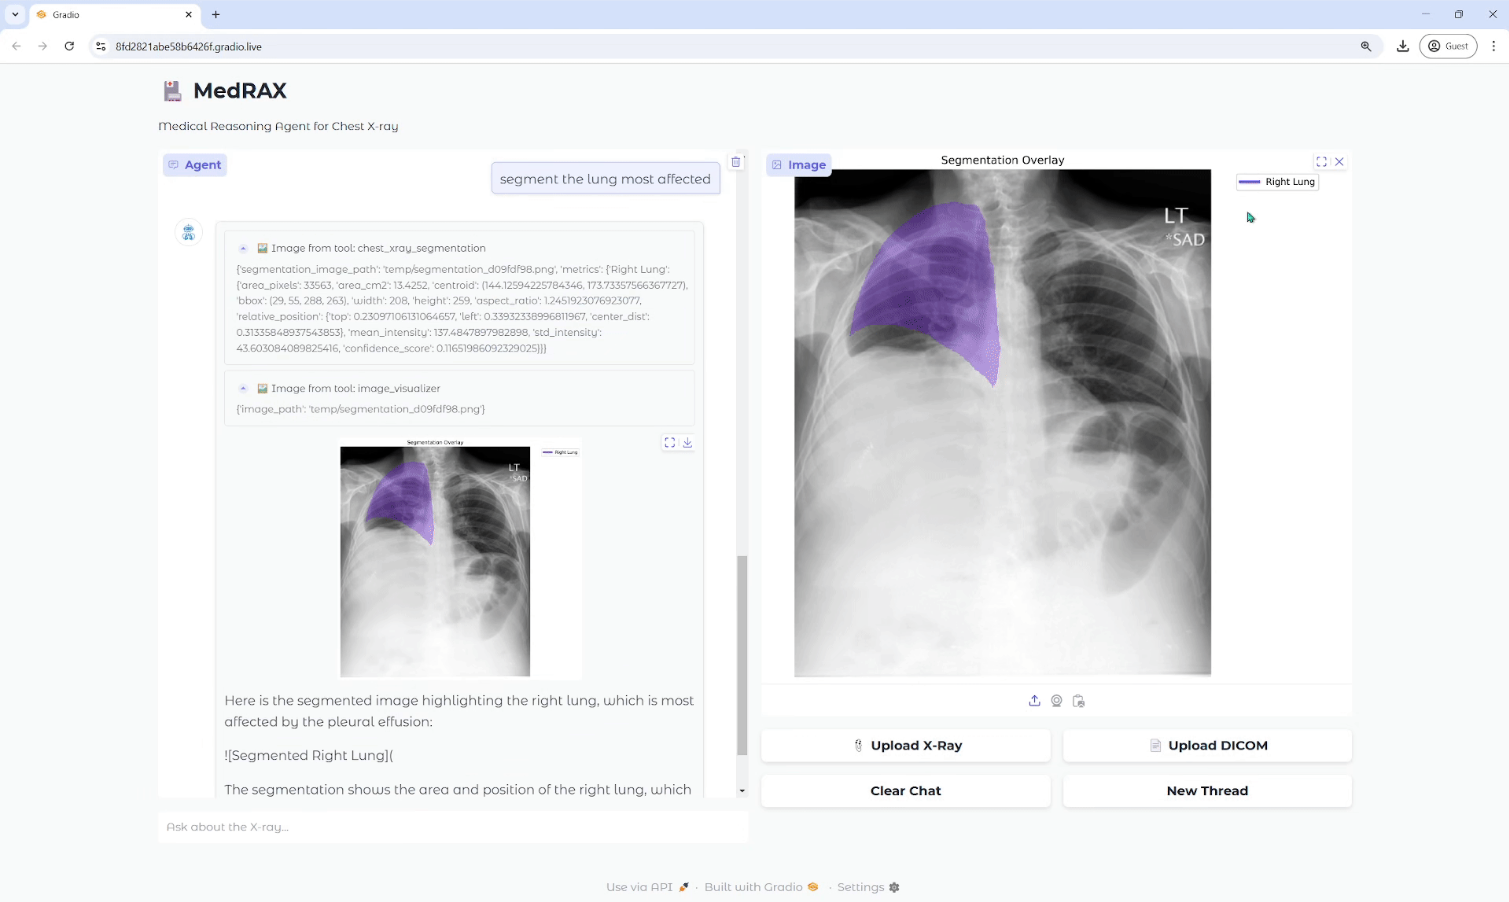
MedRAX is a state-of-the-art AI intelligence designed specifically for Chest X-ray (CXR) analysis. It integrates state-of-the-art CXR analysis tools and multimodal large language models to dynamically process complex medical queries without the need for additional training.MedRAX provides a unified framework that significantly improves the utility and performance of automated CXR interpretation systems through its modular design and strong technology foundation. The platform also introduces ChestAgentBench, a comprehensive benchmark of 2,500 complex medical queries, to evaluate its capabilities.

Function List
- Visual Q&A: Complex visual understanding and medical reasoning using CheXagent and LLaVA-Med.
- image segmentation: Accurate anatomical structure identification using MedSAM and PSPNet models.
- localization: Localizing specific findings in medical images with Maira-2.
- Report Generation: Generate detailed medical reports using SwinV2 Transformer.
- Classification of diseases: Detection of 18 pathology categories using DenseNet-121.
- X-ray film generation: Generate synthetic CXRs using RoentGen.
- Utilities: Includes DICOM processing, visualization tools, and custom drawing capabilities.
Using Help
precondition
- Python 3.8+
- CUDA/GPU (optimal performance)
Installation steps
- clone warehouse: Run the following command in the terminal:
git clone https://github.com/bowang-lab/MedRAX.git cd MedRAX - installer: Run the following command to install the dependency:
pip install -e .
Guidelines for use
- Launching the Gradio interface: Run the following command to start the Gradio interface:
python main.pyIf you encounter problems with permissions, you can use the following command:
sudo -E env "PATH=$PATH" python main.py - Setting up the model catalog: in
main.pyset up inmodel_dirWeight the catalog for the tools you wish to download or already own. Comment out tools you don't have access to. - Configuring the API Key: Ensure that in
.envfile to set your OpenAI API key.
Guidelines for use
- Launch Interface: Run
python main.pyLaunch the Gradio interface. - Load data: Upload chest X-ray images through the interface.
- Selection Functions: Select the desired analysis function in the interface, e.g., visual quiz, image segmentation, etc.
- View Results: The results of the analysis will be displayed in the interface, including a detailed medical report and image annotation.
Detailed Function Operation
- Visual Q&A: After uploading a CXR image and entering a relevant medical question, the system will use CheXagent and LLaVA-Med to reason and return the answer.
- image segmentation: By selecting the image segmentation function, the system will use MedSAM and PSPNet models to recognize the anatomical structure of the image and label the results on the image.
- localization: Using the localization function, the system will annotate specific medical findings in the image via Maira-2.
- Report Generation: By selecting the Report Generation function, the system will use SwinV2 Transformer to generate a detailed medical report including diagnostic results and recommendations.
- Classification of diseases: After uploading the CXR image and selecting the disease classification function, the system will use the DenseNet-121 model to detect the pathology categories in the image and return the classification results.
- X-ray film generation: By selecting the X-ray film generation function, the system will use RoentGen to generate synthetic CXR images for further analysis and research.
© Copyright notes
Article copyright AI Sharing Circle All, please do not reproduce without permission.
Related posts

No comments...


