
AutonomyAI: Turning Figma Designs into Clean React Code

General Introduction
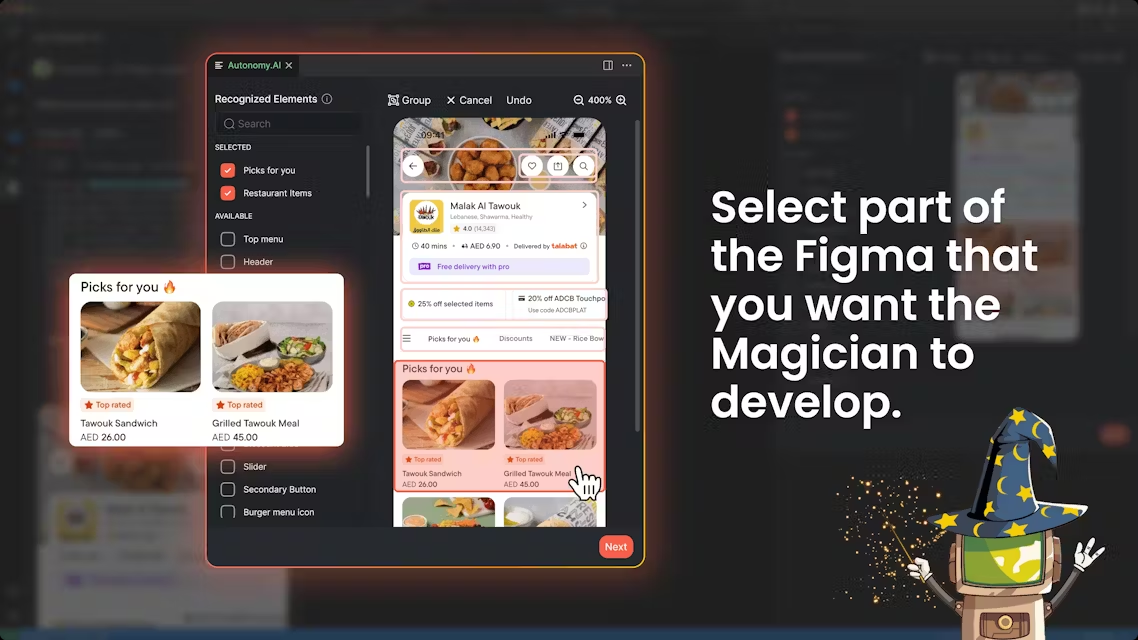
AutonomyAI is an online tool that utilizes artificial intelligence to improve the efficiency of front-end development. Developed by a team, its core goal is to help developers turn their designs into production-ready front-end code through "context-aware agent" technology. Main Products The Magician The ability to translate Figma designs into clean React code, while adapting to the style and structure of the user's existing codebase.What makes AutonomyAI special is that its ACE (Agentic Context Engine), a powerful engine that understands the codebase as well as a senior engineer, ensuring that the high quality code generated is seamlessly integrated into the project. Early access to the site is currently available and users can join the experience by signing up.
Function List
- Figma to React Code: Automatically generate clean, usable React code from Figma designs.
- production-ready output: The generated code is adapted to the project technology stack and can be used directly in the production environment.
- context-sensitive technology: Understand the components, structure and specifications of the code base to generate code that matches the style.
- Native component reuse support: Identify and use components already in the project to maintain consistency.
- Early Access Application: Users can register to experience the full functionality in advance.
Using Help
AutonomyAI is an online tool that requires no local installation and can be operated by the user through the browser. Below is a detailed step-by-step guide to help you get started quickly.
Register & Login
To use AutonomyAI, go to the official website https://autonomyai.io/. On the home page, there is a "Join for early access" button, click on it to go to the registration page. Enter your e-mail address and click submit. After submitting, you will receive a confirmation email, open the email and click the link to complete the registration. Since this is the Early Access stage, you may need to wait for official review after registration. After approval, you will receive a welcome email with a login link or instructions. Login to access the main screen.
Main interface overview
After logging in, the main interface is divided into several areas: input area, output area and settings bar. The input area is used for uploading or describing design requirements, the output area displays the generated code, and the settings bar allows you to adjust code preferences. At the top of the interface, there may be options such as "New Task" and "History" for easy project management.
How to use Figma to React features
This is a core feature of AutonomyAI that relies on The Magician Realization. This is done as follows:
- Upload Figma Design: In the input area, click the Upload button and select your Figma file (currently supports direct upload or import via link). For example, a web design with a navigation bar and buttons.
- Describe the need (optional): If you have additional requirements, such as "Use my project's component library", you can make this clear in the input box.
- Generate Code: Click the "Generate" button and wait a few seconds. The system will analyze the Figma file and your description and output the React code.
- View & Edit: The output area displays the generated code, including JSX, CSS, etc.. You can modify the code directly on the interface.
- Download Code: Once you are satisfied, click "Download" to save the file as a local file.
The generated React code is production-ready and can be deployed directly. For example, a navigation bar design might generate 150-200 lines of code with componentized structure and styles that are compatible with major browsers.
Role of the ACE Engine
AutonomyAI is unique in that ACE (Agentic Context Engine). It has three key steps:
- look up: Extract relevant information from your code base, documentation, and dependencies.
- indicate: Organize the data to ensure that the AI only processes what is necessary.
- repeatable: Maintain consistency and keep the code in line with the project specifications.
To use it, you can upload your project's codebase (e.g. a GitHub link or a ZIP file). ACE analyzes the components and styles in it and generates matching code. For example, if your codebase uses Tailwind CSS, the generated code will follow that style.
Setting Code Preferences
In the Settings field, you can adjust the output preferences. For example:
- Choose the code style: Concise (less comments) or Detailed (with comments).
- Specified frameworks: currently pushing React, may support more in the future.
After making adjustments, click Save and the AI will generate the code as you want.
View History
In the "History", you can see all the previously generated codes. By clicking on a record, you can reopen the code for editing or downloading.
caveat
- network connection: A stable network is required, as all operations are done online.
- input language: It is currently recommended that the requirements be described in English and the generated code is standard React.
- file format: Figma files should be in a standardized format to avoid complex nested hierarchies that may affect parsing.
- Feedback channels: If the results are not satisfactory, you can submit a question via the "Feedback" button and the team will improve it.
Details of production-ready code
The generated code is optimized for direct use in production environments. For example, a login page not only has a form, but also includes basic validation logic and a responsive layout. The code is clearly structured with standardized filenames (e.g. Login.jsx), suitable for teamwork. If the code base is uploaded, the code will also reuse existing components, reducing duplication of work.
Support & Updates
The site is in its early stages and features will be improved over time. Officials may be notified of new features via email. If you have any questions, you can contact the team via "Contact Us" at the bottom of the website.
application scenario
- Quickly convert design to code
After the designer completes the Figma file, the developer uses AutonomyAI to generate the React code directly, skipping the manual coding step.
For example, an e-commerce home page design can be turned into a usable front-end page in minutes. - Teamwork Efficiency Improvement
When front-end tasks are heavy on the team, AutonomyAI quickly generates the base code and developers optimize the details.
Ideal for projects that require rapid iteration. - Tools for Learning React
Beginners can use it to generate code, analyze structure, and learn how to turn designs into React components.
QA
- Is AutonomyAI free?
Early access is currently free, but paid features may be introduced in the future. No specific plans have been officially announced. - Is the generated code commercially available?
Can. The code is production-ready and suitable for commercial projects, but it is recommended to check that the requirements are fully met. - Support for other frameworks?
Currently pushing React, may be extended to Vue or Angular in the future, depending on the official update. - Do I need to upload a code base?
Not required. But when uploaded, the code will fit the style of your project better and work better.
© Copyright notes
Article copyright AI Sharing Circle All, please do not reproduce without permission.
Related posts


No comments...