AgentIQ: An open source tool for flexible connection and management of AI intelligences

General Introduction
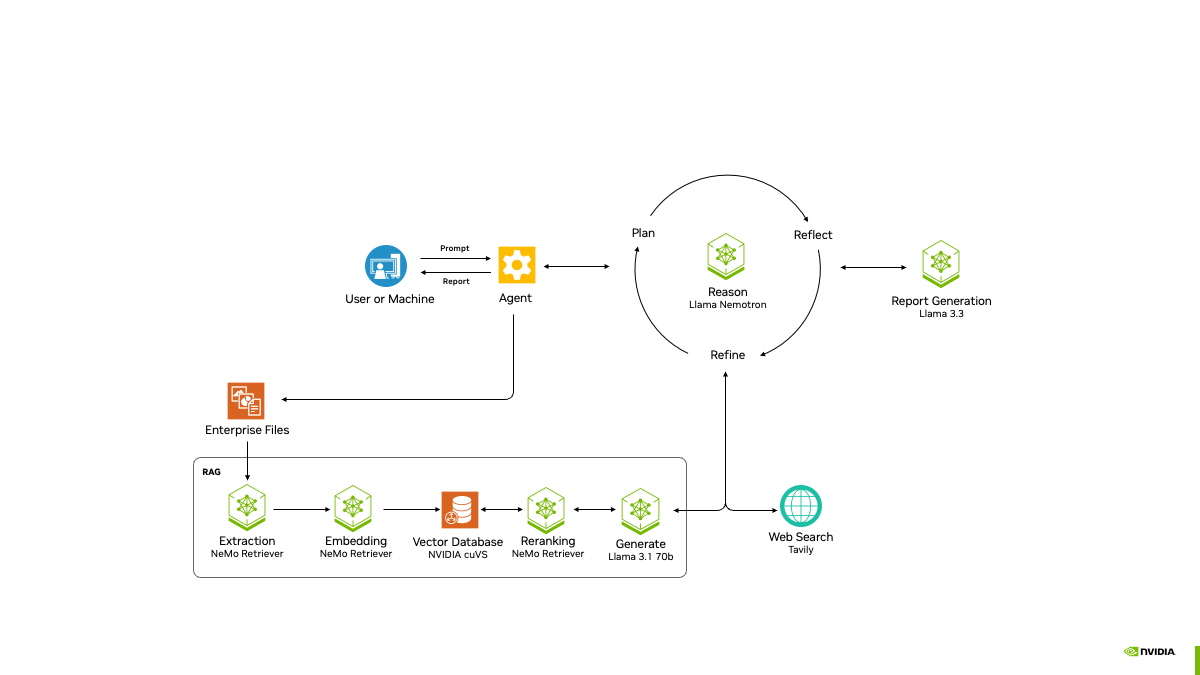
AgentIQ is an open source tool from NVIDIA designed to help developers efficiently connect and manage AI intelligences. It enables intelligences from different frameworks to seamlessly collaborate, connect enterprise data and tools, and build workflows like calling functions. The tool's best features are flexibility and reusability, allowing developers to quickly develop, optimize, and reuse AI tasks. agentIQ provides performance analytics and a visualization interface for enterprises to build reliable AI systems. As of March 2025, the official documentation and GitHub page are the latest sources of information.
Function List
- Support any framework: compatible with LangChain, LlamaIndex, etc., no need to change the technology stack.
- Reusable design: Intelligentsia, tools and workflows can be reused, saving development time.
- Rapid Development: Provides pre-built modules that developers can modify and use directly.
- Performance analytics: tracking the runtime of each smartbody and token consumption and optimize efficiency.
- Observability: Supports the OpenTelemetry tool for easy monitoring and debugging.
- Evaluation system: built-in tools to validate workflow accuracy.
- Chat Interface: Interact with intelligences through the UI to view results.
- MCP Support: Compatible with Model Context Protocol, can call external tools.
Using Help
AgentIQ is a Python based open source tool , easy to install , suitable for developers to use . The following is a detailed description of the installation and operation.
Installation process
Before installing, make sure your computer has Git, Git LFS, and uv tools. Here are the steps:
- Cloning Codebase
Enter it in the terminal:
git clone git@github.com:NVIDIA/AgentIQ.git agentiq
cd agentiq
This will download AgentIQ locally.
- Updating submodules
Input:
git submodule update --init --recursive
Get dependent external modules.
- Download Dataset
If example data is needed, run:
git lfs install
git lfs fetch
git lfs pull
- Creating a Python Environment
Use uv to create a virtual environment:
uv venv --seed .venv
source .venv/bin/activate  # Linux/Mac
.venv\Scripts\activate     # Windows
- Installation of core libraries
Install AgentIQ and all optional dependencies:
uv sync --all-groups --all-extras
If only the core functions are loaded:
uv sync
Want to load specific plugins (e.g. LangChain):
uv pip install -e '.[langchain]'
Performance Analysis Dependencies:
uv pip install -e '.[profiling]'
- Verify Installation
Check the version:
aiq --version
Displaying the version number is successful.
How to use the main features
After installation, you can start using AgentIQ. the following is a step-by-step guide to the core functionality:
Creating Workflows
AgentIQ calls intelligences and tools as functions. Define tasks with a YAML file. For example:
- establish
workflow.yaml::
functions:
wikipedia_search:
_type: wiki_search
max_results: 2
llms:
nim_llm:
_type: nim
model_name: meta/llama-3.1-70b-instruct
temperature: 0.0
workflow:
_type: react_agent
tool_names: [wikipedia_search]
llm_name: nim_llm
verbose: true
retry_parsing_errors: true
max_retries: 3
- Running:
aiq run --config_file workflow.yaml --input "列出五种土豚亚种"
The output will list the answers.
performance analysis
Monitor workflow performance:
aiq run --config_file workflow.yaml --profile
The results show the elapsed time and token usage for each smart body to help with optimization.
visualization interface
Launch the UI:
aiq ui
Open http://localhost:8000 in your browser, type in your question, and the intelligent body will answer it in real time.
data integration
Connect to the data source in the workflow.yaml Add in:
data_sources:
- type: "csv"
path: "data/sales.csv"
After running, the smart body can process the file data.
Assessment workflow
Verify accuracy:
aiq evaluate --config_file workflow.yaml
The system checks that the output is as expected.
Featured Function Operation
The highlights of AgentIQ are flexibility and observability. For example:
- Multi-Intelligence Collaboration: Configure one intelligence to generate code, another to test it, and automatically adjust it until it passes.
- adjust components during testing: Use the OpenTelemetry tool to see how each step is performing and identify problems.
To experience the full functionality, it is recommended to refer to the official example:
cd examples/simple
uv pip install -e '.[langchain]'
aiq run --config_file workflow.yaml
application scenario
- Automation Development
Generate and test code with AgentIQ for rapid prototyping.
One intelligence writes the code, the other runs the tests, and the results are output directly. - Enterprise data processing
Connect sales data and automatically generate analytical reports.
Intelligentsia reads CSV files and outputs charts. - Customer Support
Configure intelligences to answer common questions and improve efficiency.
Users enter questions through the UI and the smart body responds in real time.
QA
- Need an API key?
Yes, an NVIDIA API key is required to run the examples, register for it at https://build.nvidia.com. - What language models are supported?
Support for multiple NIM models can be specified through a configuration file, e.g. Llama-3.1-70b. - How do I give feedback on a problem?
Submit issues at https://github.com/NVIDIA/AgentIQ/issues.
© Copyright notes
Article copyright AI Sharing Circle All, please do not reproduce without permission.
Related posts


No comments...