
Windsurf Chinese tutorials, Windsurf installation and use methods

Windsurf Quick Start
Windsurf be Codeium 's next-generation AI IDE, designed to help you keep your creative juices flowing. On this page, you'll find out how toInstall WindsurfThe step-by-step instructions for completing the initial setup process and turning on your first AI-driven project.
You might need one:Codeium Windsurf sets up a Chinese interface with a single Chinese extension plugin
If you don't know anything about programming at all and want to refer to the UI prototype to start building the app.CopyCoder It can assist you in using Windsurf Build applications quickly.
Well... If you can't even deploy your development environment properly (like me), try 3 minutes to deploy the official website, I use Windsurf and Devbox one-click development environment (reproduced), the next step is to simply learn the basic operation of VSCODE (Windsurf similar AI IDE tools are based on VSCODE two open), you can Windsurf interface in the complete development of a stand-alone application!
With all the preparations in place, let's get some more application skills:
- Recommended reading for developers before using Windsurf:To program correctly with AI IDE tools, you need to construct a set of specification documents and detailed requirement statements
- Recommended reading for non-developers before using Windsurf:How to make it low-barrier for people who don't know how to program to write complete apps using Windsurf
Windsurf settings 🏄
To get started, make sure your device meets the requirements, click the download link, and follow the instructions to install and run Windsurf.
- Mac: Minimum operating system version: OS X Yosemite
- Windows (computer): Minimum operating system version: Windows 10
- Ubuntu: Minimum OS version: >= 20.04 (or glibc >= 2.31, glibcxx >= 3.4.26)
- Other Linux distributions: Minimum OS version: glibc >= 2.28, glibcxx >= 3.4.25
Windsurf Getting Started Process
Once Windsurf is running, you will see the page below. Let's get started! Please note that you can always use the "Reset Getting Started" command to restart the getting started process.

1. Selection of the setup process
If you are using VS Code and wish to import the configuration, select "Import VS Code". Otherwise, select "Fresh Start". You can also choose to set the windsurf Install it in the PATH so that you can run it from the command line. windsurfThe

- Fresh Start: Choose your key bindings here, options include the default VS Code bindings or Vim bindings.
- Import from VS Code: Here you can migrate your settings, extensions or both.

2. Select the editor theme
Choose your favorite color scheme theme from these default themes! Don't worry, you can still change it later. If you import settings from VS Code, the imported theme will override the current selection.

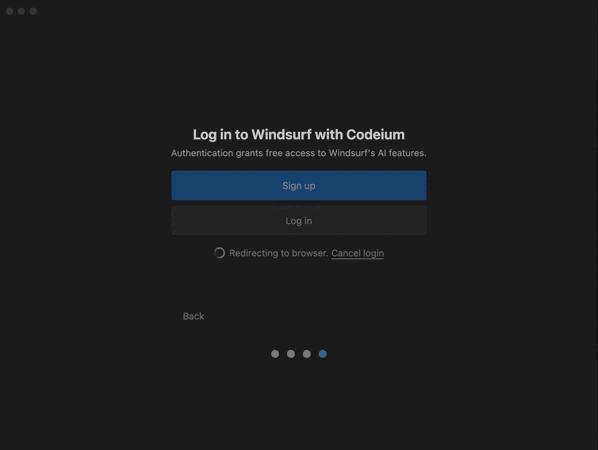
3. Registration / Login
To use Windsurf you need to use your Codeium account, or you can create one if you don't have one yet. Registration is completely free!

When you have completed the authentication process correctly, you should see this page. Click "Open Windsurf" and you're ready to go!

Problems?
If you encounter problems with the authentication process, you can also log in manually and provide Windsurf with an authentication code.
- Select "Problem?" Click the "Copy Link" button to copy the authentication link to the clipboard and paste it into your browser.
- Enter Authentication Code: Copy the authentication code shown in the link and enter it into Windsurf.

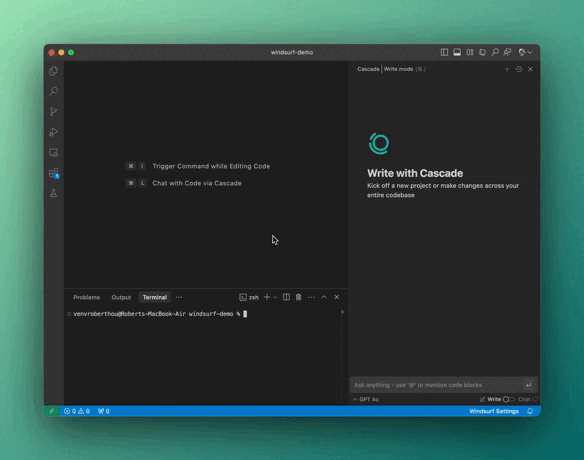
4. Start surfing! 🏄
Functions that Windsurf can try
Now that you have successfully opened Windsurf, let's try out some of the features! All of these features are easily accessible from the start page. :)
Written in Cascade

On the right side of the IDE, you'll see a new panel called "Cascade". This is your AI-driven code assistant! You can use Cascade to chat, write code, and run code! Click on the
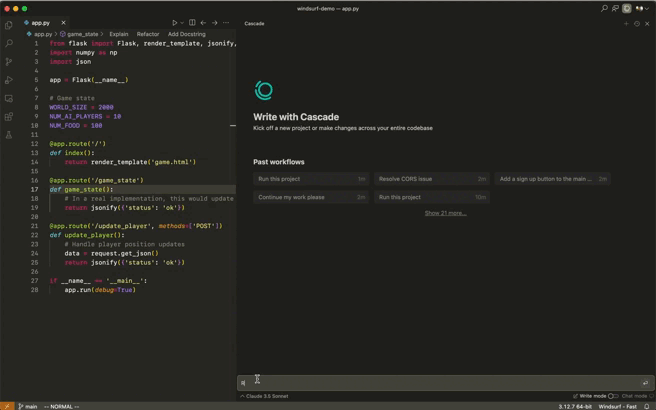
Generating Projects with Cascade

You can use Cascade to create a brand new project! Click on the "New Project" button to get started.
Open Folder / Connect to Remote Server

You can open the folder or connect to a remote server via SSH or a local development container. Click here are Learn more.
Configuring Windsurf Settings

Configure Windsurf's AI settings here. Want to slow down auto-completion or disable certain features? You can set it here.
Open the command panel

You can use the ⌘+⇧+P(on Mac) or Ctrl+Shift+P(On Windows/Linux) shortcut keys to open the command panel and explore the available commands!
Forgot to import your VS Code configuration?
If you decide to import your VS Code configuration into Windsurf after completing the onboarding process, you can do this easily. Open the command panel (on Mac) ⌘+⇧+PThe following is a list of the most popular features of the Windows/Linux Ctrl+Shift+P), then type "Import VS Code".

Windsurf Advanced Guide (Cascade)
Cascade reveals to us a new paradigm in the field of programming assistants: AI Flows.
A next-generation evolution of the traditional Chat panel, Cascade is an agent-based chatbot that collaborates with you like never before, with the ability to track your previous actions in real time to perform tasks.
To open Cascade, click the Cascade icon in the upper right corner of the Windsurf window.

You can also use the following shortcut keys to open Cascade:Cmd+L
Text selected in the editor or terminal will be automatically included.
Windsurf Model Selection
Select the model you want from the selection menu below the chat input.
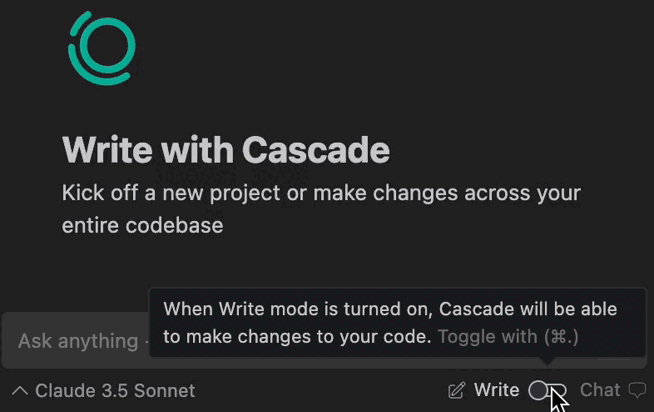
Write/Chat Mode
Cascade has two modes:Write cap (a poem) ChatThe
Write mode allows Cascade to create and modify your codebase, while Chat mode is optimized for answering your questions about your codebase or general programming principles.
Windsurf Real-Time Collaboration
One of the unique features of Windsurf and Cascade is the ability to sense what you are doing in real time, allowing for unprecedented collaboration.
You no longer need to contextually prompt the AI for previous actions because Cascade and Windsurf are already aware of them.
In the video below, you'll see Cascade only passes the prompts continue to rename other instances, how easy it is to detect the latest variable name changes.

Windsurf Direct access to tools and terminals
Cascade can detect which packages and tools you are using, identify what needs to be installed, and even install them for you. Just ask Cascade how to run your project and click "Accept".
Windsurf Revert to previous steps
You can revert changes made by Cascade to previous steps if needed. Restore all code changes to the target state of the codebase by hovering over the prompt and clicking the arrow on the right. Note: The revert operation is currently irreversible, so use caution!

Windsurf Advanced Guide
SSH Support
The common SSH support in VSCode is licensed by Microsoft, so we have implemented our own SSH support specifically for Windsurf. This feature requires the installation of the OpenSSHThe program has very few dependencies other than that, and should work "straight out of the box" as you're used to.
The extension works well in our internal development, but there are still some known limitations and vulnerabilities:
- Currently we only support connecting to Linux-based remote hosts with x64 architecture.
- The regular Microsoft "Remote - SSH" extension (and the open-remote-ssh extensions) will not work properly - do not install these extensions, they will conflict with our SSH support.
- We do not currently have the full functionality of the Microsoft SSH extension. The main support at this time is for the important feature of connecting to a host. If you have a feature request, please let us know!
- The ability to connect to a remote host via SSH and then access a development container on that remote host does not fully support VSCode's mode of operation (we're working on it!) . If you want to implement this feature, it is recommended to manually set up an SSH daemon in your development container. Below is the setup we found to work, but make sure it's appropriate for your use case.
- Inside the development container, run the following command once (multiple runs may cause your
sshd_config(Configuration error):
sudo -s -- <<HERE sed -i '/SSO SSH Config START/Q' /etc/ssh/sshd_config echo "Port 2222" >> /etc/ssh/sshd_config ssh-keygen -A HERE- Within the development container, run this command in a terminal that needs to stay connected (e.g. via tmux):
sudo /usr/sbin/sshd -D- Then connect to your remote host via Windsurf using port 2222.
- Inside the development container, run the following command once (multiple runs may cause your
- SSH proxy forwarding is enabled by default and will use Windsurf's latest connection to that host. If you encounter problems, try reloading the window to refresh the connection.
- On Windows, when a password is required, a number of pop-ups will appear
cmd.exeWindows. This is normal - we will remove them as soon as possible. - If you encounter problems, first make sure that you can use the regular
sshcommand to connect to the remote host. If the problem persists, report the error by including theOutput > Remote SSH (Windsurf)The content of the tab's output!
Development Containers
Windsurf also supports development containers! If you want to run development containers locally on your Linux machine, you can use the following three commands:
Open Folder in Container- Open the folder in the new workspace with the specified devcontainer.json file
Reopen in Container- Reopen the current workspace in the new container and specify the devcontainer.json file to configure the container.
Attach to Running Container- If you already have a running development container, you can attach a remote server to that container and connect the current workspace to it.
caveat
- Windsurf does not currently support the SSH + Development Container feature, but we plan to support it in the future.
- Currently, only Linux-based x86 architectures are supported.
WSL
Coming soon!
Expanding Markets
You can change the marketplace used to download the extension. To do this, go to View -> ExtensionsClick on the "Change in Settings" link and modify the settings as necessary.

© Copyright notes
Article copyright AI Sharing Circle All, please do not reproduce without permission.
Related articles


No comments...