SD Model Dress Up: Inpaint Anything
Similar cases: https://cloud.tencent.com/developer/article/2365063
an actual example
A beautiful woman wearing a white wedding dress adorned with lace, walking along the beach at sunset. Her hair is gently lifted by the breeze, and she is holding a bouquet of white roses. Her hair is gently lifted by the breeze, and she is holding a bouquet of white roses. dynamic pose, photography, masterpiece, best quality, 8K, HDR, highres, absurdres: 1.2, Kodak portra 400, film grain, blurry background, bokeh: 1.2, film grain. blurry background, bokeh: 1.2, lens flare
Reverse: nsfw, ugly, paintings, sketches, (worst quality:2), (low quality:2), (normal quality:2), lowres
For example, you have photos like this one of a mannequin in a dress, which was taken in our own showroom.
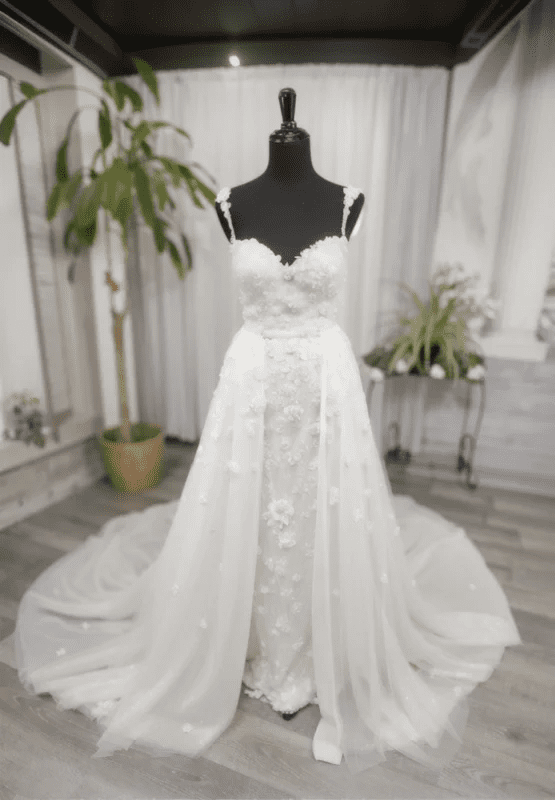
rooftop plan
If you can use Stable Diffusion, it won't take ten minutes for the first picture to come out.
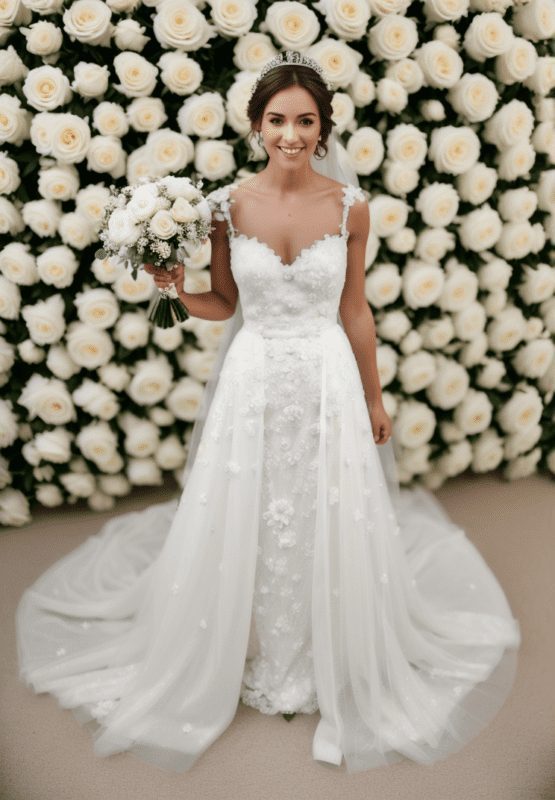
Even if adjustments have to be made, an hour is enough. For example:
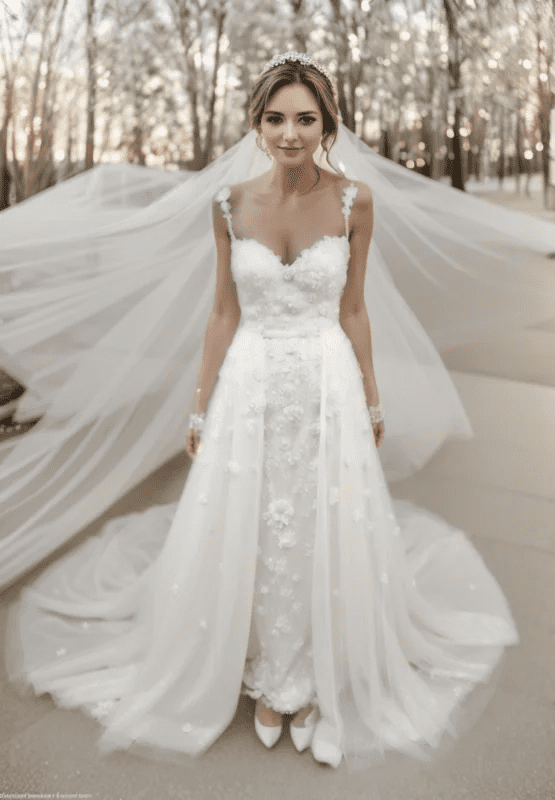
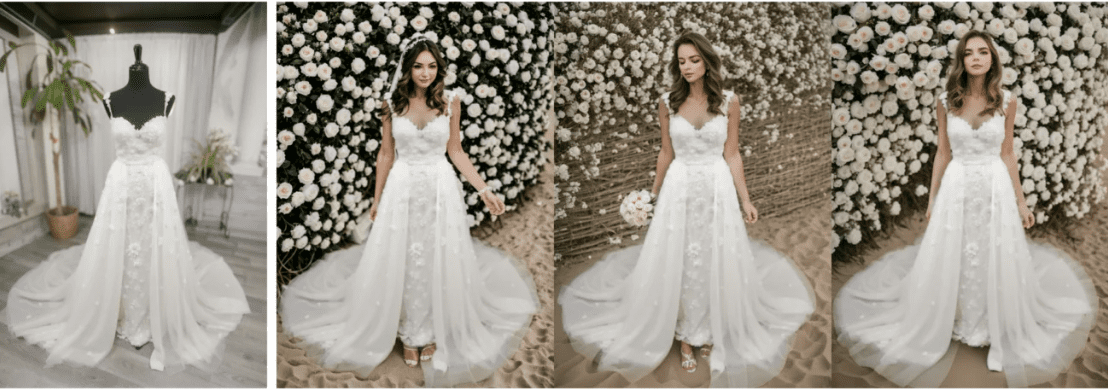
Mannequin Generation Live Model 1
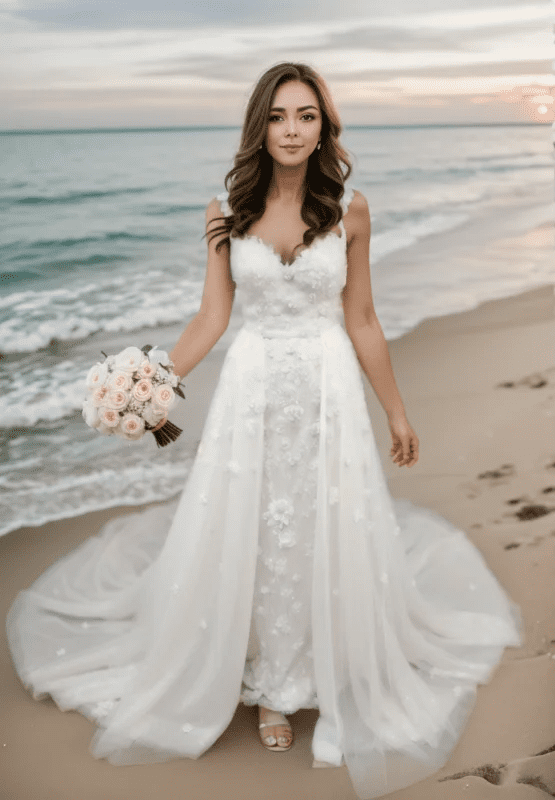
Mannequin Generation Live Model 2
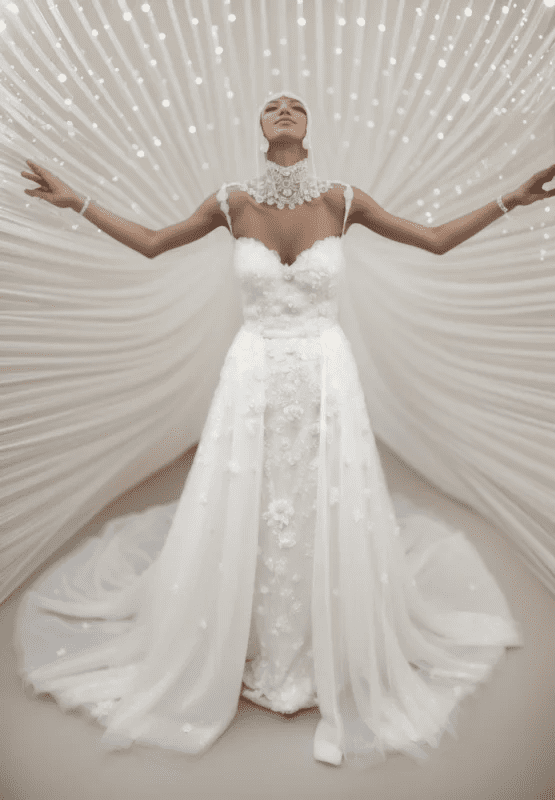
Mannequin Generation Live Model 2
I. Ideas for real-life generation of human-platform diagrams
How do you turn a dummy table into a real person and still keep the clothes?
At this point, friends familiar with Stable Diffusion will say: I know, it is to use the Inpaint function in the Tuchengtu, and then make a mask outside the clothes, so that Stable Diffusion repainting.
How do you make that mask? If you have to do the masking with one stroke by hand that's too slow, if that's the case I don't have to come out with this one in particular.
Again, someone will say, I know, first make the mask in photoshop and then use the mask redraw function.
That's one way to do it, but it could be smarter now.
Today we're going to use a plugin inpainting anything, to give a photo, which takes the photo and separates it out with color blocks for different things. At the end of the day we just have to pick which color blocks we want to make into masks, and this way the masks are made.
The repainting feature is then used to life-size the dummy while retaining the clothes.
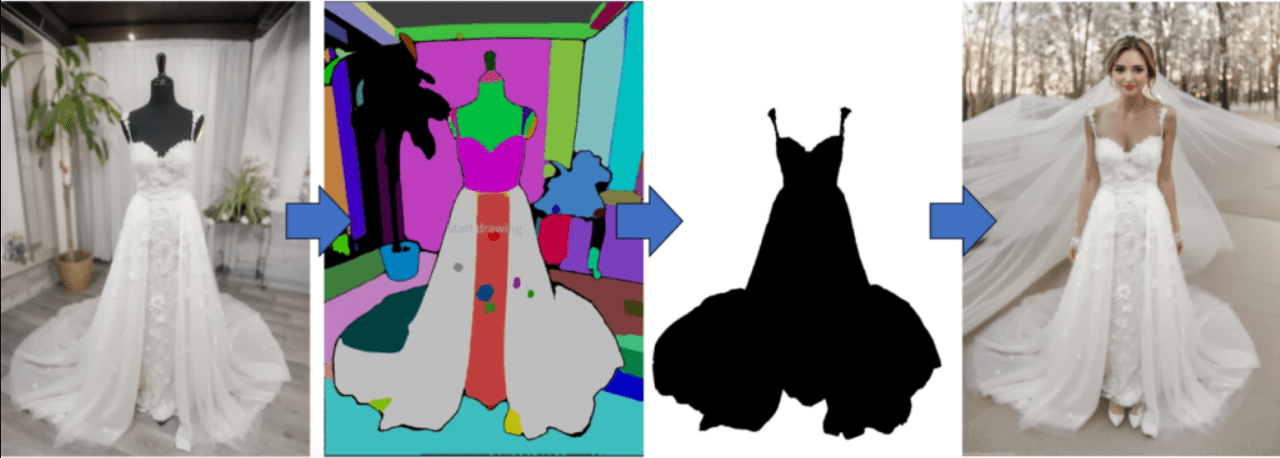
While the basic idea is this, if you've done it yourself, you'll know there are still a lot of potholes along the way.
So in this article, not only will I show you hands-on how to turn a dummy into a real person, the important thing is that I'll also show you how I fill in those holes.
I'll explain them all to you now.
II. Dummy table model real-life preparation tools
This demonstration is using Automatic 1111's WebUI and is modeled after SD 1.5, so let's get ready!
Preparation 1: inpaint anything
First of all, we will use Inpaint Anything plugin, please check your Automatic 1111's WebUI to see if there is Inpaint Anything plugin, if not, please install it.
Install inpaint anything
Go to Install from URL, enter
https://github.com/Uminosachi/sd-webui-inpaint-anything.git
Ready to install
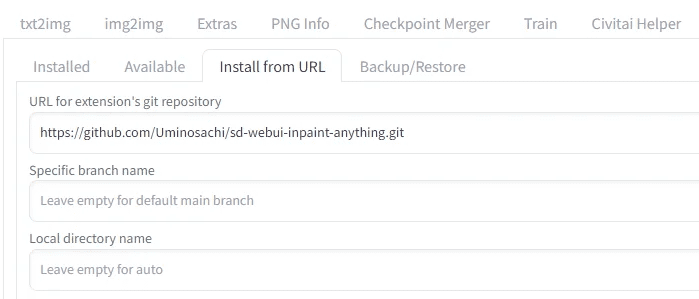
Once installed, go back to the install tab and press Apply and quit.

Preparation 2: Inpaint-specific model
This time I will use epiCPhotoGasm to demonstrate that the quality of the model comes out as if it was taken by a master photographer, which makes it especially suitable for use in places that require realistic images.
Instead of his main model, we're going to use his Inpaint model today.
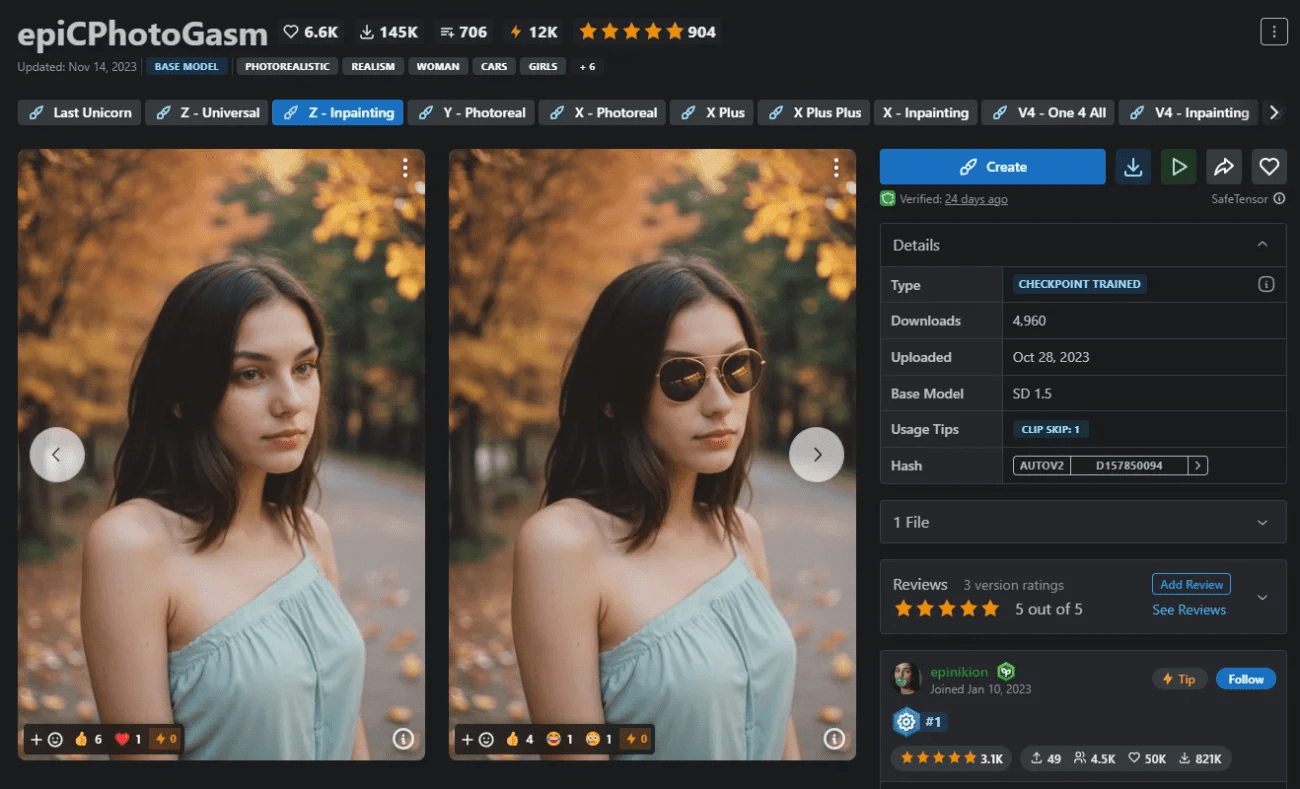
Go to the link below to download its Inpaint model and install it ready for use later.
https://civitai.com/models/132632?modelVersionId=201346
Preparation 3: Dummy photo
We'll use our example of this one

This was taken in his own showroom, be warned he's a black mannequin, which is going to cause some trouble later. Here's a teaser for now.
Once those 3 things are ready, we're ready to go.
III. Operational demonstrations
This instruction is modeled using SD 1.5 to demonstrate the entire process.
Step 1: Select SAM Model and Download Model
Press the Inpaint Anything tab and you'll see a screen like this one
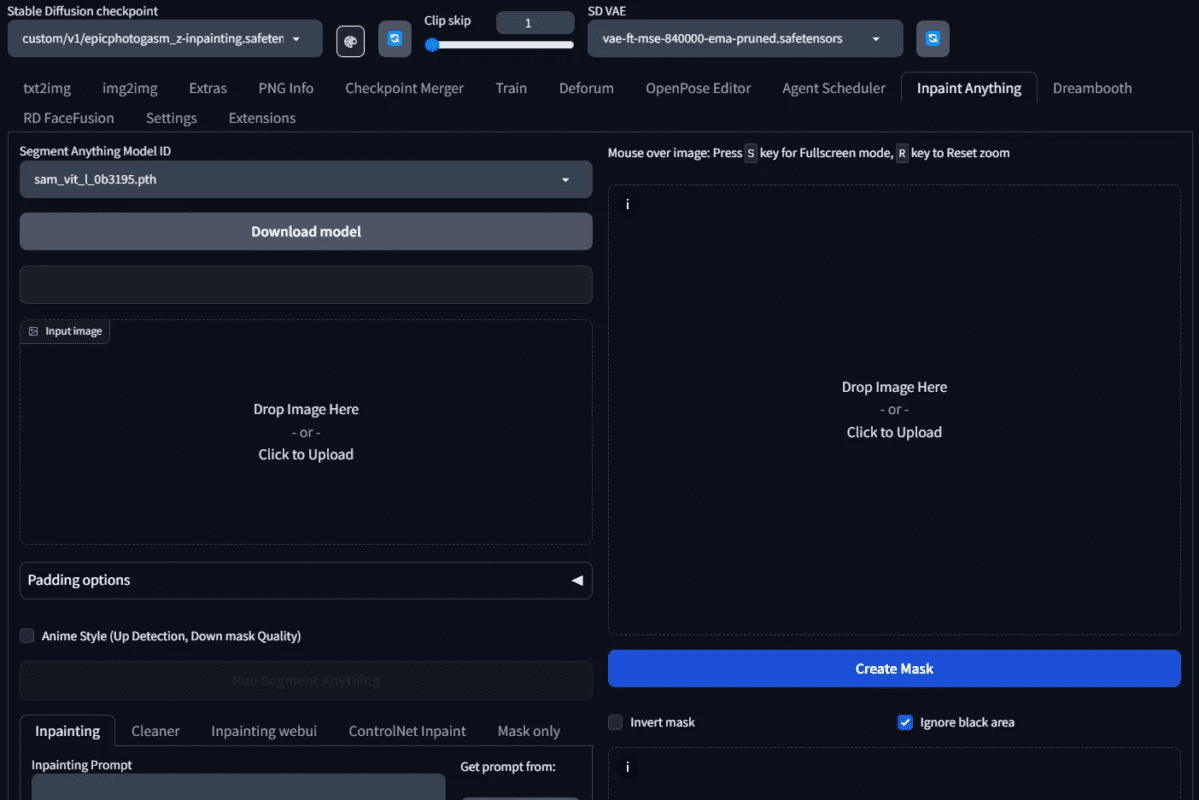
Select the Segment Model ID of the semantic segmentation model to be used. Here we choose the model sam_vit_l_0b3195.pth. If you just installed it, these models are not downloaded yet, you have to Download model button for it to download.
Load.

Step 2: Obtain an example segmentation map
Upload the image to inpaint anything and press Run Segment Anything.
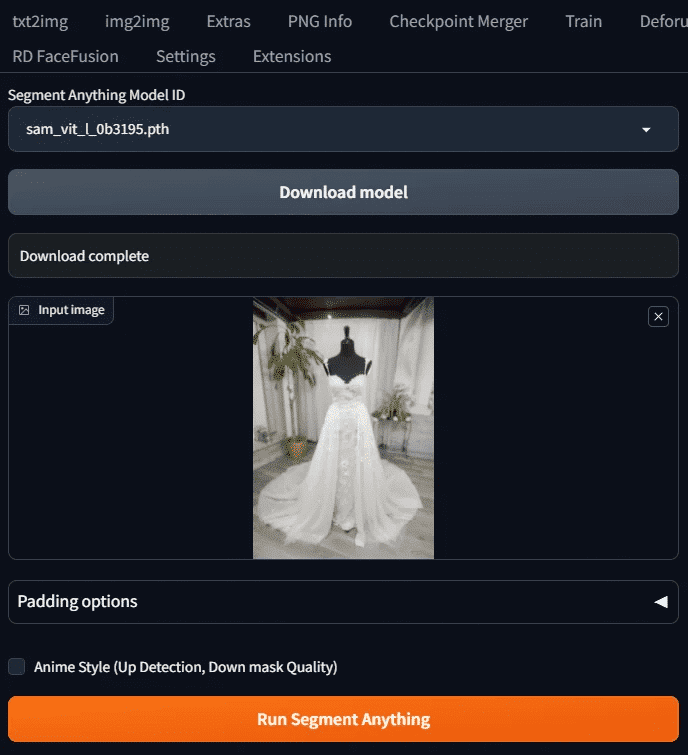
You'll see the example split diagram on the right
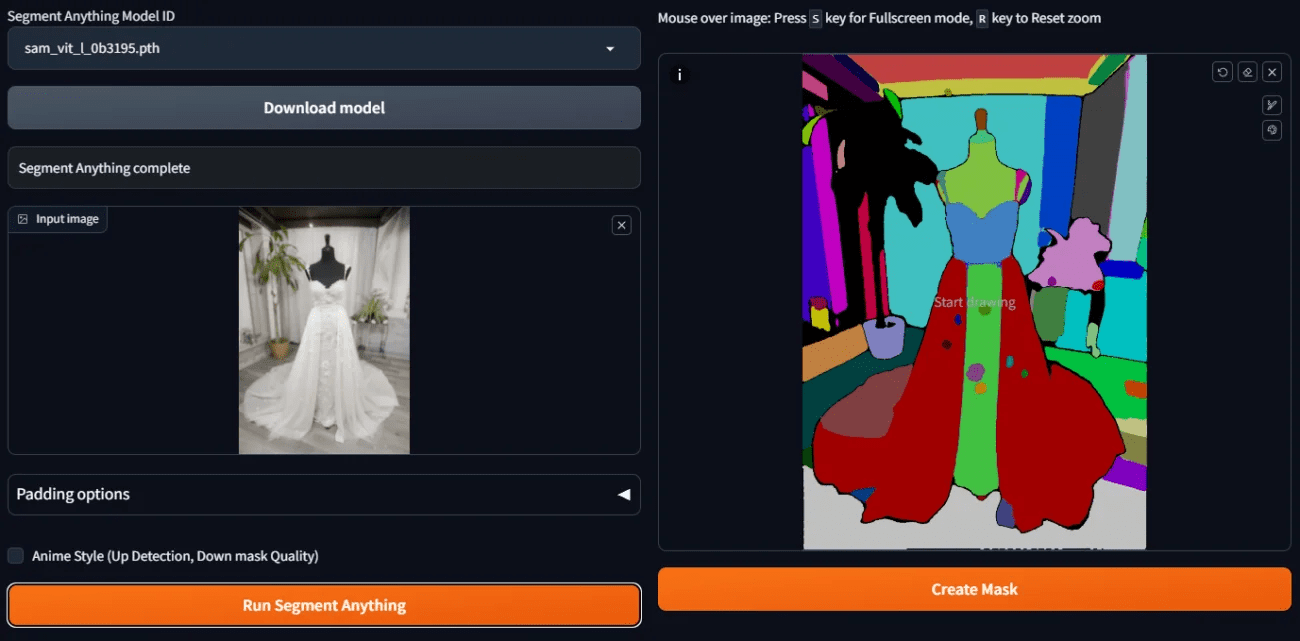
Step 3: Make a preliminary mask.
If we want to use the redraw function later, we need to make a mask of the area we want to redraw. Now that we have semantically separated color blocks, how do we quickly make a mask?
It's easy, just take the mouse and tap on the color block you want to make a mask, you don't have to paint the whole block, just tap on that color block and wait a bit and it will become a mask.
Because we want it to be the backgrounds, dummies, etc. to be repainted, so those places have to be picked up, but but the backgrounds are a little complicated to do up
It's too much of a hassle, so we can instead click on the color block on the dress and then check Invert Mask.
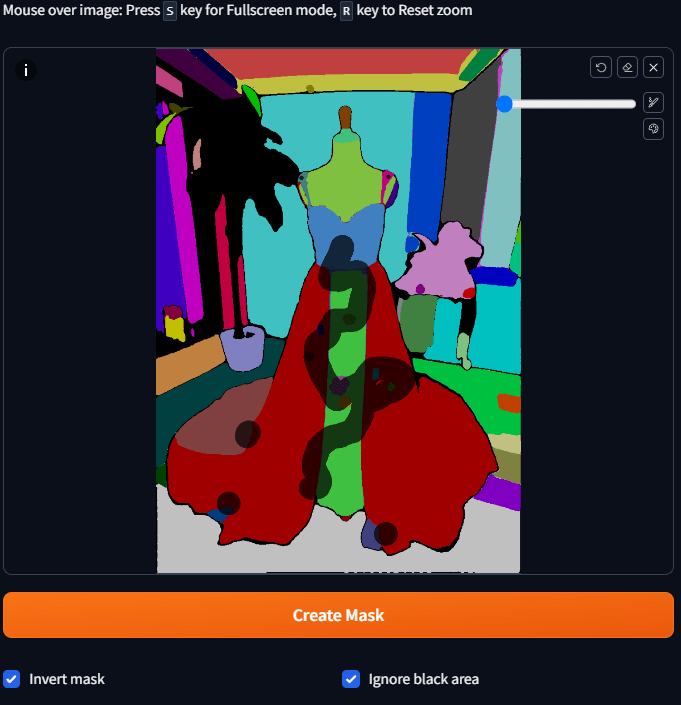
Once you've selected them all, press Create Mask and you'll see the results of the mask.
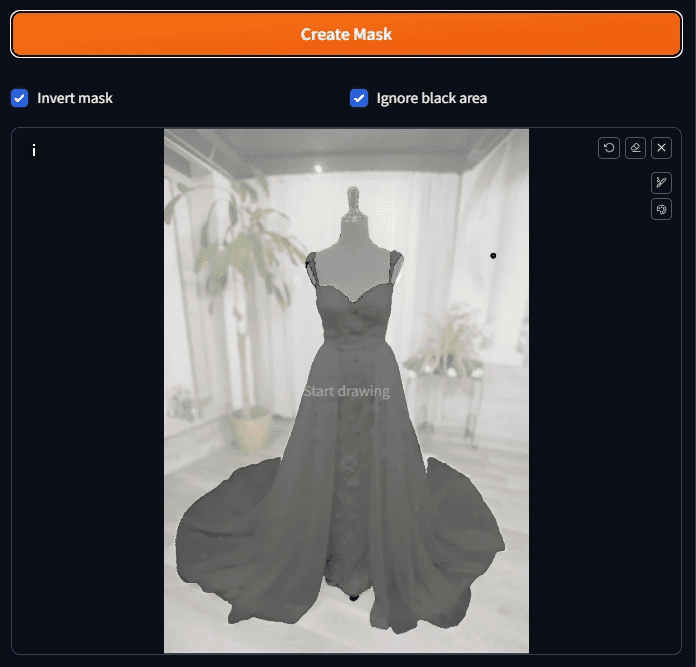
Step 4: View mask results
Check the results of the mask to see if there are any missed, in fact, the screen if more complex, so it is difficult to see clearly, here is a trick, the side of the Mask Only tab to open out.
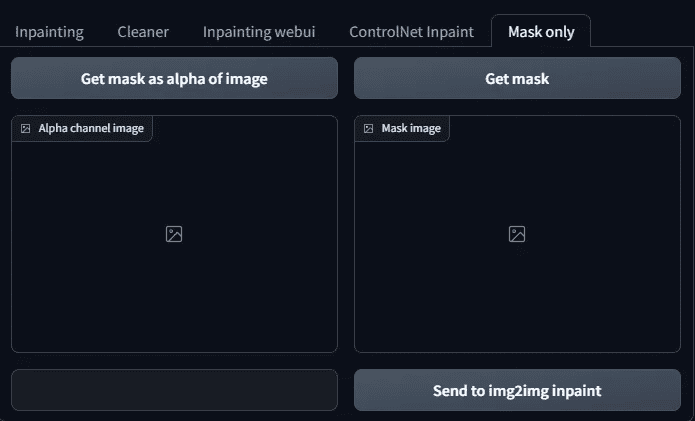
There are two buttons on it:
Get mask as alpha of image
Get mask
Once these two buttons are pressed, you can see if the mask is done.
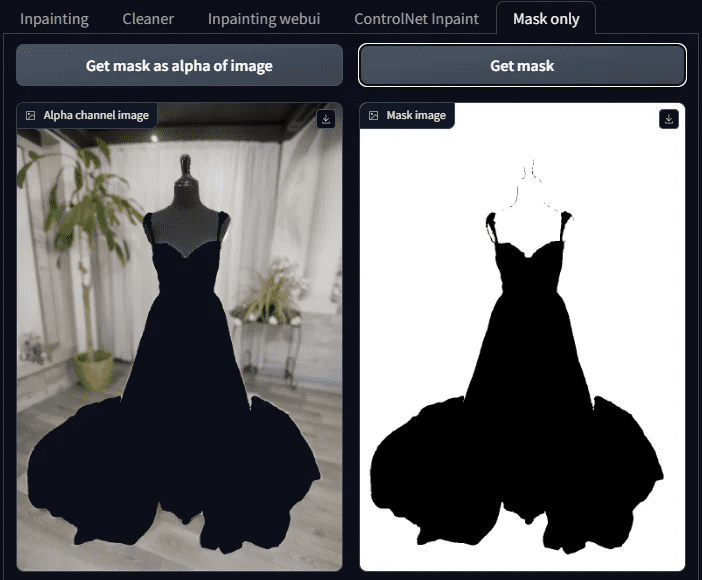
Note that the white on this side, is the mask, the area to be AI filled in the future, and the black is the part to be kept, don't get it wrong.
Step 5: Fine-tune the mask
As you can see from this masked image, there are other places besides the clothes that haven't been masked yet (i.e. there are things that shouldn't be there)
(black lines).
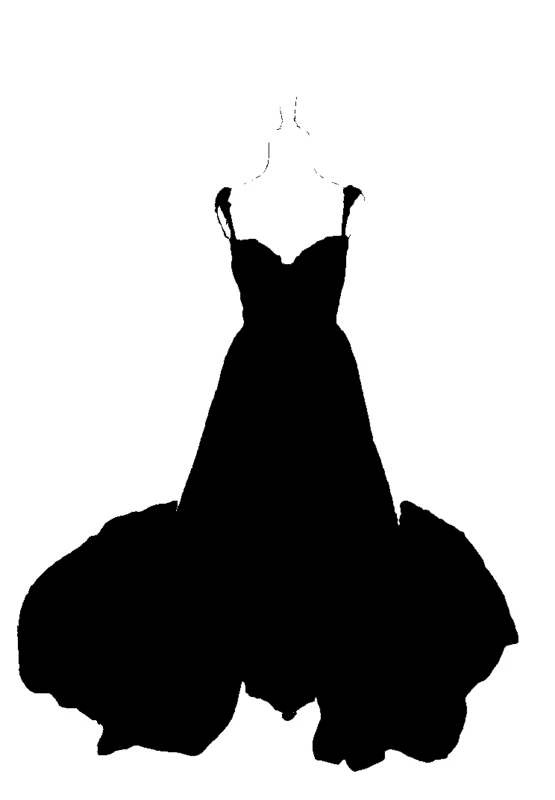
That's when it's fine-tuned by hand.
Go back to the diagram that generated the mask and paint the areas to be masked on it. If there are areas to add black, manually paint them and press the Trim mask by skatch button, and conversely, to add white, manually paint them and press the Add mask by skatch button.
If you think the image is too small to paint, you can enlarge it by pressing S, and then press S again to restore it.
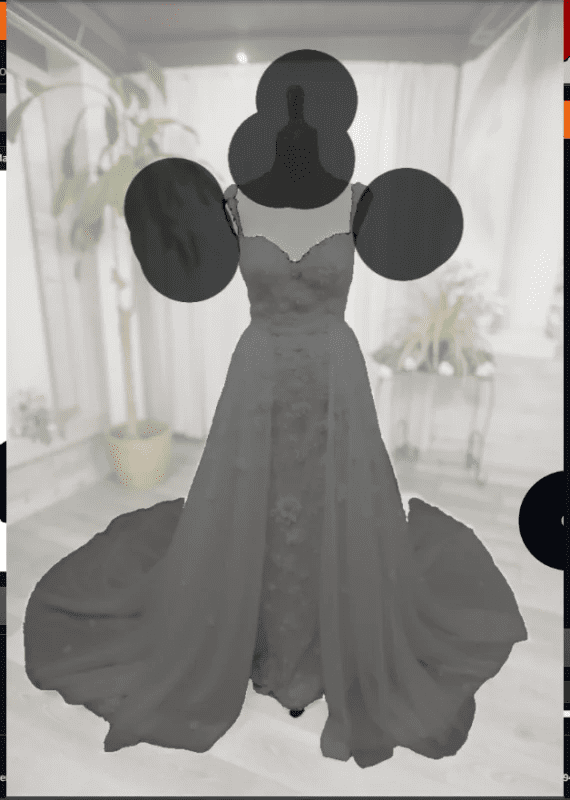
Plus Black: Trim mask by skatch button
Add white: Add mask by skatch button
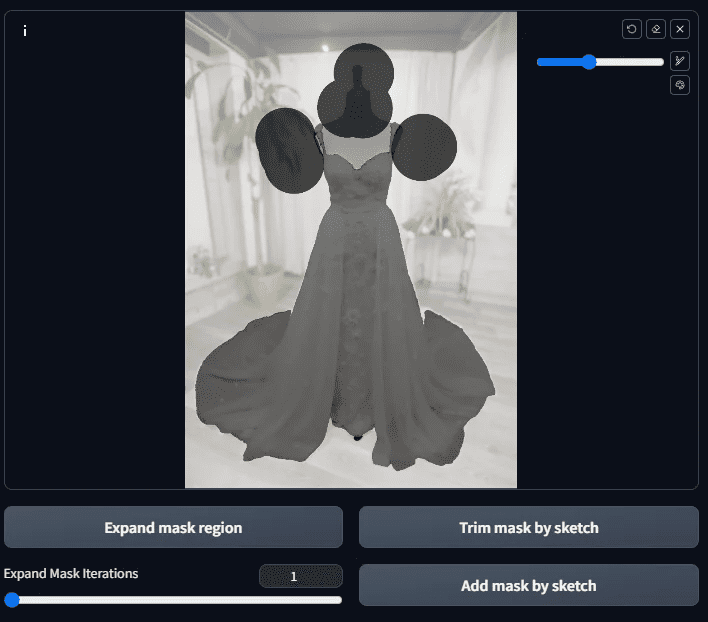
After applying, press the Add mask by sketchThe
Then go to the Mask Only tab and press the Get mask up to Get mask as alpha of image Is that what we want?
The Mask.
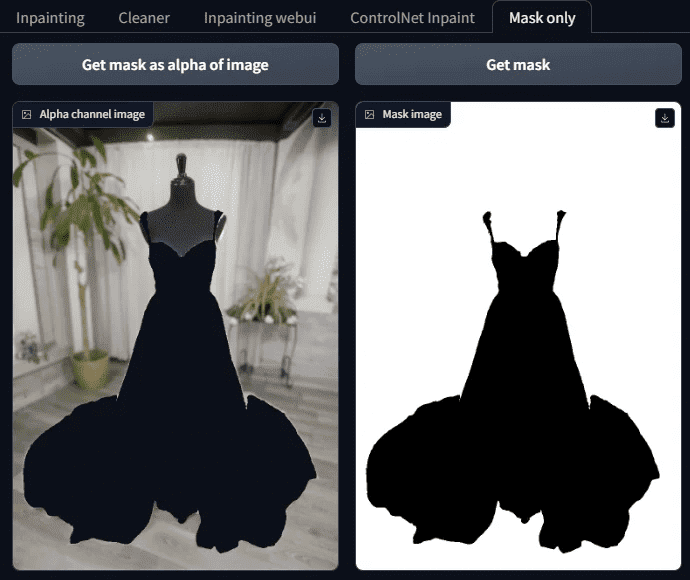
If there are any other stray spots, trim them off in the same way; if that's okay, we'll move on to the next step.
Step 6: Start repainting in inpaint anything
Once our masks are all done, we can start asking stable diffusion to help us fill in the background.
Go to the inpaint tab and fill in the mention and reverse mention. Because the image I want to generate is: beautiful woman wearing a wedding dress and holding a white rose. So enter the following mention:
A beautiful woman wearing a white wedding dress while holding a bouquet of white roses.
Dynamic pose, photography, masterpiece, best quality, 8K, HDR, highres, absurdres: 1.2,
Kodak portra 400, film grain, blurry background, bokeh: 1.2, lens flare
The reverse teleprompter is as follows:
Nsfw, ugly, paintings, sketches, (worst quality:2), (low quality:2), (normal quality:2), lowres
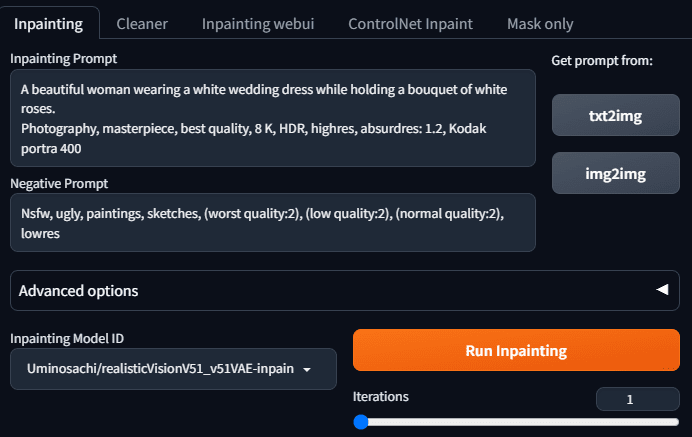
Select one of the inpaint models, these are inpaint anything he presets.
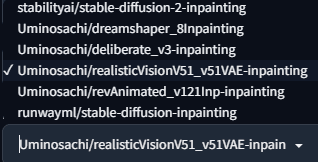
Because we want to do real photos, we use the Uminosachi/realisticVisionV51_v51VAE-inpainting this one
Model.
Press Run Inpainting and you will get a picture of the real model.
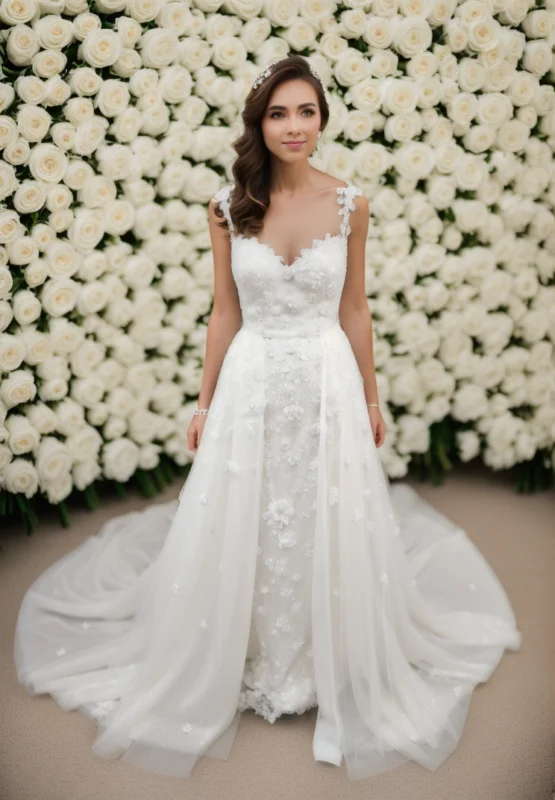
Looks good, let's have a few more births.
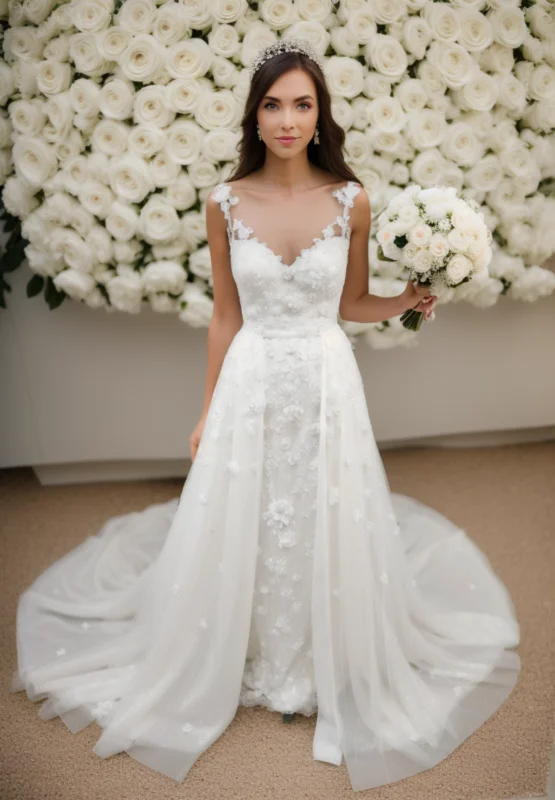

After you get the chart, do you think this teaching is over?
Not yet! Because there are still some questions if you really want to use it
- There's no way to put out a lot of pictures at once for us to pick from.
- There is no way to use the model we want
So what to do? So we need the next step.
Step 7: Use the redraw feature of Tupelo
Go back to the Mask Only tab and press "Send to img 2 img inpaint".
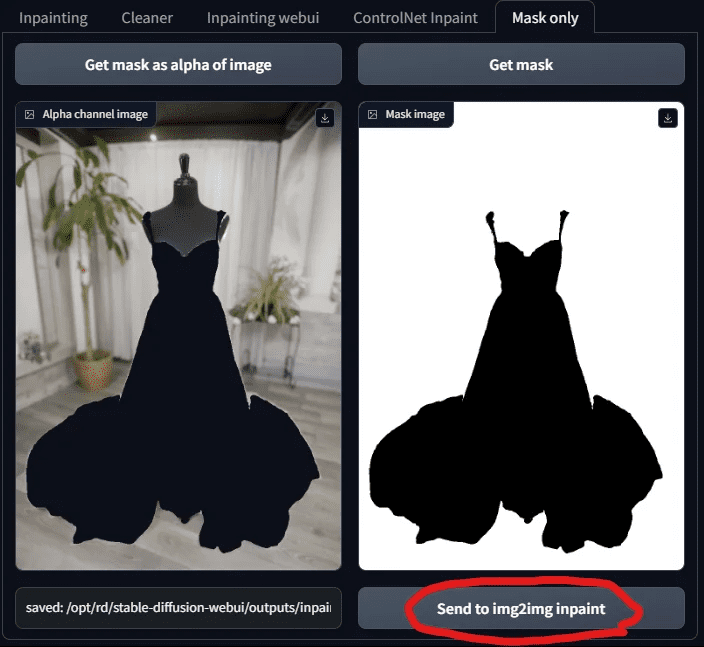
When you send the masked photo, you'll jump to the Inpaint Upload tab in Tupelo. You'll see that your image and mask have been sent over
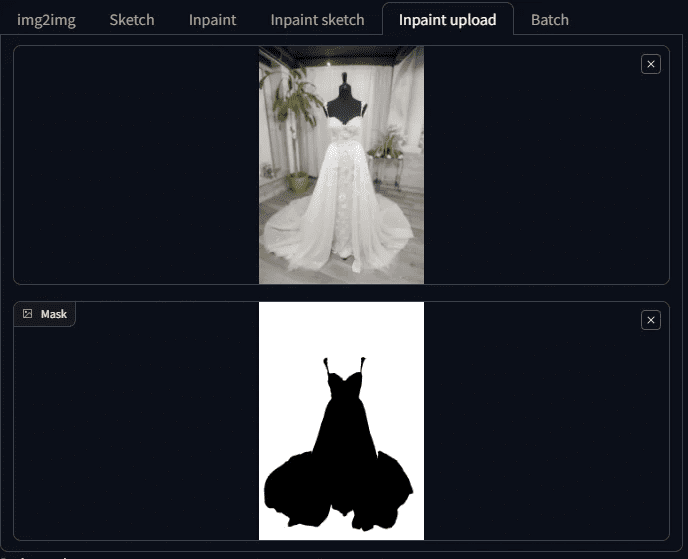
This is when people who are familiar with SD will be happy to be back in a familiar place and finally be able to pick their favorite model.
So let's pick a model! Here I pick chilloutmix.
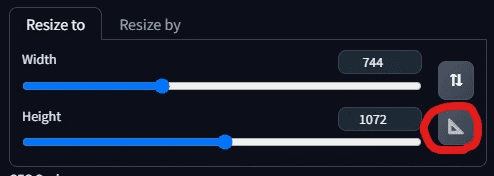
Then adjust the image size, after pressing the triangle board, the system automatically adjusts the width and height to the same as the photo, without us having to enter again.
Now to fill in the teleprompter, now we want to change it so that the beautiful woman is on the beach in her wedding dress, her hair is blowing gently in the breeze, and she is holding a bouquet of white roses. So let's change the teleprompter as follows:
A beautiful woman wearing a white wedding dress adorned with lace, walking along the
beach at sunset. Her hair is gently lifted by the breeze, and she is holding a bouquet of white roses. Dynamic pose, photography, masterpiece, best quality, 8K, HDR, highres, absurdres: 1.2,
Kodak portra 400, film grain, blurry background, bokeh: 1.2, lens flare
The reverse teleprompter remains unchanged:
Nsfw, ugly, paintings, sketches, (worst quality:2), (low quality:2), (normal quality:2), lowres
The sampler is a DPM++ 2 M Karras with the sampling step set to 40.
All other parameters are used as presets, as shown below:
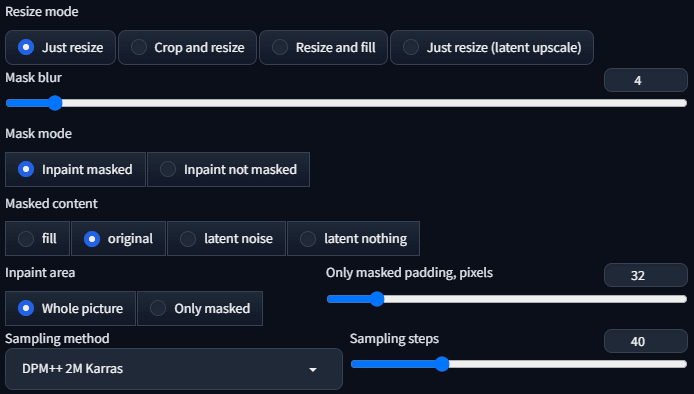
It should all be ready to generate now!
Strange things have appeared!
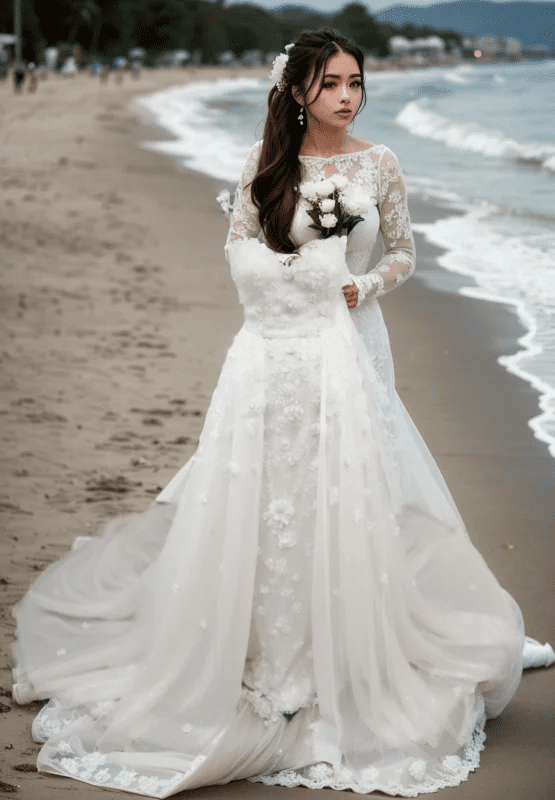
Why doesn't the AI-generated model change her clothes? The clothes look like they're floating in the air.
Is it the Masked content that needs to be adjusted? The current preset is original.

Let's change it to something else. Let's start with fill.
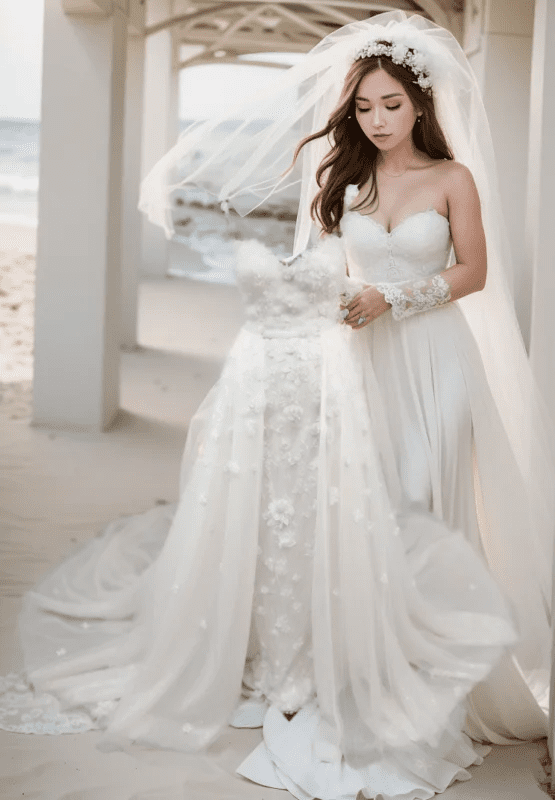
It's still not wearing well. Then turn it to latent noise and see.
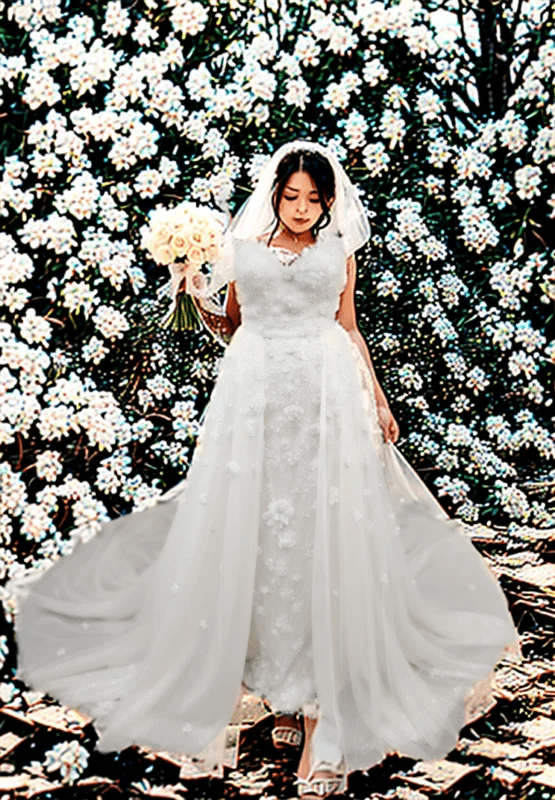
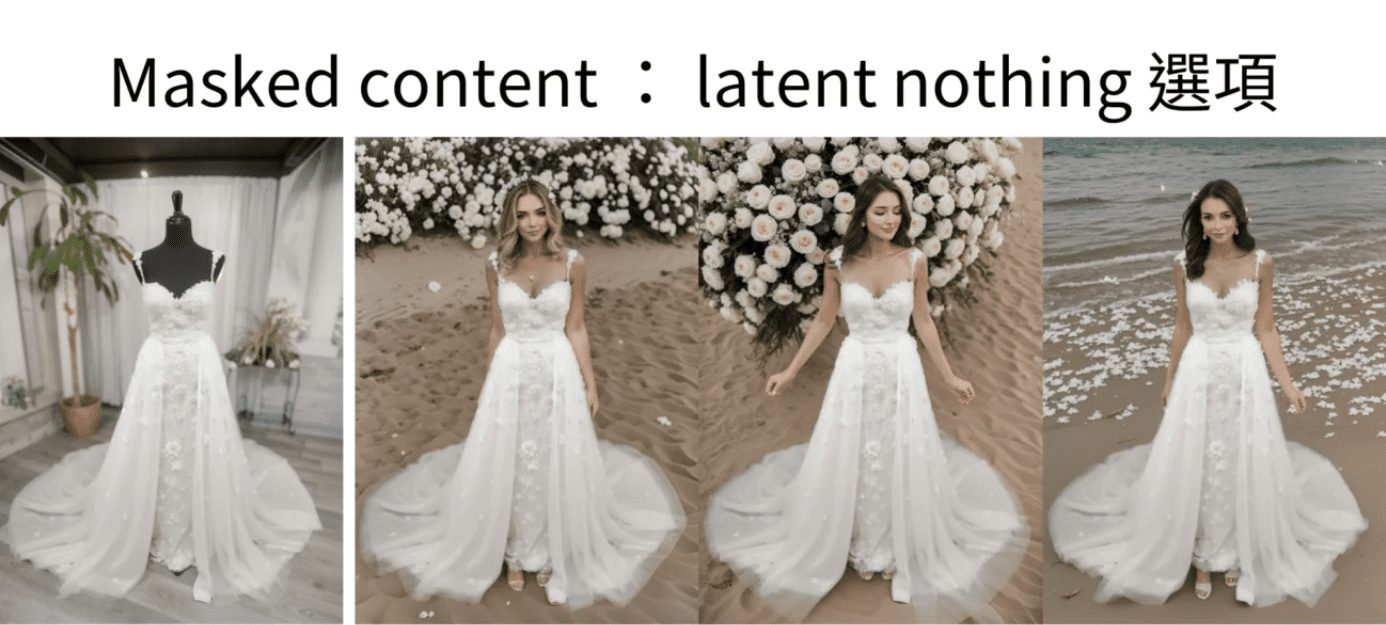
The picture is even weirder. So is it going to be latent nothing ?
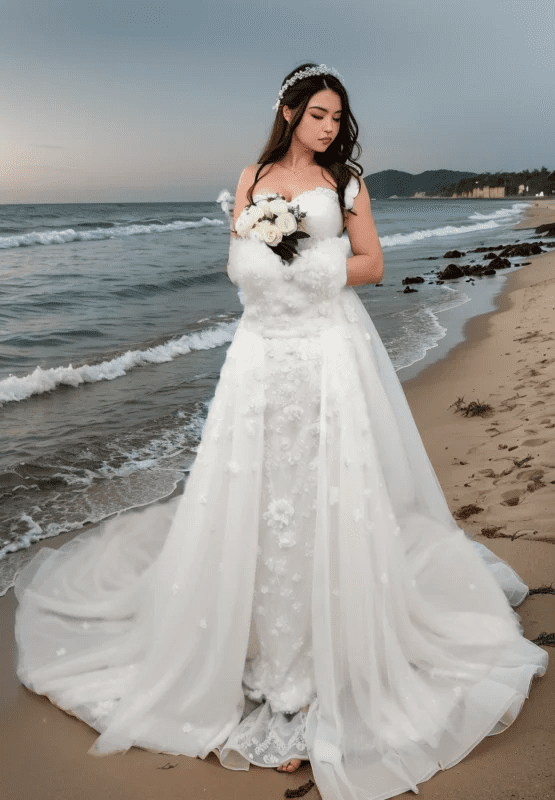
Just as undressed! What's going on here? Why do the clothes always stay on?
So over here we come to the conclusion... it's broken ....
Don't jump to conclusions yet, this is really about us picking the wrong model.
Step 8: Select epiCPhotoGasm Inpainting Model Repainting
The reason the clothes just don't always fit is simple, what we're doing is repainting, not purely generating, so we're going to use a model that's specifically designed to do repainting.
ChilloutMix is not the model to be used for repainting, so we're now going to use the previously downloaded epiCPhotoGasm_zinpainting instead.
Model.

With the model changed, let's start generating it. This should be fine now!
Let's look at the results:
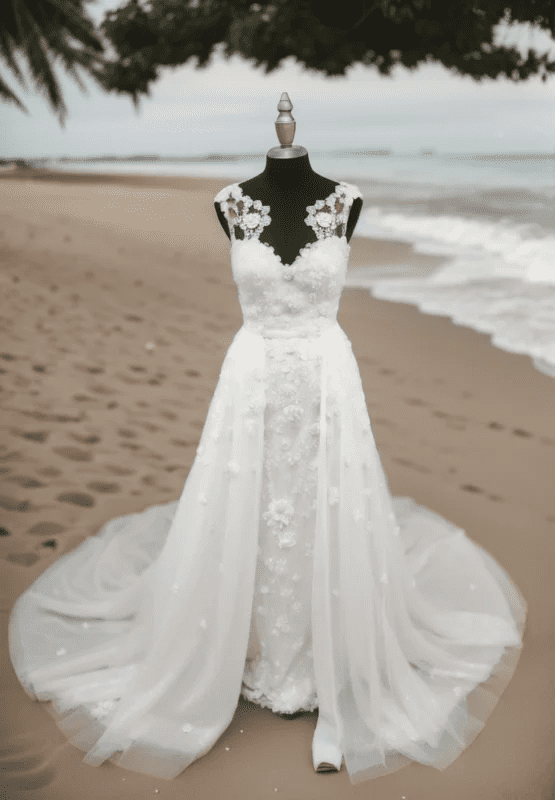
We got a dressed up...beautiful mannequin.
What's going on here? Just now the clothes were not put on, and now the person is gone, where is the promised beauty? Could it be bad luck, generate it again and see.
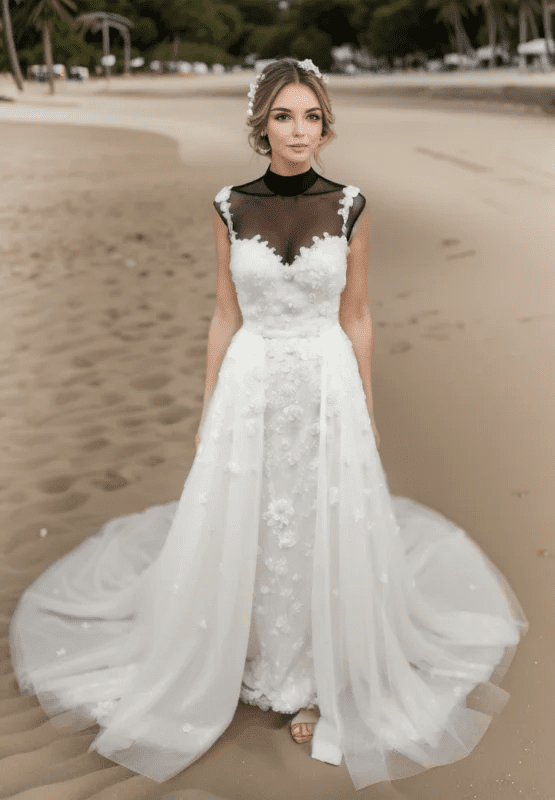
As a result, the beauty is there, but what's with the black cloth on his chest? We didn't ask for this piece of cloth!
The reason for this is because the current mask content parameter is original, which will refer to the structure and color of the original image when it is redrawn, that's why there are platforms and black cloths, as these are present on the original image. So how do we solve this problem?
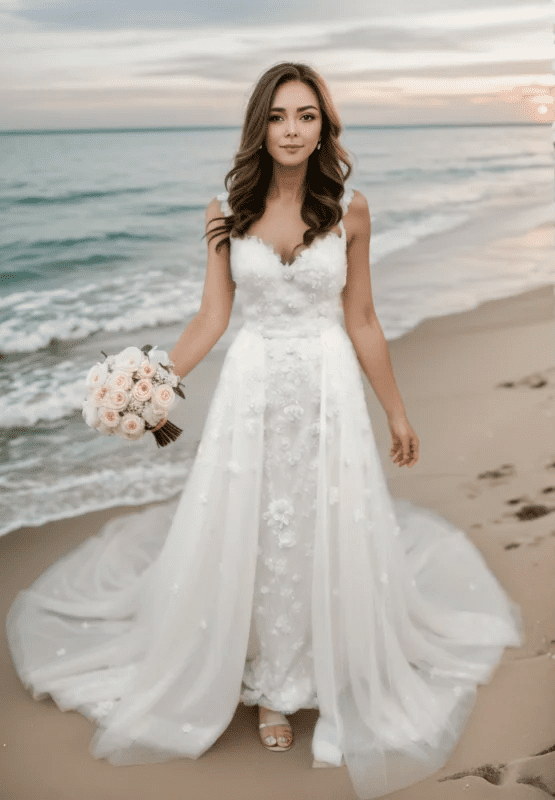
Simple, just change the parameter to something else, for example, let's change to fill , you will get a diagram like the one below.
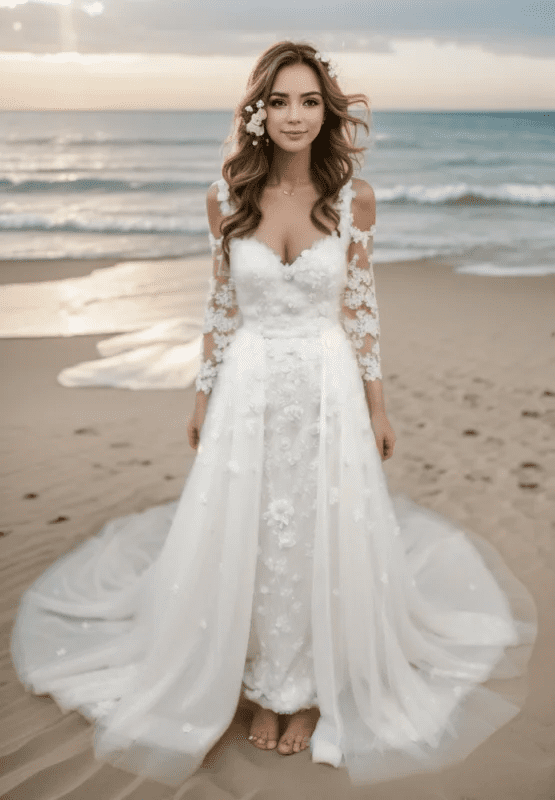
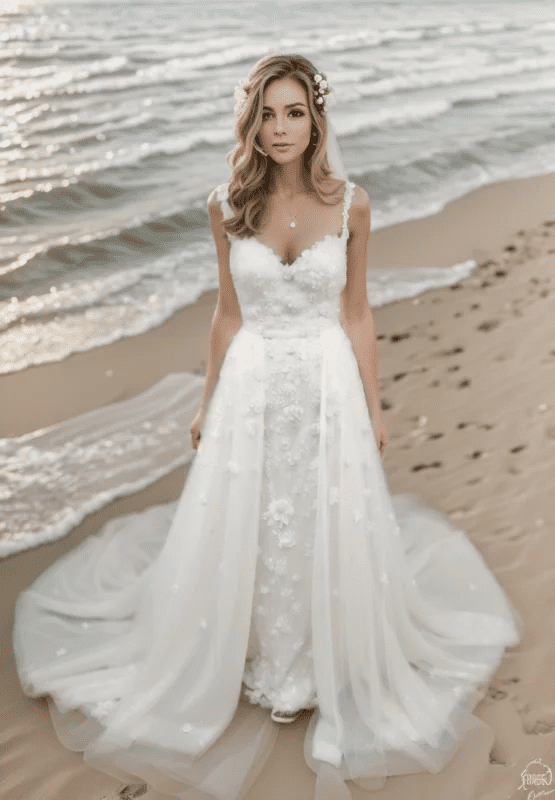
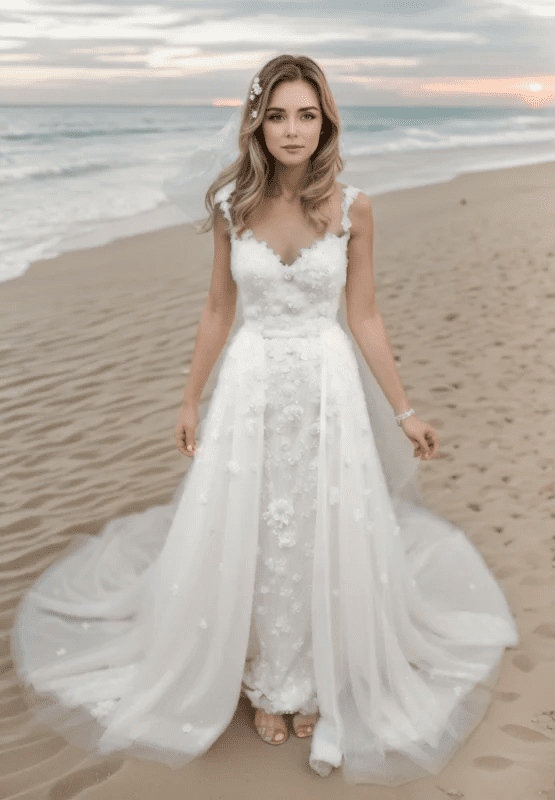
If latent noise is used, the result will look like the following
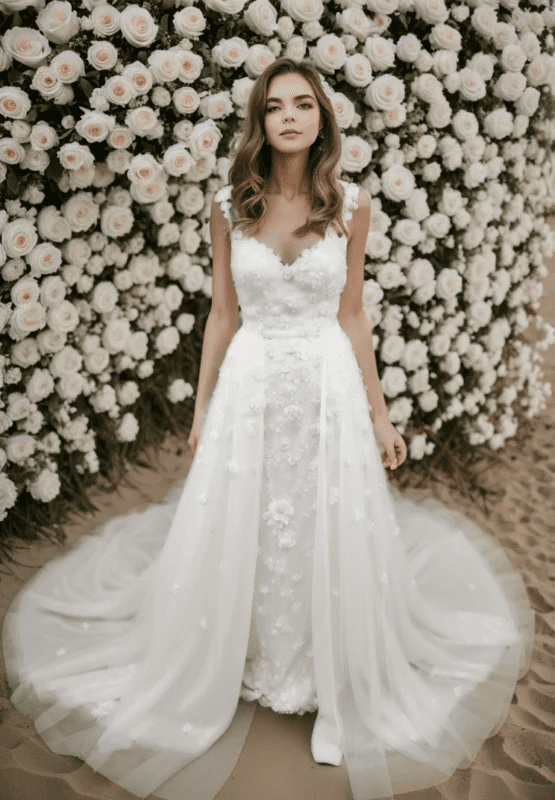
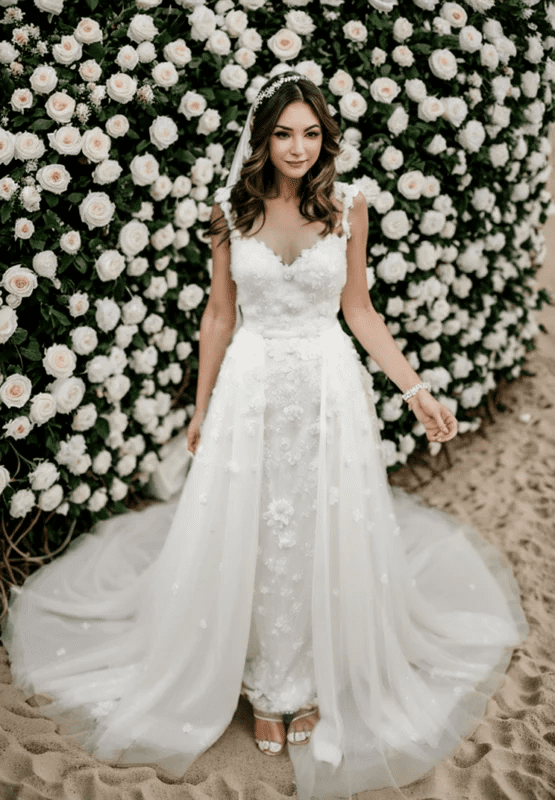
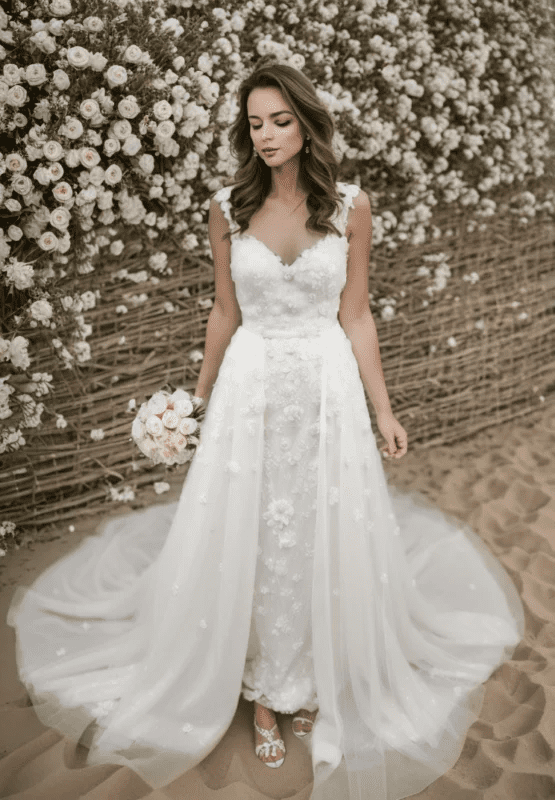
If latent nothing is used, then the
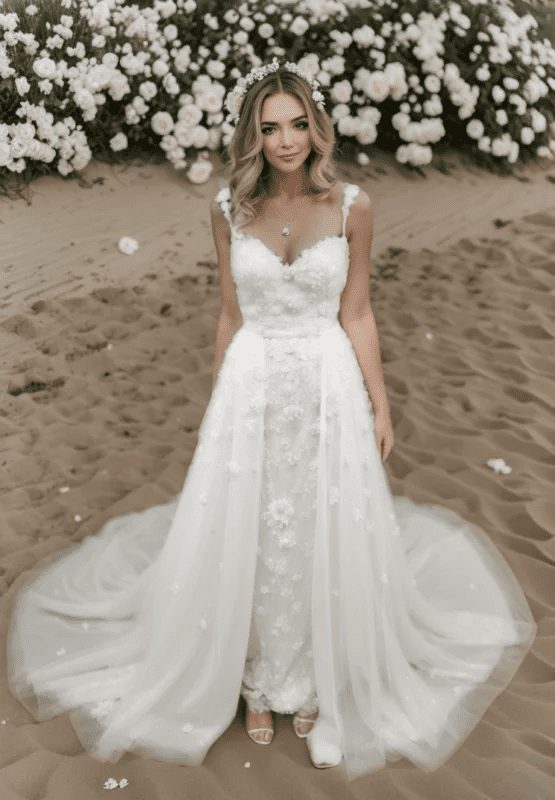
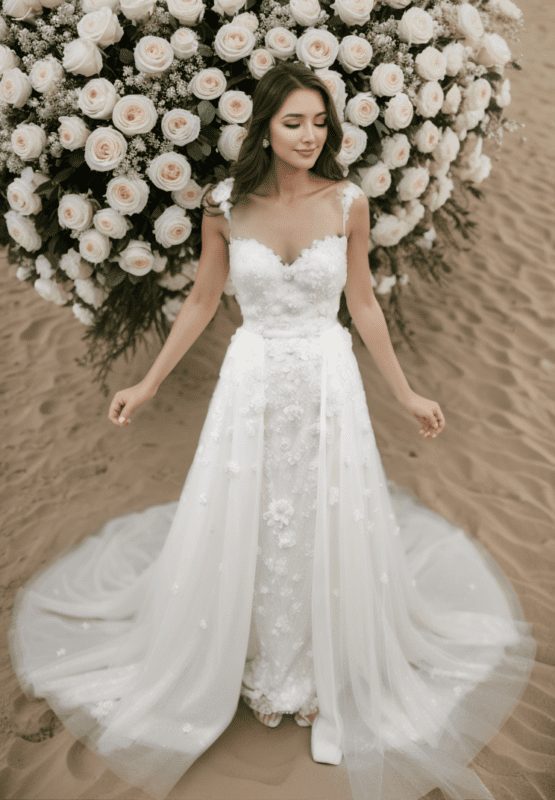
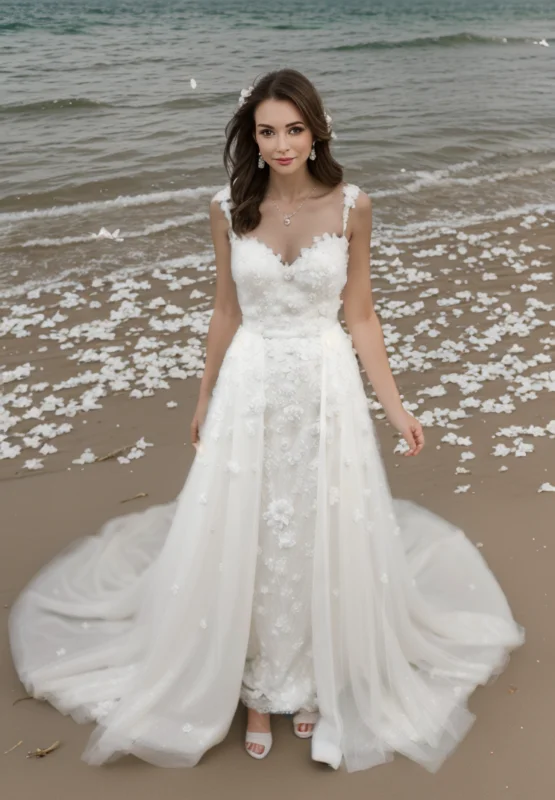
Isn't this a great picture? It's not even finely fine-tuned to have this kind of quality, it'll be better if it's optimized again, so what's the next step to optimize it?
IV. Frequently asked questions
Once you operate in this way, you may have some questions, one by one for you.
Question 1: What is instance partitioning?
Instance segmentation refers to the process of differentiating between things in a picture by labeling different things with different colors, with each color representing one thing.
This time it's all about splitting with examples to speed up the time it takes us to make a mask.
Question 2: Inpaint Anything has different Segment Anything Models, what is the difference?
The Segment Anything Model, also known as SAM, provides nine types of Inpaint Anything.
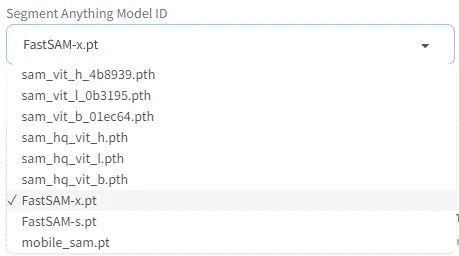
It can be divided into 4 categories, which we explain one by one.
Class 1: beginning with sam_vit - SAM model provided by Meta
The beginning of sam_vit is the model provided by meta. Since Meta named their semantic segmentation model Segment Anything Model, what we currently call SAM starts from here, and should be considered as the originator of this wave of SAM models.
This is a series of models announced by Meta in April 2023, and other SAM models will be compared to this series. There are 3 models, in terms of size, h (huge), l (large), b (base), huge > large > base, and the accuracy is theoretically proportional to the size, and the speed of computation is also proportional to the size.
In terms of effect, there is little difference between huge and large, but there is a significant difference between base and huge.
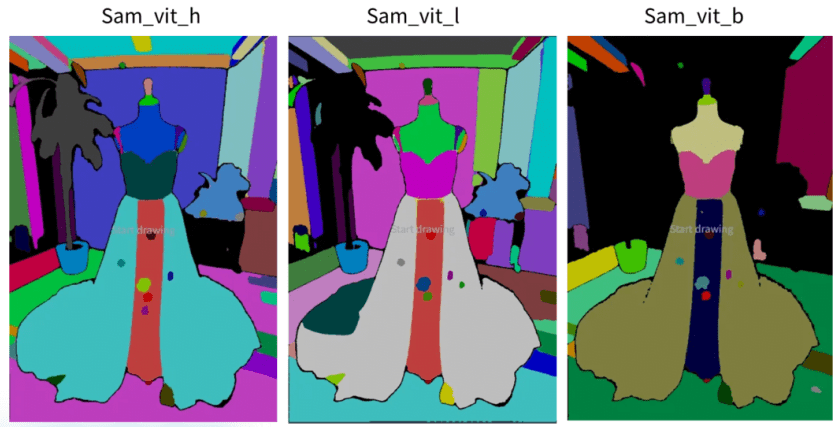
Meta SAM Reference:
https://segment-anything.com/
https://github.com/facebookresearch/segment-anything
https://huggingface.co/facebook/sam-vit-base/tree/main
https://huggingface.co/facebook/sam-vit-large
https://huggingface.co/facebook/sam-vit-huge
Class 2: sam_hq_vit - Segment Anything in High Quality series
The model starting with sam_hq_vit is a high-quality semantic segmentation model provided by the Visual Intelligence and Systems Group at ETH Zürich, and according to the data provided in their paper, their cutting accuracy is better than Meta, so it is called high quality. According to the data provided in their paper, the accuracy of their segmentation is better than Meta, so it is called high quality, although the segmented region is thinner than Meta, but the difference is not significant in our case.
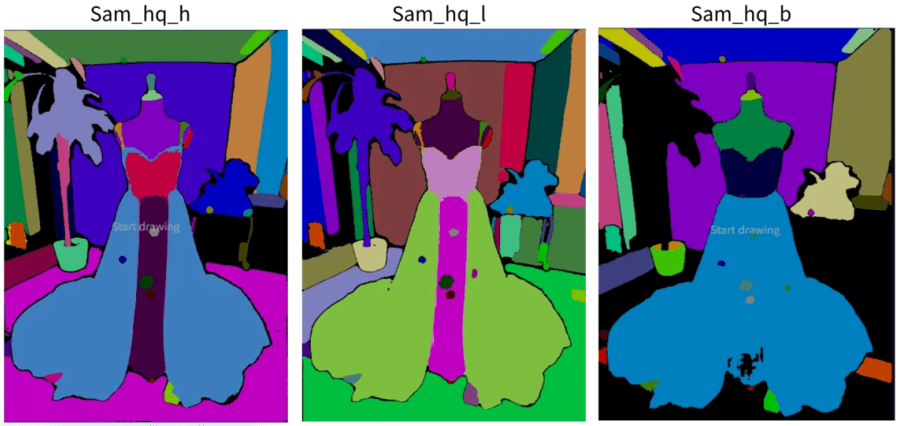
SAM HQ Reference:
https://github.com/SysCV/sam-hq
https://huggingface.co/lkeab/hq-sam/tree/main
Class 3: FastSAM Beginnings - FastSAM Series
For good results and to save some memory, you can use the FastSAM series, which is offered by CASIA-IVA-Lab (CASIA-IVA-Lab). I use this model myself on small VRAM machines.
It's available in 2 models, X and S.
The model X worked fine in our example of this wedding dress, but the S just didn't work for our example.
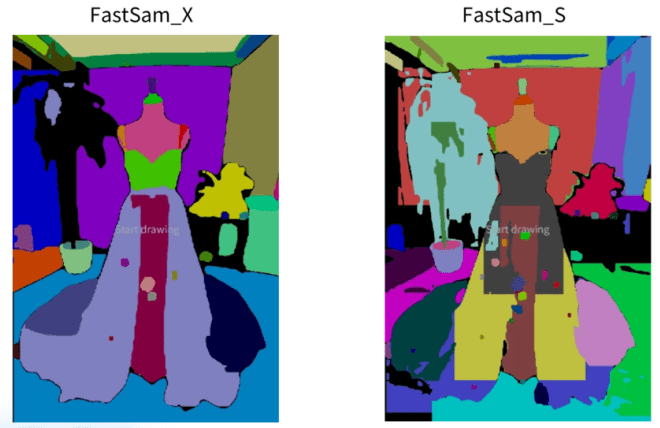
FastSAM information is provided below:
https://github.com/CASIA-IVA-Lab/FastSAM
https://huggingface.co/An-619/FastSAM
Category 4: Mobile SAM
Small and fast SAM , a SAM that can run fast even with a CPU. But, the effect is also one of the worst, only good for distinguishing large blocks of stuff.
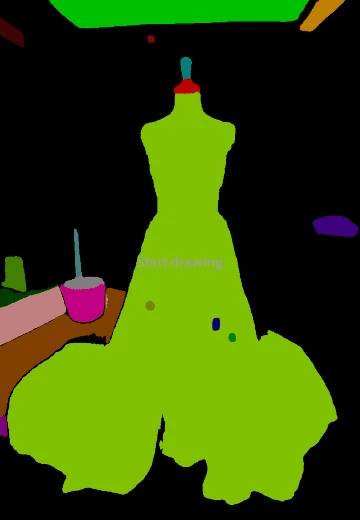
Mobile SAM Reference:
https://github.com/ChaoningZhang/MobileSAM
https://huggingface.co/dhkim2810/MobileSAM/tree/main
Question 3: What does Inpaint's Masked content parameter control?

There are four options for Masked content, described below:
Option 1: Fill
The fill option blurs the image of the redrawn area as much as possible, retaining only the general structure and colors. Therefore, it is used when large-scale repainting is required.
In our paradigm, the position of the sea level, the course of the sand difficulty, are all the same, even the color of the sunset is similar.
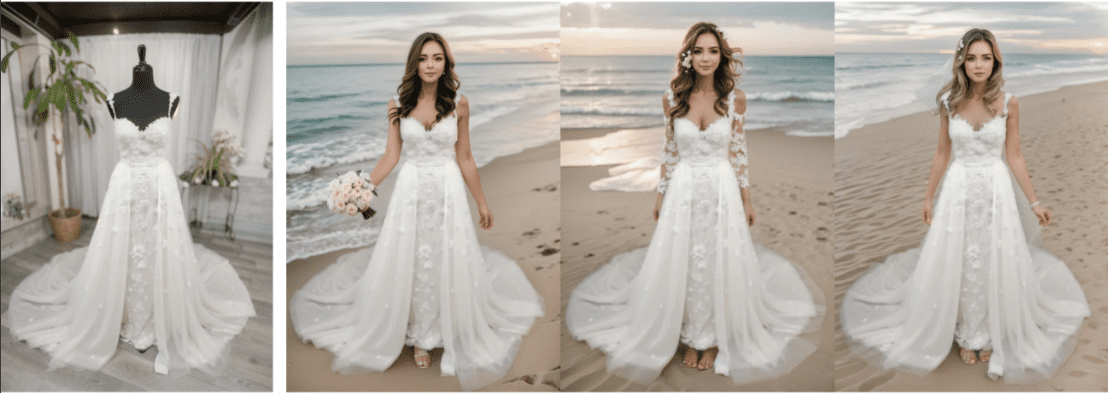
Option 2: Original
Original will refer to the original image, and the generated image will be very similar to the original image in terms of blocks, colors, and so on.
In our example, this option would leave the black part of the table and the beach orientation would remain.
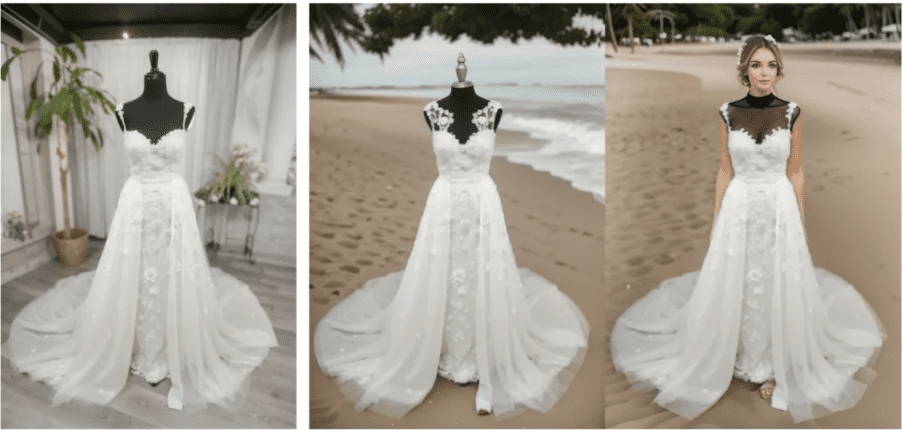
Option 3: Latent noise
Latent noise clutters up the part to be redrawn, making it easy to produce irrelevant content, and is used where creativity is required.
In our demonstration, you will notice that the image generated with latent noise will repeat the small thing mentioned in the prompt (e.g. white roses in our case).
Option 4: Latent nothing
Latent nothing refers to the colors near the area to be repainted, finds the average of the nearby colors, and fills in the repainted area. This is great for removing unwanted objects.
But in our example this time, it doesn't feel like there's removal of things because we're redrawing on a large scale. But if you observe the diagrams generated with latent nothing, you will see that their color schemes and compositions will be very similar, for example, the color of the sand is also very similar.
V. Review of extension issues
Let's review what we just did.
Simply put, there are 2 major steps:
- Masking with Inpaint Anything's semantic segmentation feature.
- This is then transferred to inpaint upload for graphic uploading and inpaint for specialized model repainting.
That alone would have made it as productive as it is today.
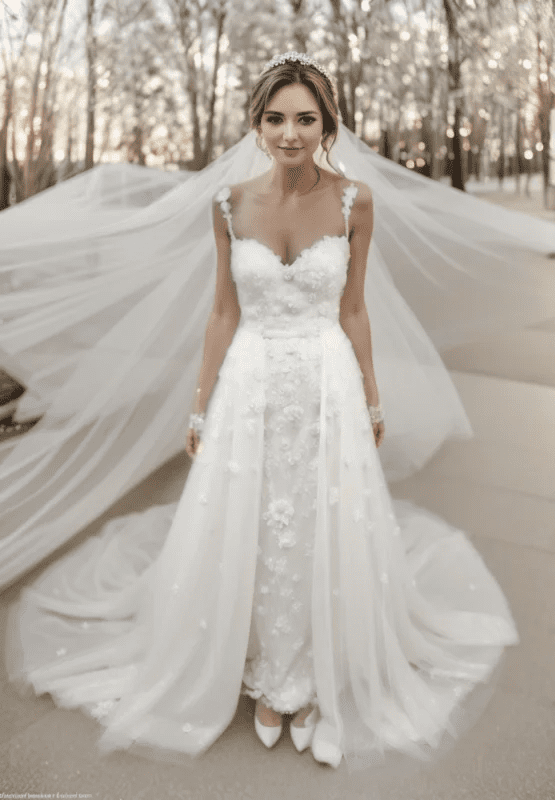

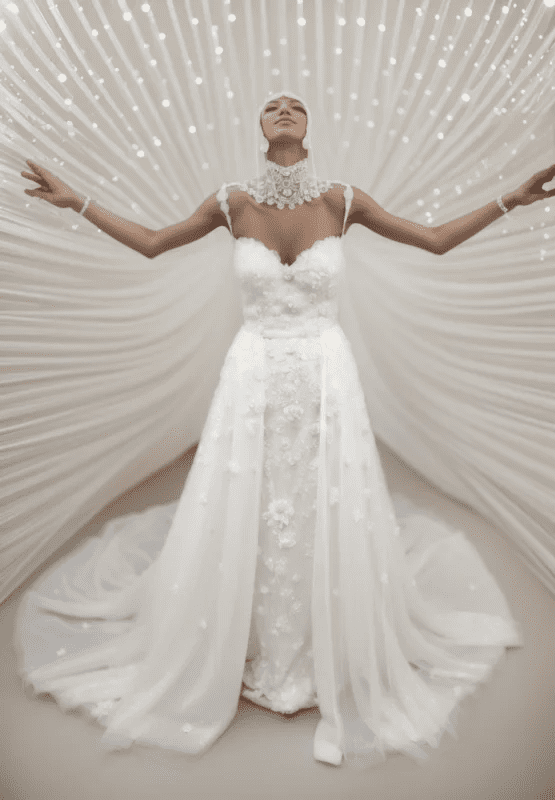

Everything could be better, and there would still be several problems with the current approach:
- What if the model I want doesn't have an inpaint model? Can I use a generic model?
- What do I have to do to change the light and shadow on my clothes?
- Sometimes it can feel like a photoshopped image, what do I need to do to make it more natural?
- How to generate richer images that aren't the ones made to look like these now.
© Copyright notes
Article copyright AI Sharing Circle All, please do not reproduce without permission.
Related posts

No comments...


