LiveTalking: open source real-time interactive digital human live system, to achieve synchronous audio and video dialogues
General Introduction
LiveTalking is an open source real-time interactive digital human system, dedicated to building high-quality digital human live solution. The project uses the Apache 2.0 open source protocol and integrates a number of cutting-edge technologies , including ER-NeRF rendering , real-time audio and video stream processing , lip synchronization and so on. The system supports real-time digital human rendering and interaction, and can be used for live broadcasting, online education, customer service and many other scenarios. The project has gained more than 4300 stars and 600 branches on GitHub, showing a strong community influence.LiveTalking pays special attention to real-time performance and interactive experience, and provides users with a complete digital human development framework by integrating AIGC technology. The project is continuously updated and maintained, and is supported by comprehensive documentation, making it an ideal choice for building digital person applications.

Function List
- Support for multiple digital human models:ernerf,musetalk,wav2lip,Ultralight-Digital-Human
- Synchronize audio and video conversations
- Support for sound cloning
- Pro-digital people speaking up and being interrupted
- Supports full-body video splicing
- Support for RTMP and WebRTC push streams
- Support for video scheduling: play customized videos when not speaking
- Supports multiple concurrency
Using Help
1.Installation process
- Environmental requirements : Ubuntu 20.04, Python 3.10, Pytorch 1.12, CUDA 11.3
- Installation of dependencies ::
conda create -n nerfstream python=3.10
conda activate nerfstream
conda install pytorch==1.12.1 torchvision==0.13.1 cudatoolkit=11.3 -c pytorch
pip install -r requirements.txt
If you don't train. ernerf model, the following libraries do not need to be installed:
pip install "git+https://github.com/facebookresearch/pytorch3d.git"
pip install tensorflow-gpu==2.8.0
pip install --upgrade "protobuf<=3.20.1"
2. Quick Start
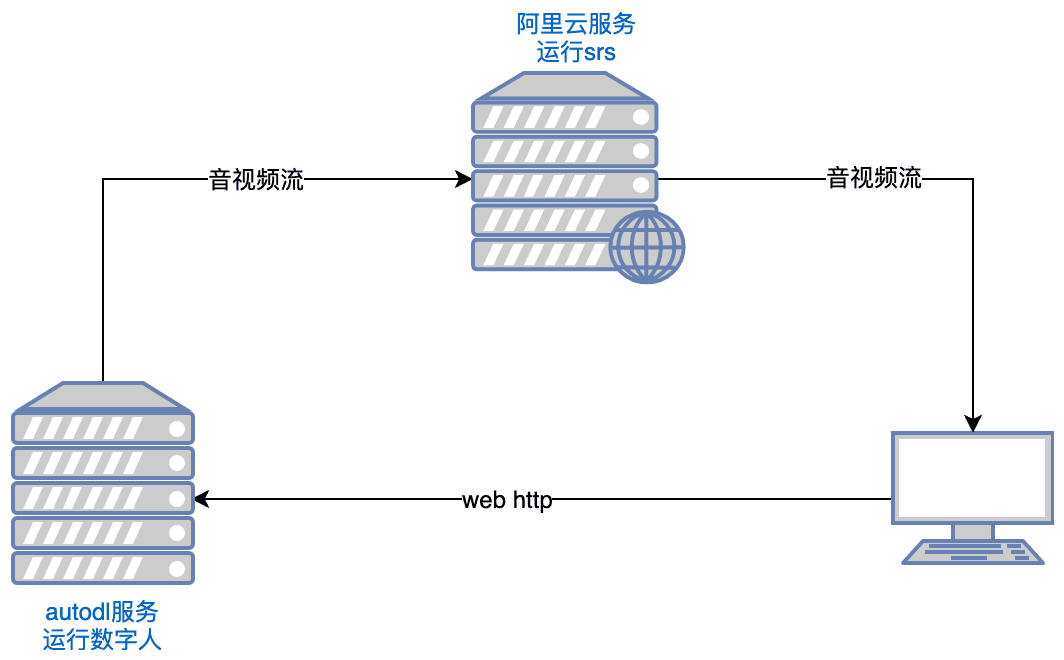
- Running SRS ::
export CANDIDATE='<服务器外网ip>'
docker run --rm --env CANDIDATE=$CANDIDATE -p 1935:1935 -p 8080:8080 -p 1985:1985 -p 8000:8000/udp registry.cn-hangzhou.aliyuncs.com/ossrs/srs:5 objs/srs -c conf/rtc.conf
Note: The server needs to open ports tcp:8000,8010,1985; udp:8000
- Launching Digital People ::
python app.py
If you can't access Huggingface, execute it before running:
export HF_ENDPOINT=https://hf-mirror.com
Open with your browser http://serverip:8010/rtcpushapi.html, enter any text in the text box, submit it, and the digital person will broadcast the passage.
More instructions for use
- Docker running : No need for the previous installation, just run it:
docker run --gpus all -it --network=host --rm registry.cn-beijing.aliyuncs.com/codewithgpu2/lipku-metahuman-stream:vjo1Y6NJ3N
The code is in the /root/metahuman-streamprior git pull Pull the latest code, then execute the command as in steps 2 and 3.
- Mirror use ::
- autodl image:autodl tutorial
- ucloud mirrors:ucloud Tutorial
- common problems : You can refer to this article for the Linux CUDA environment setup:reference article
3. Configuration instructions
- System Configuration
- Edit the config.yaml file to set the basic parameters
- Configuring cameras and audio devices
- Setting AI model parameters and paths
- Configuring Live Push Streaming Parameters
- Digital human model preparation
- Support for importing custom 3D models
- Pre-built example models can be used
- Supports MetaHuman model import
Main Functions
- Real-time audio and video synchronized conversation::
- Select Digitizer Model: Select the appropriate digitizer model (e.g. ernerf, musetalk, etc.) in the configuration page.
- Selection of audio/video transmission method: Select the appropriate audio/video transmission method (e.g. WebRTC, RTMP, etc.) according to the requirements.
- Start a conversation: Start the audio/video transmission to realize real-time audio/video synchronous conversation.
- Digital human model switching::
- Enter the Setup Page: In the Project Run page, click the Setup button to enter the Setup page.
- Select New Model: Select a new Digimon model in the Settings page and save the settings.
- Restart Project: restarts the project to apply the new model configuration.
- Audio and video parameter adjustment::
- Enter the parameter setting page: In the project running page, click the parameter setting button to enter the parameter setting page.
- Adjustment parameters: Adjust audio and video parameters (e.g., resolution, frame rate, etc.) as required.
- Save and Apply: Saves the settings and applies the new parameter configuration.
© Copyright notes
Article copyright AI Sharing Circle All, please do not reproduce without permission.
Related posts

No comments...


