Excel AI: AI intelligent function plug-ins, to achieve data extraction, batch conversion, formula generation, data analysis
General Introduction
Excel AI is an Excel plug-in based on artificial intelligence technology, the unique AI function can automatically fill all kinds of functions according to the user description. Designed to enhance the efficiency of data processing through intelligent functions and automation tools. Users can use the plug-in to achieve data extraction, conversion, formula generation and data analysis functions, thereby simplifying the complexity of Excel operations, improve work efficiency.
Excel AI latest version:
for Windows 10+ / for Microsoft Excel 2013+
32-bit:release v1.9.0
64-bit:release v1.9.0
64-bit download, there may be antivirus software misreporting intercept, if you trust the security of this plug-in, you can temporarily turn off the antivirus software!
for Windows 10+ / for WPS Personal Edition
release v1.9.0
Excel AI Accelerated Download:
release v1.9.0 for Excel
release v1.9.0 for WPS
Excel AI error fixing
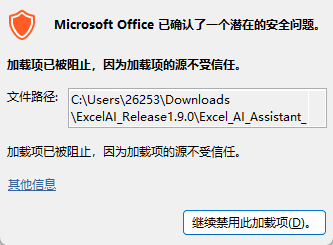
Since Windows may mark files downloaded from the Internet as "blocked", you can follow the steps below to unblock them:
- Steps:
- Find the file:
C:\***\Excel_AI_Assistant_64.XLLThe - Right-click on the file and select "Properties".
- At the bottom of the Properties window, look for the message "This file came from another computer and may be blocked to help protect this computer".
- Check the "Unblock" box.
- Click "OK" to save.
- Find the file:
Setting the trust of Excel add-ins
Office's Trust Center may restrict unknown add-ons. Here is how to set the trust:
- Steps:
- Open Excel.
- strike (on the keyboard) File → Options → Trust Center → Trust Center SettingsThe
- In the Trust Center Settings:
- add-in: Enable the "Disabled add-ons" checkbox.
- A position of trust: Add folder
C:\***\ExcelAI_Release1.9.0for a position of trust. - Macro Settings: Enable macros as needed (we recommend selecting "Notify to enable macros").
- Click "OK" to save the settings.
Loading XLL files manually
If Excel does not load the XLL file automatically, you can try loading it manually:
- Steps:
- Open Excel.
- strike (on the keyboard) Development Tools → Add-onsThe
- If the Developer Tools tab is not displayed:
- show (a ticket) File → Options → Customize RibbonIf you want to use a development tool, check the "Development Tools" box.
- If the Developer Tools tab is not displayed:
- In the Add-ons window, click skim overThe
- Navigate to
C:\***\ExcelAI_Release1.9.0SelectionExcel_AI_Assistant_64.XLLDocumentation. - Click "OK".
Enable macro support (if required)
If the add-in relies on macro functionality, you need to make sure that Excel has macro support enabled:
- Steps:
- show (a ticket) File → Options → Trust Center → Trust Center SettingsThe
- In "Macro Settings":
- Check "Enable all macros (not recommended, may have dangerous code)" to test if it works.
- Or select "Notify to enable macros".
- Click "OK" to save the settings.
Function List
- Formula module: intelligent function, intelligent question formula, formula interpretation, formula corrections
- Data Module: Smart Question Conversion Formula (Smart Exchange Formula), Smart Conversion Data (Smart Exchange Data), Data Analysis, Data Generation
- Charting module: data charts (new in version 1.6.0)
- Programming modules: Smart Ask Code, Customized Code Library*
- Inspiration Module: Q&A*, Image Generation (new in version 1.7.1), Mind Mapping, Smart Translation
- Dialog module: autonomous dialog, web mode, mobile mode
- Account Module: Login*, Personal Center*, Free Dosage*, Account Top-up*, Sharing Plan*, Logout*
1, Intelligent Functions
Intelligent functions can be used to achieve intelligent associative, batch data extraction, data conversion or data query in the form of function formulas.
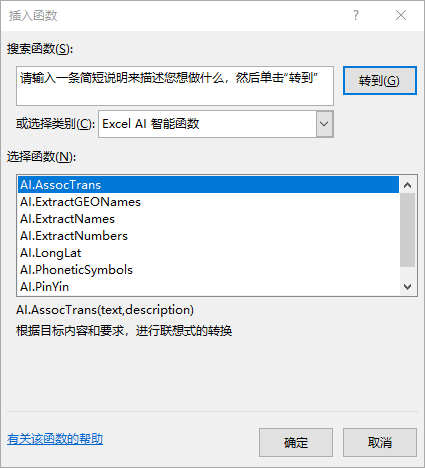
This add-in in your Excel built in a group of "AI" as the prefix of the intelligent function. From Excel's built-in [Insert Function] dialog box, select the function category for the [Excel AI Intelligent Functions], you can find these functions, such as those shown in the figure below:

Excel AI Intelligent Functions
These smart functions include:
AI.AssocTrans
Associative query conversion based on target content and conversion requirements.
This function has a very wide range of application scenarios, you can extract text content, you can query public information, you can convert latitude and longitude, you can even translate text and so on. Use your imagination, this function will be able to play a huge role.
Example:=AI.AssocTrans("澳大利亚","首都")
Results:堪培拉
Example:=AI.AssocTrans("人工智能","翻译为英文")
Results:Artificial Intelligence
AI.ExtractGEONames
Extract the place names from the text information. If there are more than one place name in the result, the default interval is a semicolon, and the second parameter can be used to specify the number of the place name to be returned.
Example:=AI.ExtractGEONames("上海市静安区愚园路433弄")
Results:上海市;静安区;愚园路;433弄
Or:=AI.ExtractGEONames("上海市静安区愚园路433弄",3)
Results:愚园路
AI.ExtractNames
Extracts the name of a person from the text. If there are more than one name in the result, the default interval is a semicolon, you can use the second parameter to specify the number of names to be returned.
Example:=AI.ExtractNames("李强去公司找王刚,遇到保安刘涛阻拦,幸好张力来解围")
Results:李强;王刚;刘涛;张力
Or:=AI.ExtractNames("李强去公司找王刚,遇到保安刘涛阻拦,幸好张力来解围",3)
Results:刘涛
AI.ExtractNumbers
Extracts numbers from text messages. If the result has more than one number, the default interval is a semicolon, you can use the second parameter to specify the number of numbers to be returned.
Example:=AI.ExtractNumbers("今天是减肥的第53天,我的体重从76.8公斤降到了62.3公斤")
Results:53;76.8;62.3
Or:=AI.ExtractNumbers("今天是减肥的第53天,我的体重从76.8公斤降到了62.3公斤",2)
Results:76.8
AI.LongLat
Obtains latitude and longitude information based on the destination address. A second parameter may be used to specify that only longitude or latitude is to be returned.
Example:=AI.LongLat("上海市人民广场")
Results:经度:121.47370, 纬度:31.23037
Or:=AI.LongLat("上海市人民广场","long")
Results:121.47370
Or:=AI.LongLat("上海市人民广场","lat")
Results:31.23037
AI.PhoneticSymbols
Convert English words to the International Phonetic Alphabet.
Example:=AI.PhoneticSymbols("Wonderful")
Results:/ˈwʌndəfəl/
AI.PinYin
Converts Chinese characters to Pinyin letters.
Example:=AI.PinYin("人工智能")
Results:rén gōng zhì néng
AI.ProvinceofCity
Get the name of the province in which the city is located based on its name or address information.
Example:=AI.ProvinceofCity("苏州")
Results:江苏省
Or:=AI.ProvinceofCity("姑苏区东北街178号")
Results:江苏省
Operation Demonstration
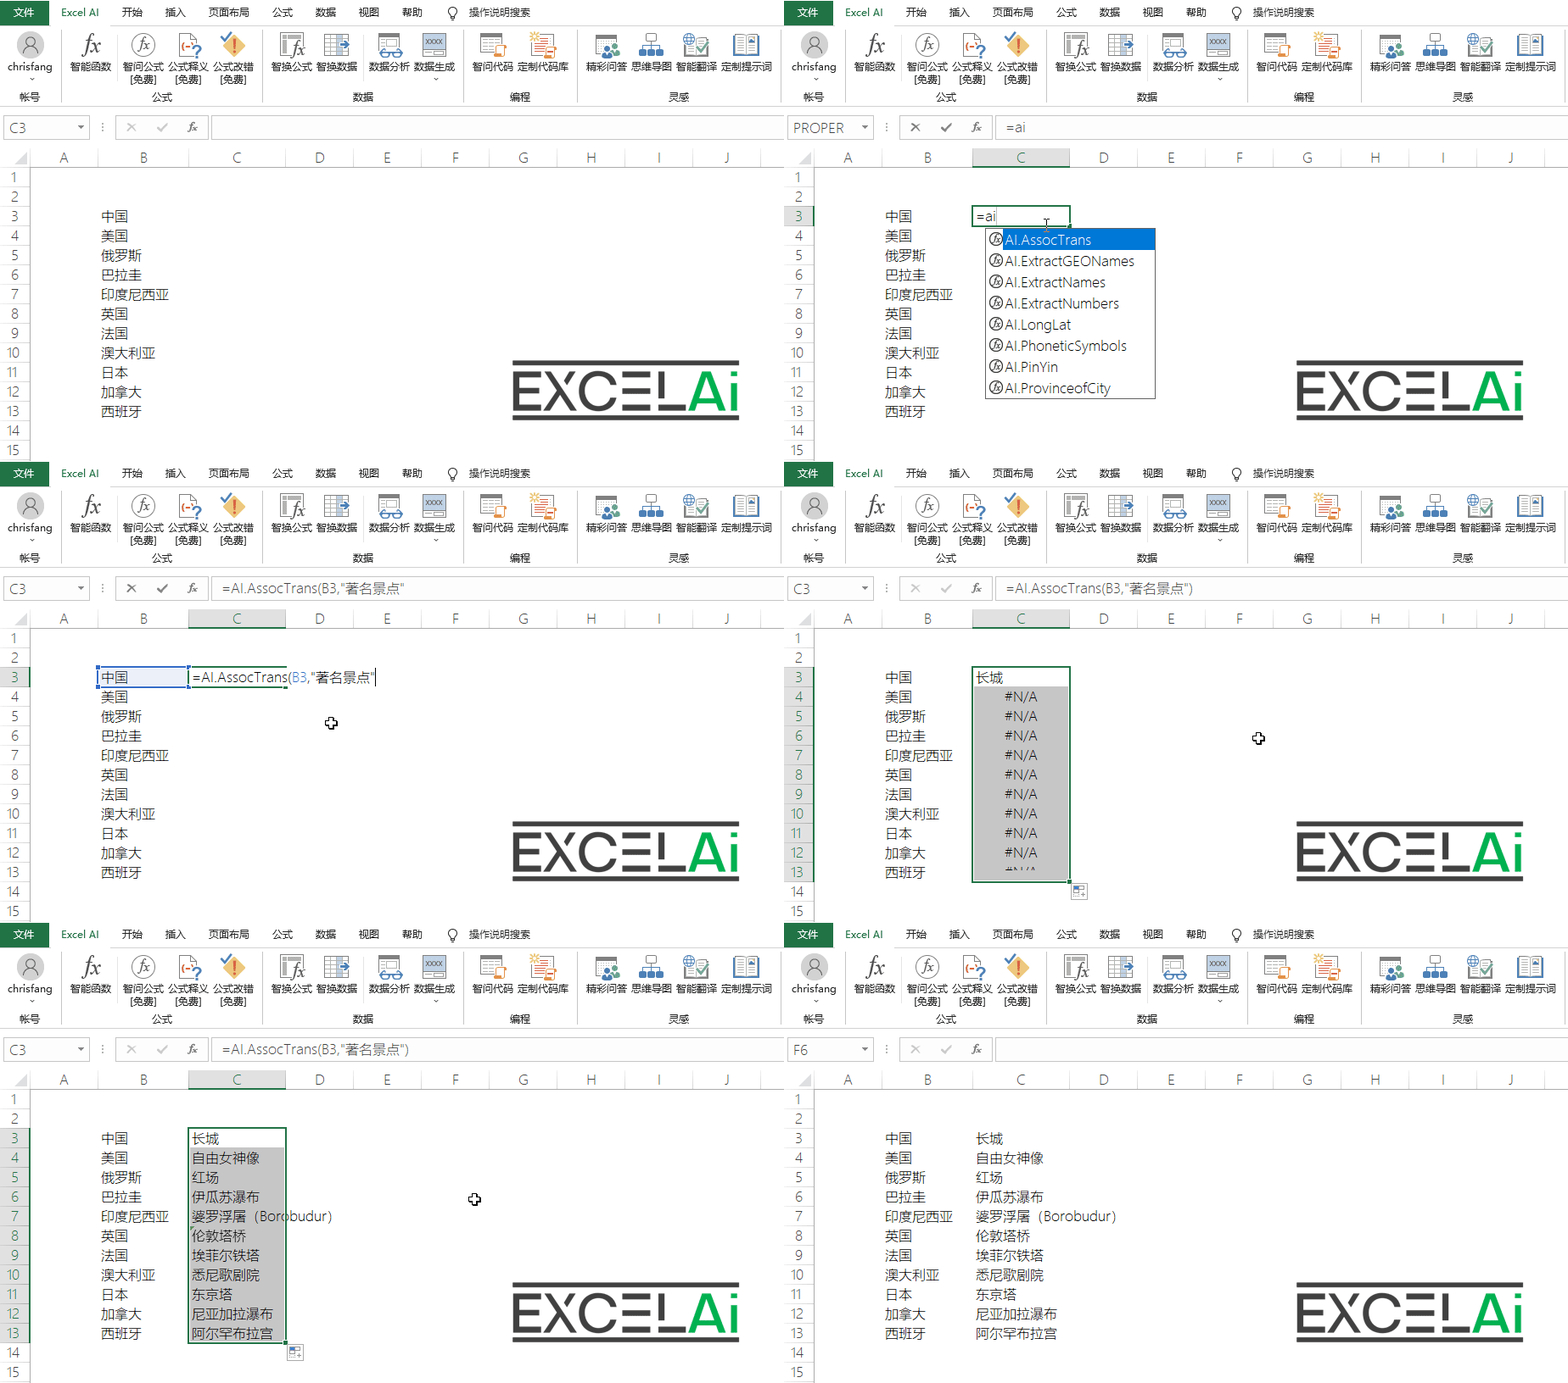 AI.AssocTrans function
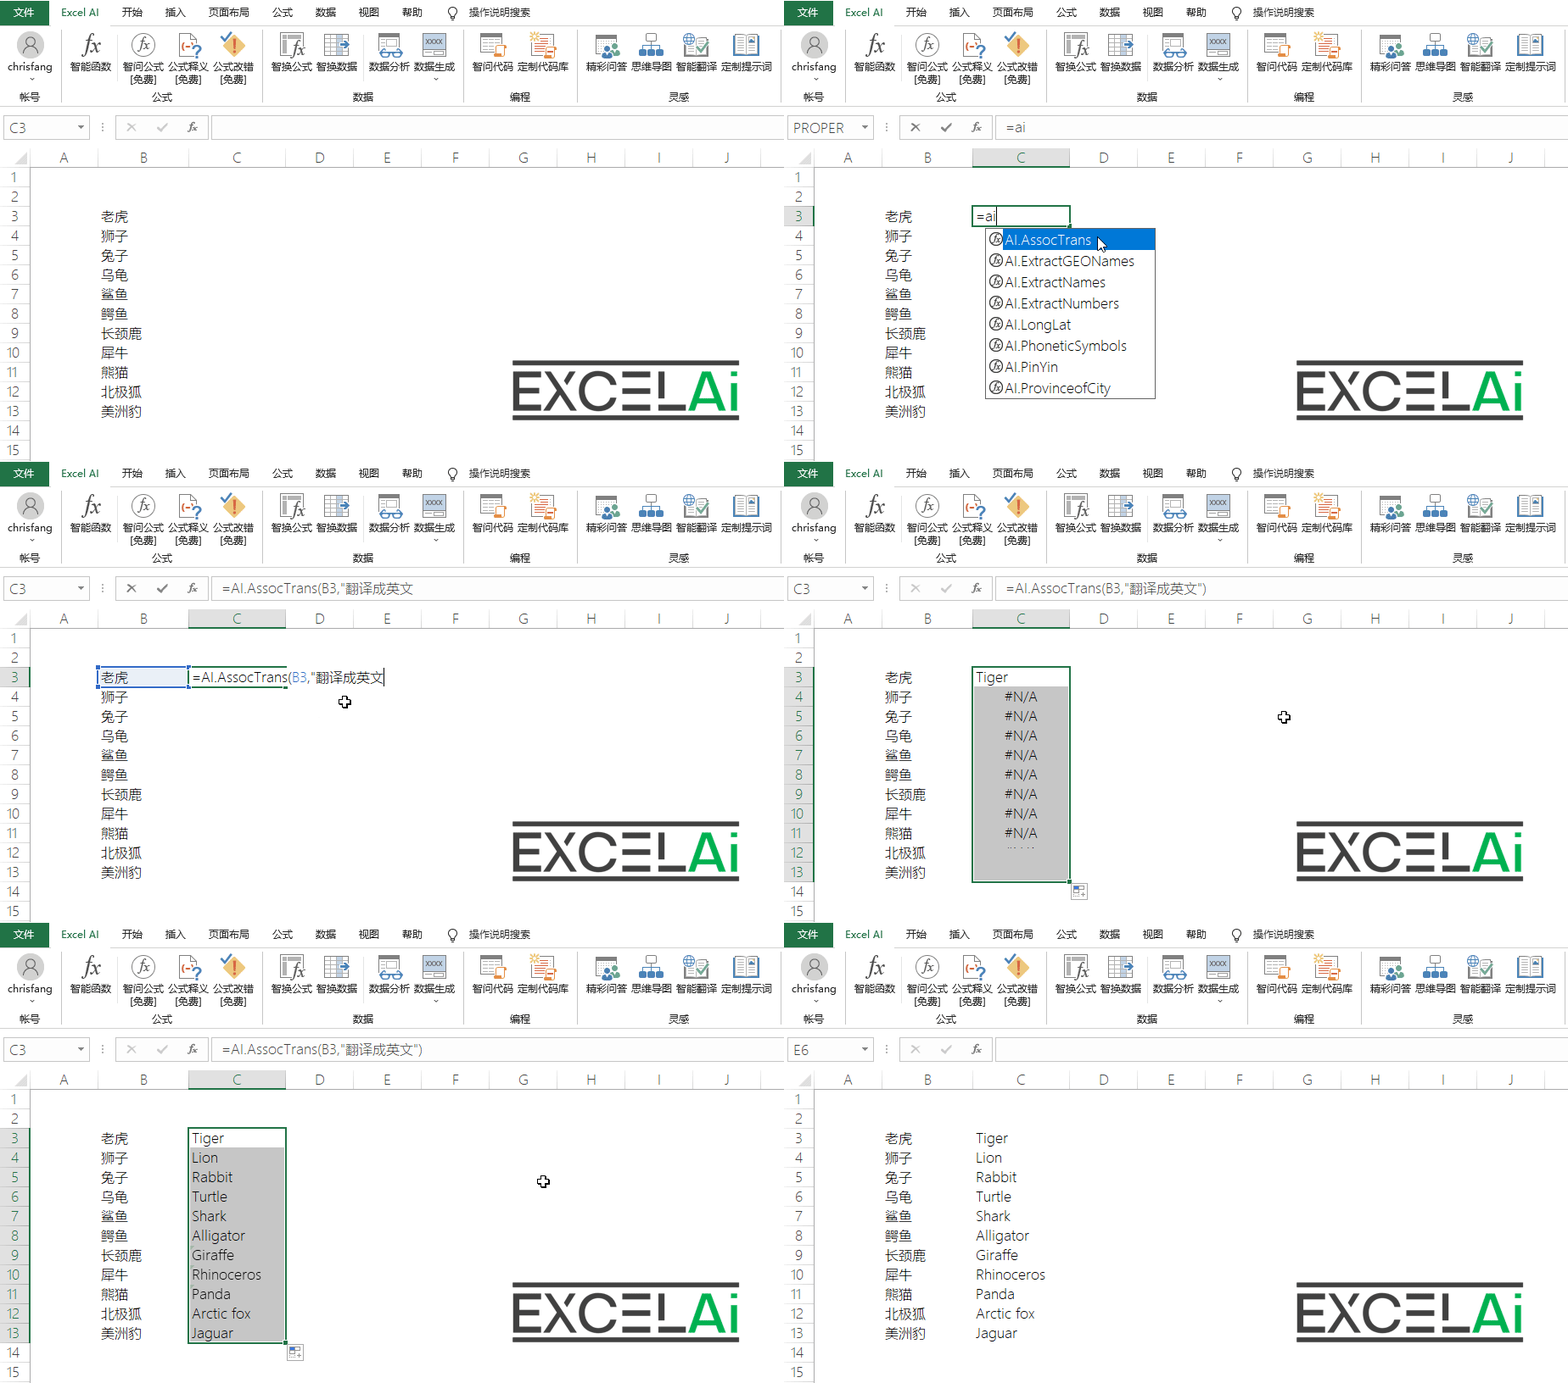 AI.AssocTrans function
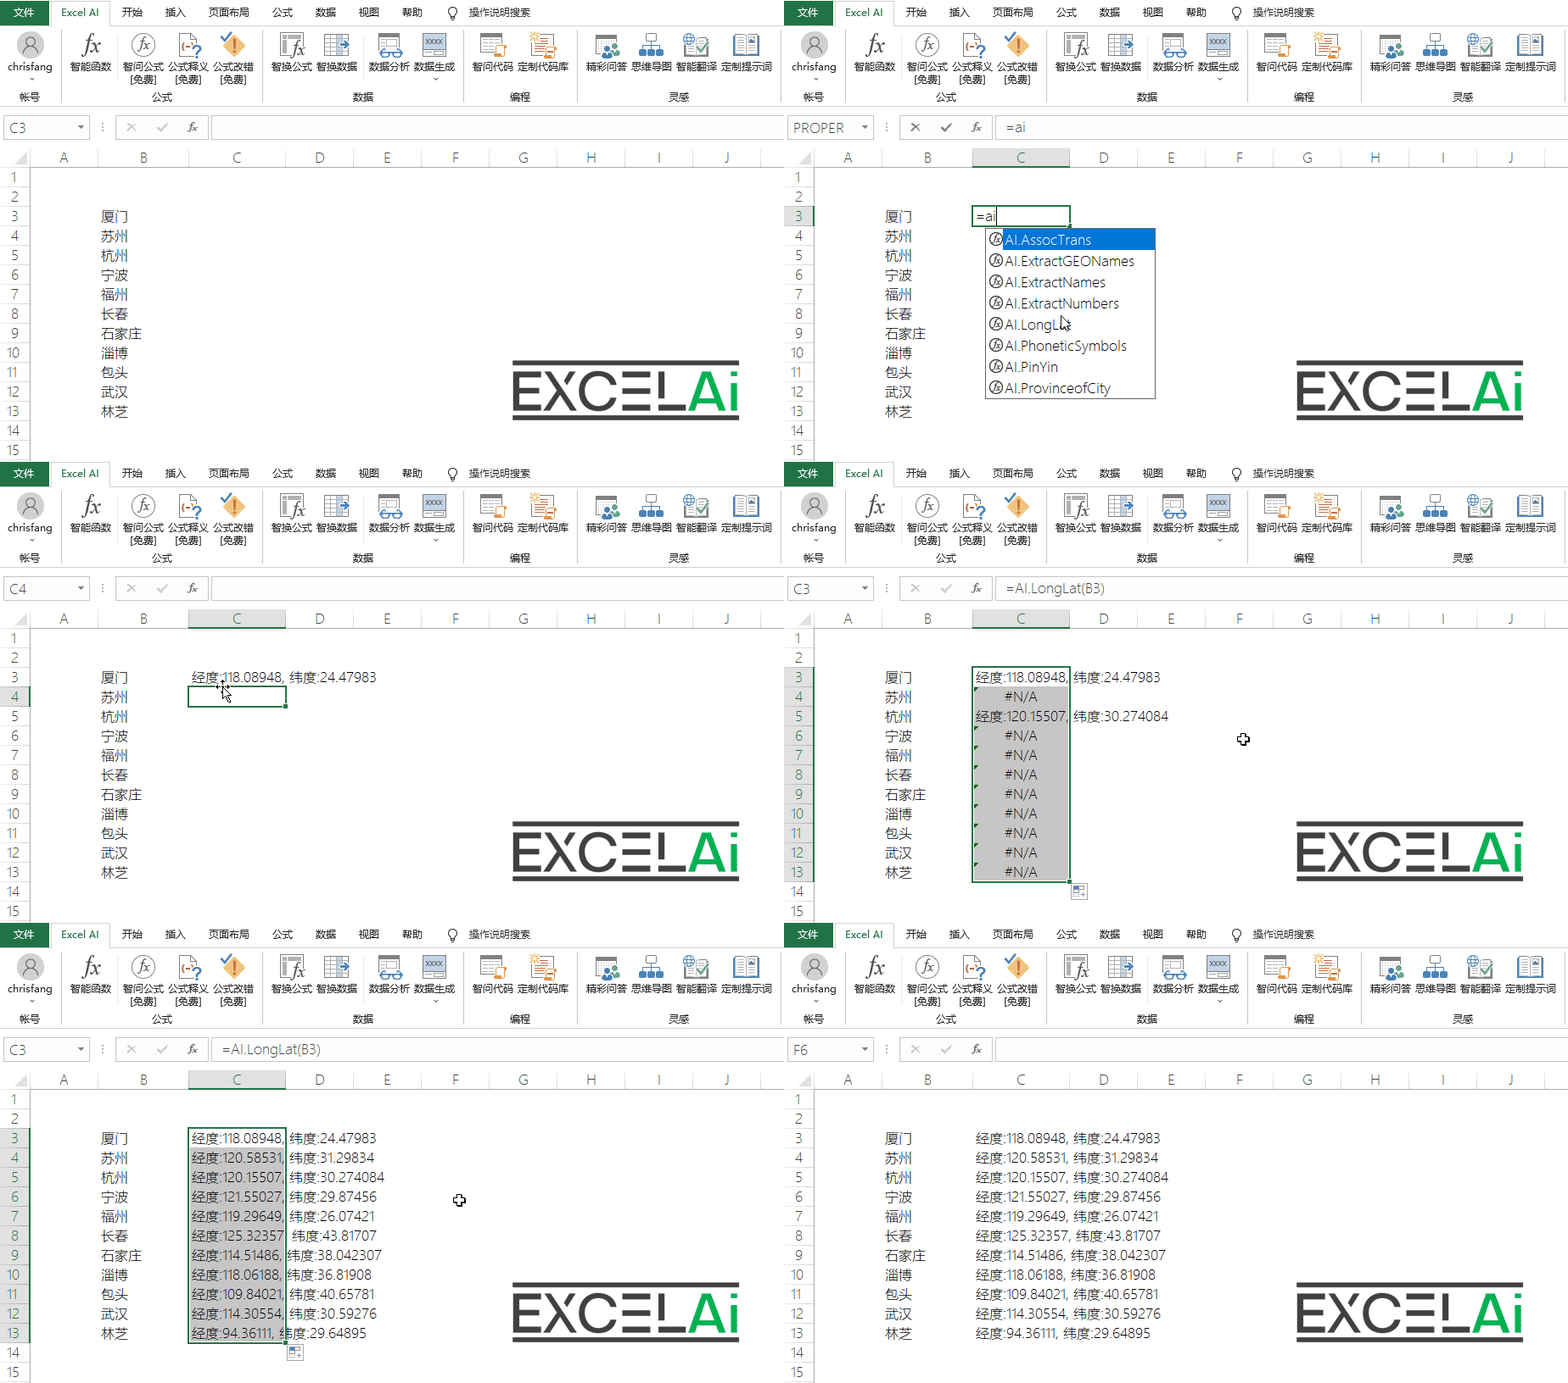 AI.LongLat function
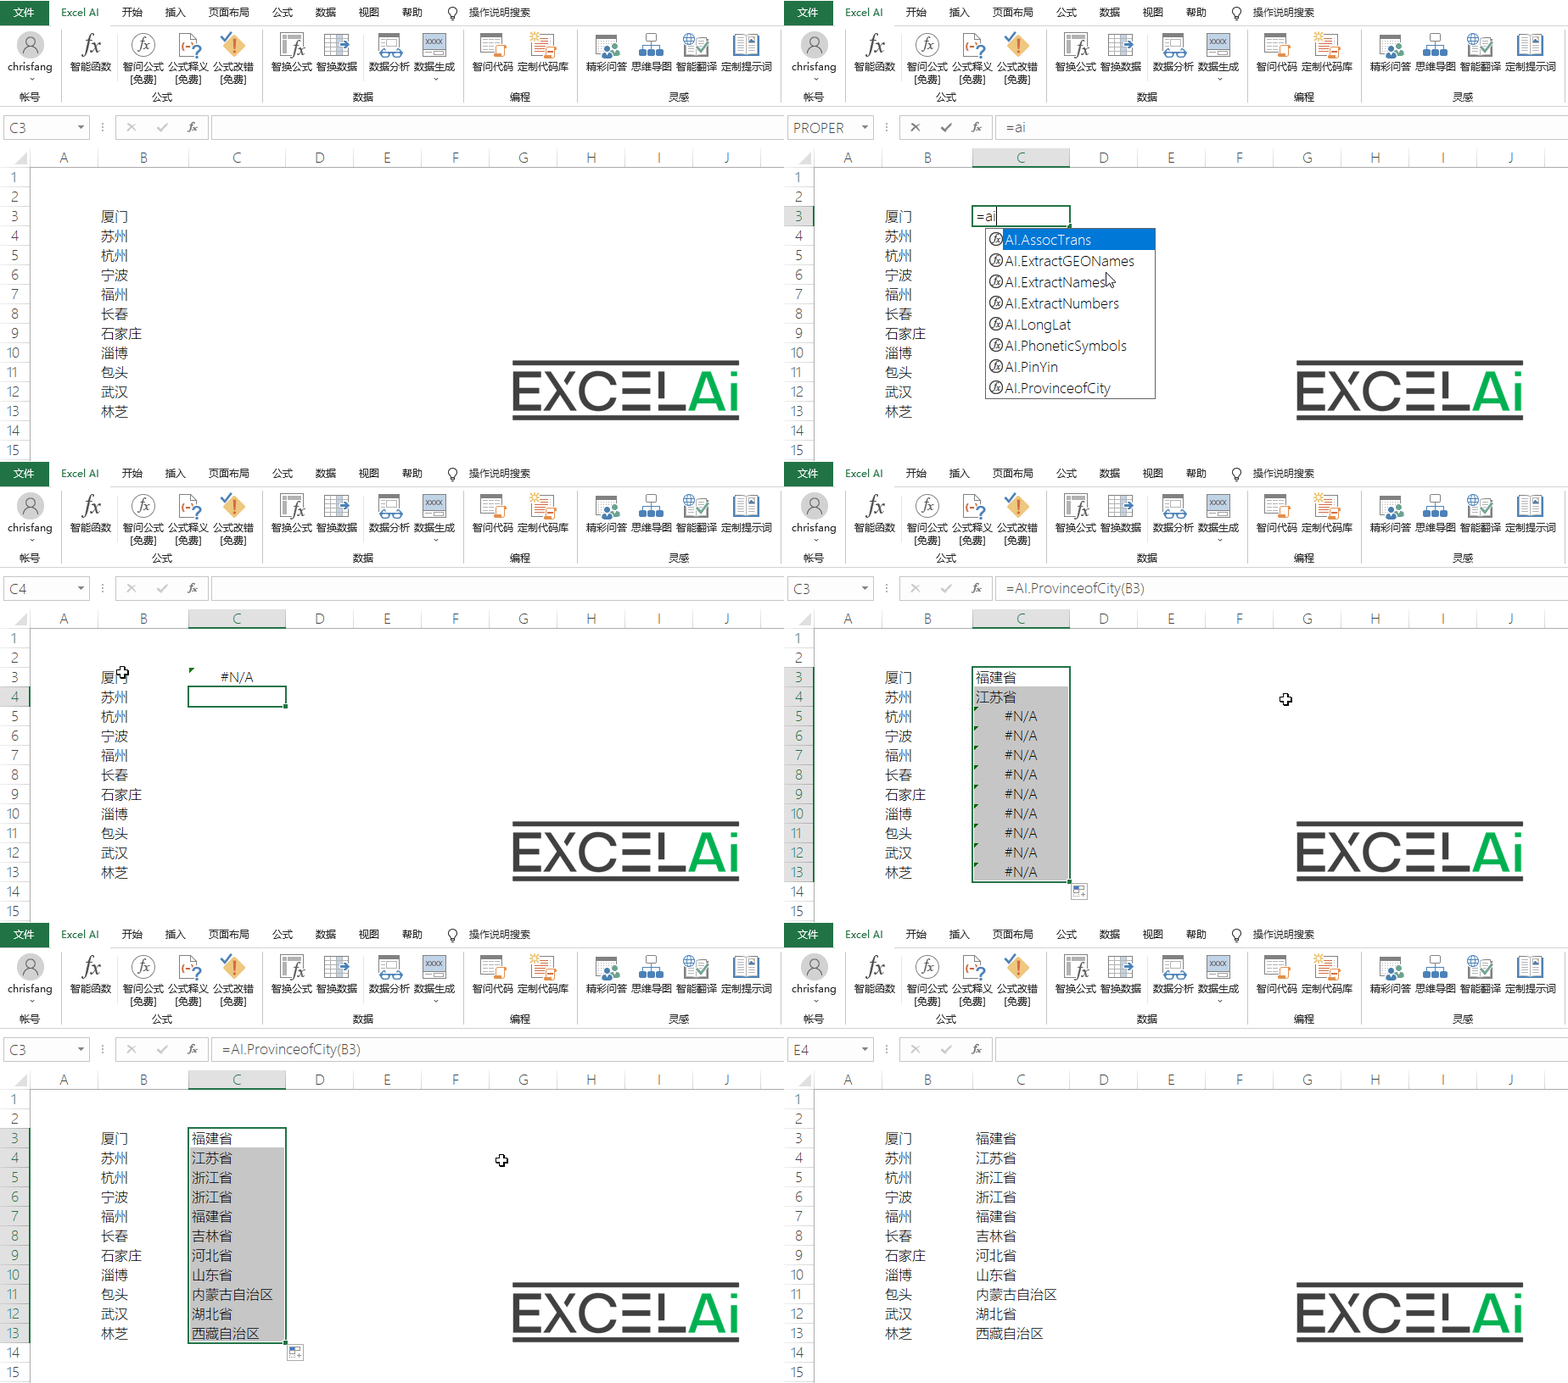 AI.ProvinceofCity function
Situations requiring attention
- There is a certain degree of randomness in the results of the intelligent function, please save the results of the formula operation as a value in time (copy-selective paste-value), in order to avoid changes in the results, which can also avoid the formula because of re-calculation caused by the waste of traffic.
- In order to ensure the availability of AI resources, we limit the access frequency of the AI service (currently around 60 times per minute), so it is not recommended to use too many numbers of intelligent functions at the same time, and they can be processed separately by batch computing.
Intelligent Function Dialog
If you are not familiar with the use of these smart functions, you can first try to use the formula examples provided by the plug-in system as follows:
- In the [Excel AI] menu bar click on the [Smart Functions] button to open the dialog box
- Check the function you want to use in the list of dialog boxes (an example of usage is shown below)
- Click on the lower right corner of the [Insert Table] can be inserted into the table of this example formula

Position of the buttons in the tabs
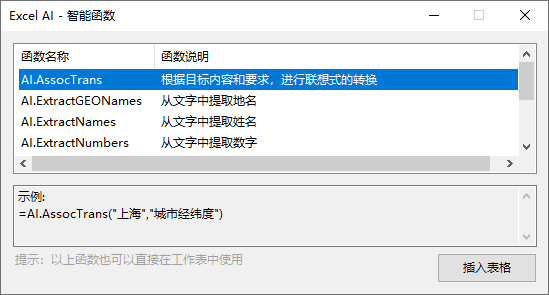
Dialogs for Smart Functions
2, The Wisdom Question Formula
Smart Question Formula allows you to use natural language to describe a problem or requirement and let the AI give an answer to the formula.
Tip: This feature is free in regular mode and paid in enhanced mode.
You want to write a formula, but there is no Excel expert around to ask for advice, you can only be alone in the help file to fumble, but the result is that you feel confused. So you decide to search the Internet, only to find a bunch of unreliable answers.
Now, you can get help by asking the AI questions through [Smart Ask Formula]! Just simply describe your goal and the AI will automatically generate the formula for you, it's that simple.

Position of the buttons in the tabs
- Click on the [Ask Formula] button in the menu bar to open the dialog box
- Fill in your target requirements in the question field above, e.g., determine the quarter A1 belongs to based on the date of its
- Then click the [Submit] button, the answer column below will show "formula generation...", indicating that the AI is generating the answer!
- After the AI answer formula is generated, it will be automatically displayed in the answer column below.
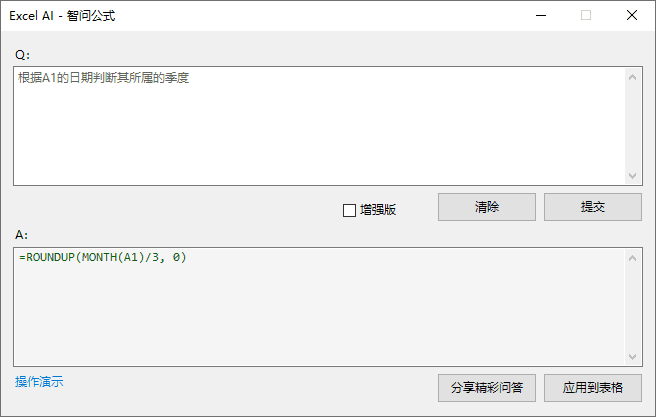
The dialog box for the Wise Question Formula
- Checking the [Enhanced] checkbox will switch to the Enhanced mode, and the system will call a more advanced AI model to generate formulas. Enhanced mode uses GPT-4o model by default, you can switch to other models in [Personal Center]. Note: Enhanced mode is not a free feature, it will consume your AI power.
- If you wish to apply the generated formulas to a table, you can click the [Apply to Table] button in the window and the formulas will be filled into the currently selected active cell. Of course, you can also manually copy anything from the answer bar to wherever you need it.
 Apply to table Note: This operation overwrites the existing contents of the currently active cell, so Excel AI will alert you to the risks of this operation and require your confirmation.
Situations requiring attention
- If your requirements are not described clearly enough, AI may not be able to find a suitable answer, and will display a reminder message in the answer column asking you to describe your requirements in more detail.
Operation Demonstration
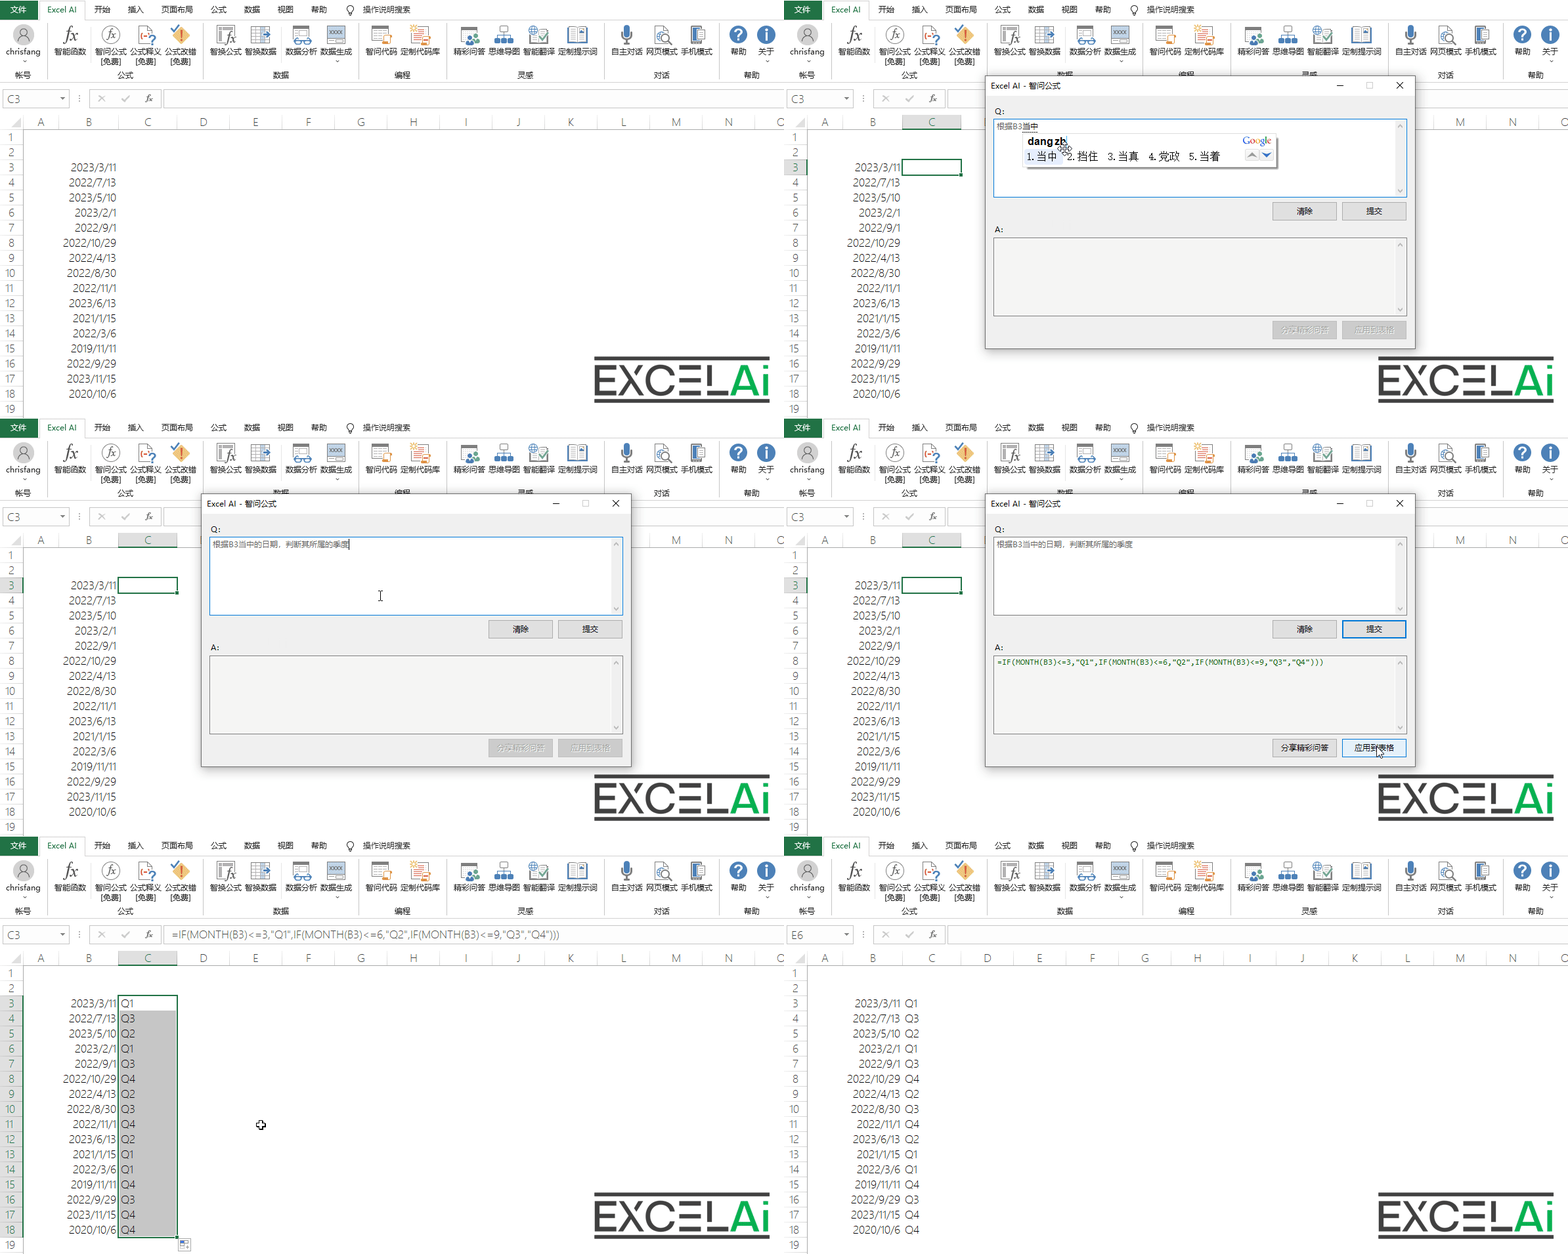 Wiseguy formula
Share a great Q&A
- When you get a great answer, it may also mean that your questioning is also very clear and effective. You can choose to share this wonderful Q&A conversation with other users, so that other people can get the opportunity to learn from it. Clicking the [Share Q&A] button in the window will upload the current Q&A results to the cloud, and all users will have the opportunity to see your sharing in the [Q&A] function. Note: Please do not share sensitive or undesirable information, if we determine that the information you share is in violation of the law, we may close your sharing function at any time!
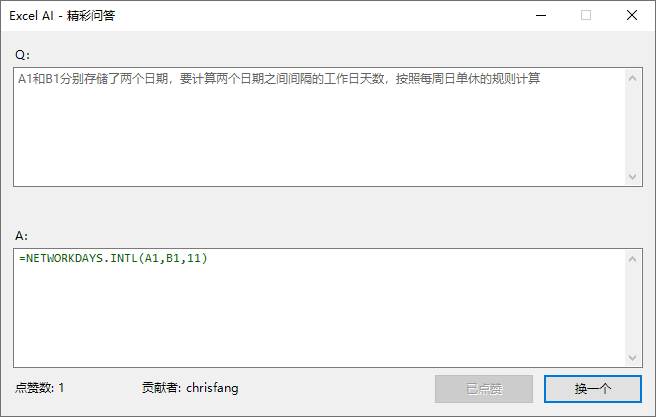
Example of a great Q&A
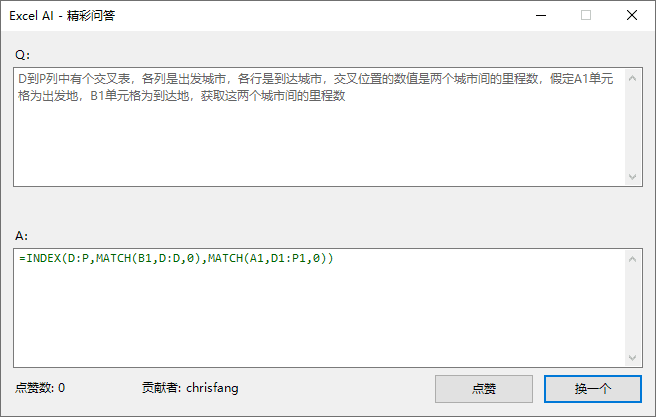
Example of a great Q&A
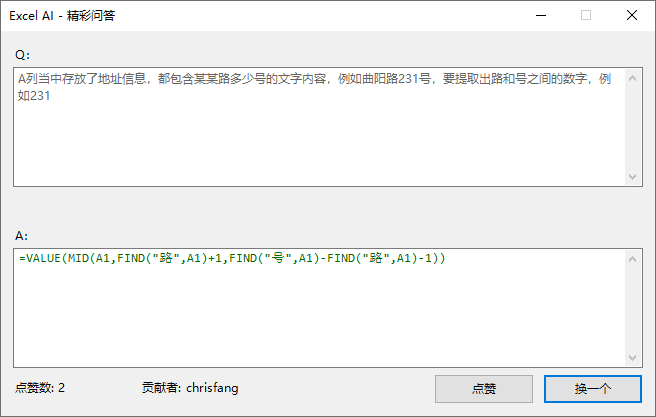
Example of a great Q&A
3, Formula interpretation
Formula Interpretation can analyze the operation steps and function usage of a formula through AI, making it easier for you to read and understand the formula.
Tip: This feature is free in regular mode and paid in enhanced mode.
Sometimes we feel blindsided by seeing formulas written by others, and we may even forget the meaning and use of formulas we have written.
Now there is AI to help you unravel the mystery of formulas! Just use [Formula Interpretation] to throw the formula to AI, it will be like a professional teacher, for you to analyze and explain the meaning of this formula, so that you can swim in the sea of formulas without obstacles.

Position of the buttons in the tabs
Operating Points: Select the cell where the formula is located, and then click the menu
- Select the cell containing the formula in the table, and then click on the menu bar in the [formula interpretation] button to open the dialog box
- The formula for the current cell is automatically populated in the question field above (you can also manually enter other formulas you need to ask about here if necessary)
- Then click the [Submit] button, the answer column below will show "Trying to explain...", indicating that the AI is analyzing the formula.
- When the analysis is complete, the analyzed content of the formula will be automatically displayed in the answer column below.
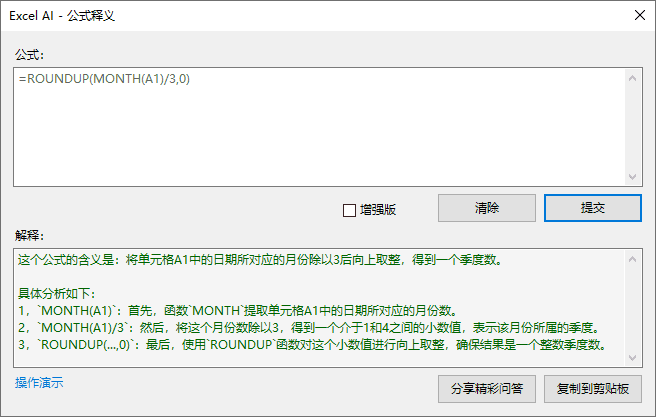
Dialog box for formula interpretation
- Checking the [Enhanced] checkbox will switch to the Enhanced mode, and the system will call a more advanced AI model to parse the formula. Enhanced mode uses GPT-4o model by default, you can switch to other models in [Personal Center]. Note: Enhanced mode is not a free feature, it will consume your AI power.
- If you wish to copy the generated formula analysis content to other places, you can click the [Copy to Clipboard] button in the window, and the content in the answer column will be stored in the system clipboard, and you can paste it anywhere you need.
- Formula Interpretation also supports the sharing function. Clicking the [Share Q&A] button in the window will upload the current Q&A results to the cloud, and all users will have a chance to see your sharing in the [Q&A] function. Note: Please do not share sensitive or undesirable information, if we determine that the information you share is illegal, we may close your sharing function at any time!
Operation Demonstration
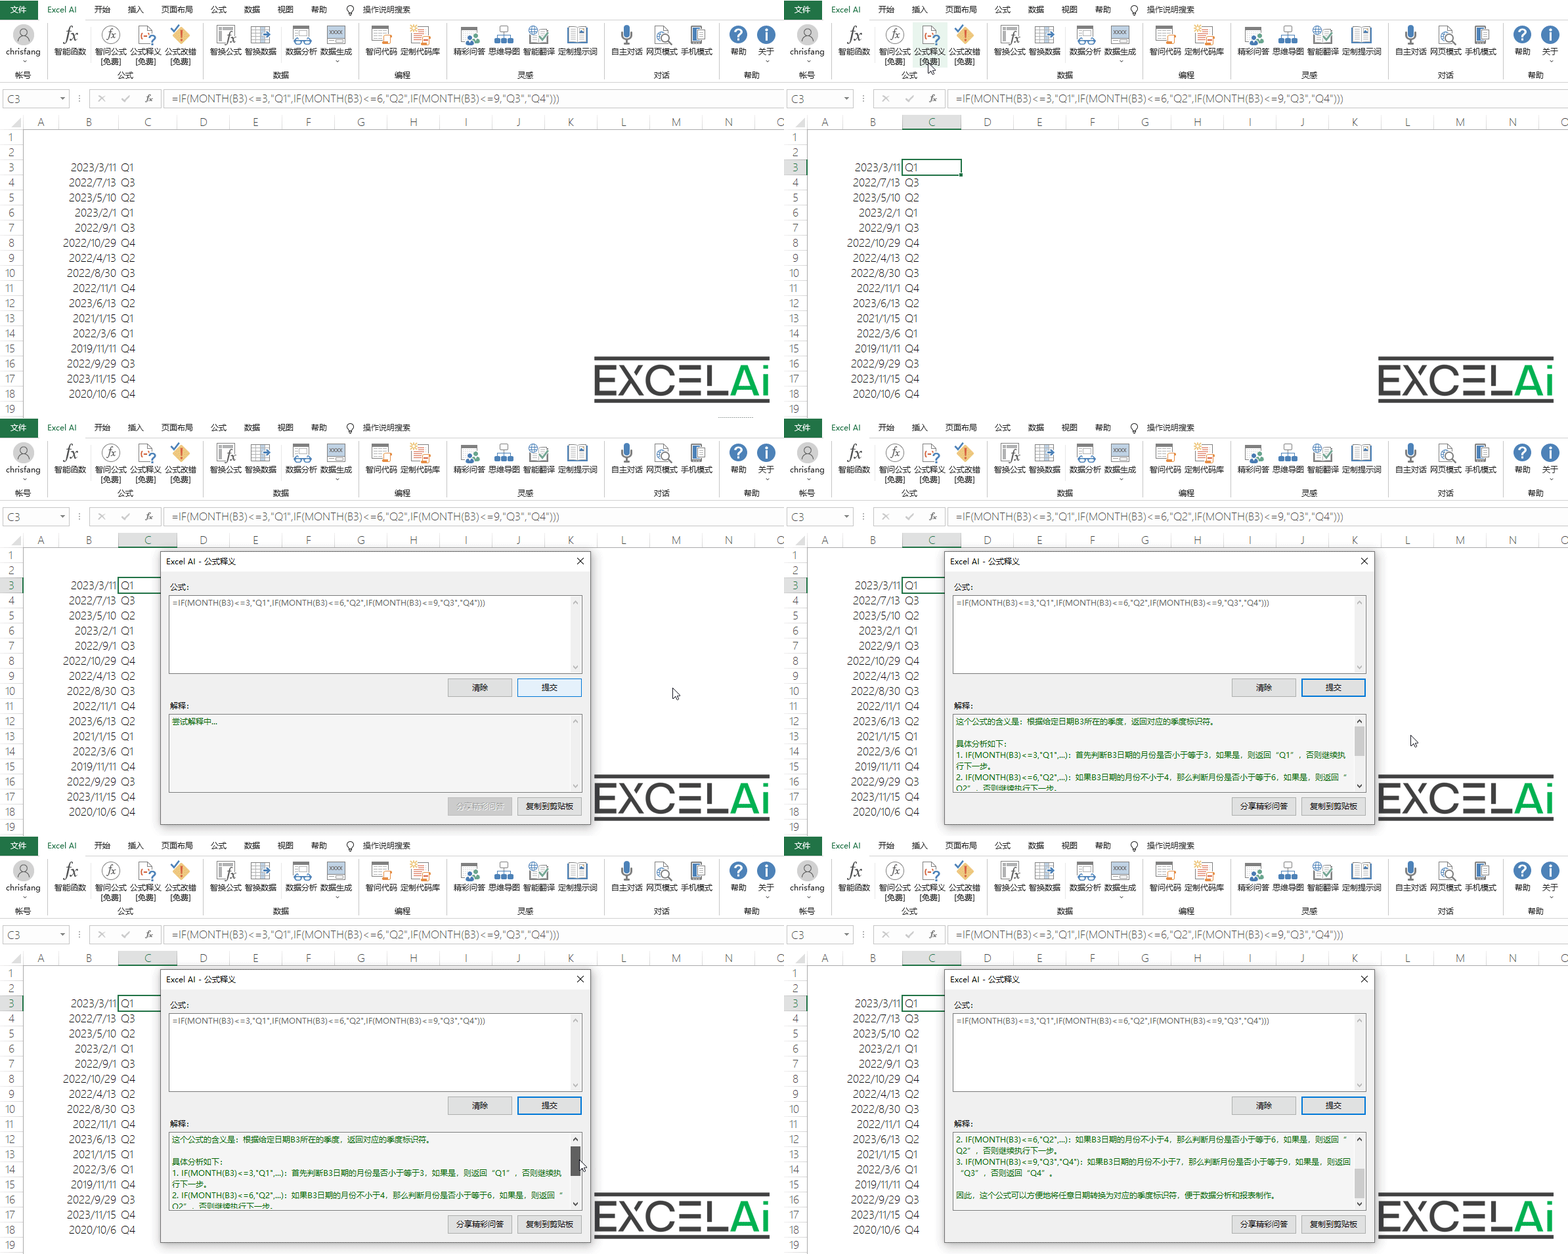 Interpretation of formulas
quick operation
- This feature also supports right-click menu shortcuts.
- In the selected cell contains the formula right-click, in the context of the right-click menu, select the [formula interpretation
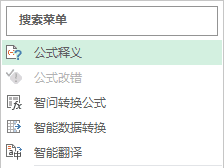
context menu (computing)
- At this point, the program will no longer display a dialog window, but will directly display the interpretation in a pop-up window after the analysis is complete
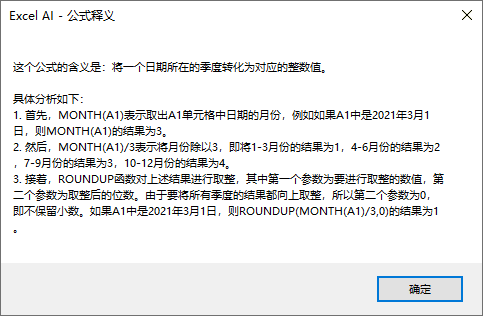
Shortcut pop-up window for formula interpretation
Situations requiring attention
- When the selected active cell does not contain formula content, the formula interpretation menu in the context menu will be grayed out and unavailable.
4, Formula correction
Formula Correction allows you to analyze the formula that has made an error, and the AI will explain the reason for the formula error and try to correct the formula error.
Tip: This feature is free in regular mode and paid in enhanced mode.
Sometimes, when we enter formulas in Excel, but found that the results are not what we expect, there is an unknown error code. Is the code entered incorrectly? Or is it the wrong usage of the parameter? Can anyone tell me why?
Now using the formula correction function, you can not only let AI help you find out why the formula is wrong, and also try to help you fix the formula error, so that you can get rid of the trouble of formula error, and no longer let the wrong formula to hinder your progress!

Position of the buttons in the tabs
Operating Points: Select the cell where the wrong formula is located, and then click the menu
- In the form of selected formulas, and the error value of the cell, and then click the menu bar in the [formula interpretation] button to open the dialog box
- In the upper question field, the formula of the current cell is automatically filled in, and in the upper right corner, the type of error value is automatically selected (if necessary, you can also manually enter other formulas that need to be asked for and select the type of error value here).
- Then click the [Submit] button, the answer column below will show the words "Error Analysis...", indicating that the AI is analyzing the formula!
- After the analysis is complete, the cause of the formula error will be automatically displayed in the error cause answer column below, and possible alternative formulas will be displayed in the suggested formula column.
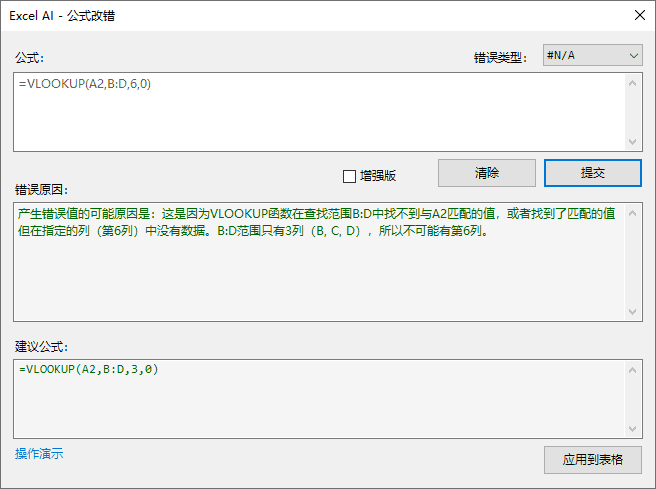
Dialog box for formula correction
- Checking the [Enhanced] checkbox will switch to the Enhanced mode, and the system will call a more advanced AI model to analyze and solve the error. Enhanced mode uses GPT-4o model by default, you can switch to other models in [Personal Center]. Note: Enhanced mode is not a free feature, it will consume your AI power!
- If you wish to apply the alternative formulas suggested by AI to a table, you can click on the Apply to Table button in the window, and the formulas will be filled into the currently selected active cell. Of course, you can also manually copy anything from the window to wherever you need it.
Note: This operation overwrites the contents of the currently active cell, so Excel AI will alert you to the risks of this operation and require your confirmation.
Operation Demonstration
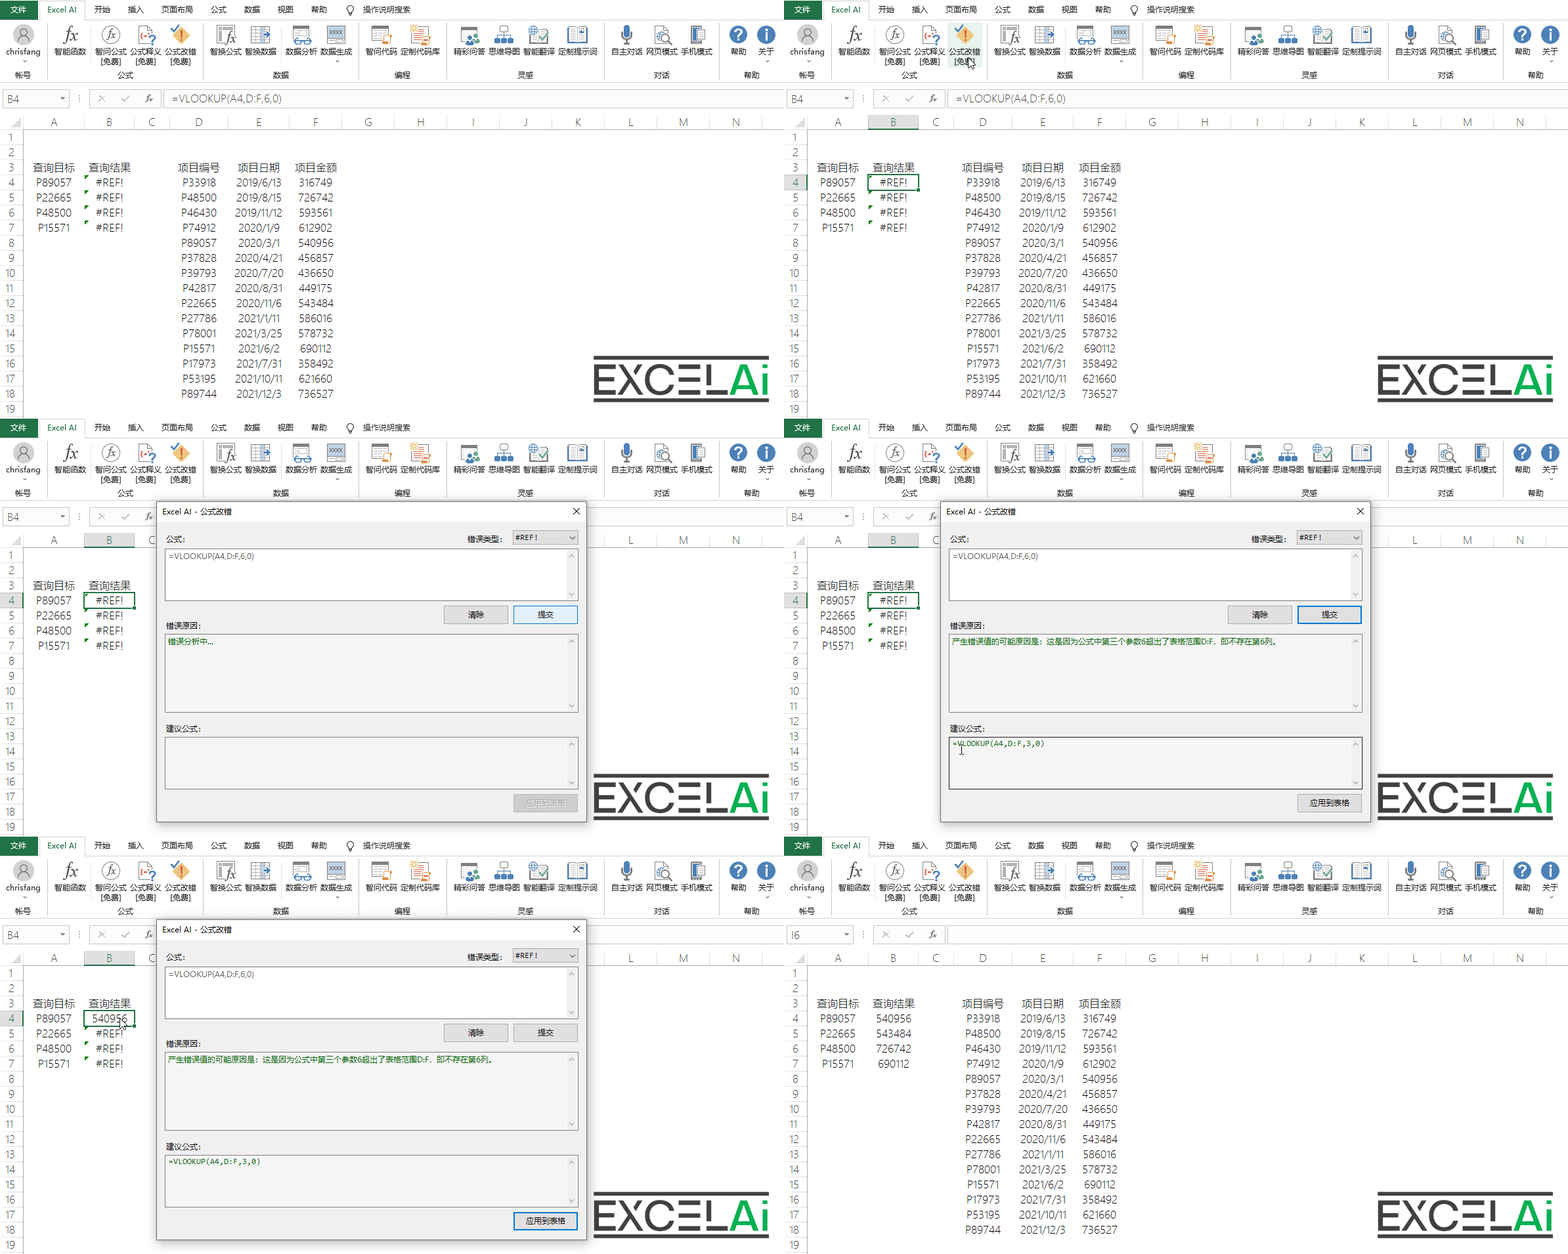 correction of errors in formulas
quick operation
- This feature also supports right-click menu shortcuts.
- In the selected cell contains the wrong formula right-click, in the context of the right-click menu, select the [formula to correct the error].
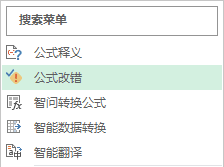
context menu (computing)
- Instead of displaying a dialog window, the program will display the formula error analysis results and suggested alternative formulas in a pop-up window directly after the analysis is completed.
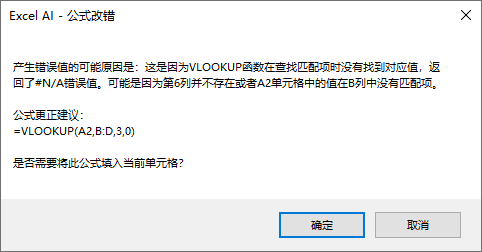
Quick popup for formula correction
- If you need to fill the suggested formula into the currently active cell, you can click the [OK] button in the dialog box. If you click the [Cancel] button will directly close the pop-up window.
If there is no alternative formula available in the AI return result, or if the return result is formatted in such a way that the program does not recognize the alternative formula correctly, this pop-up window will not be able to fill in the formula directly into the form.
Operation Demonstration
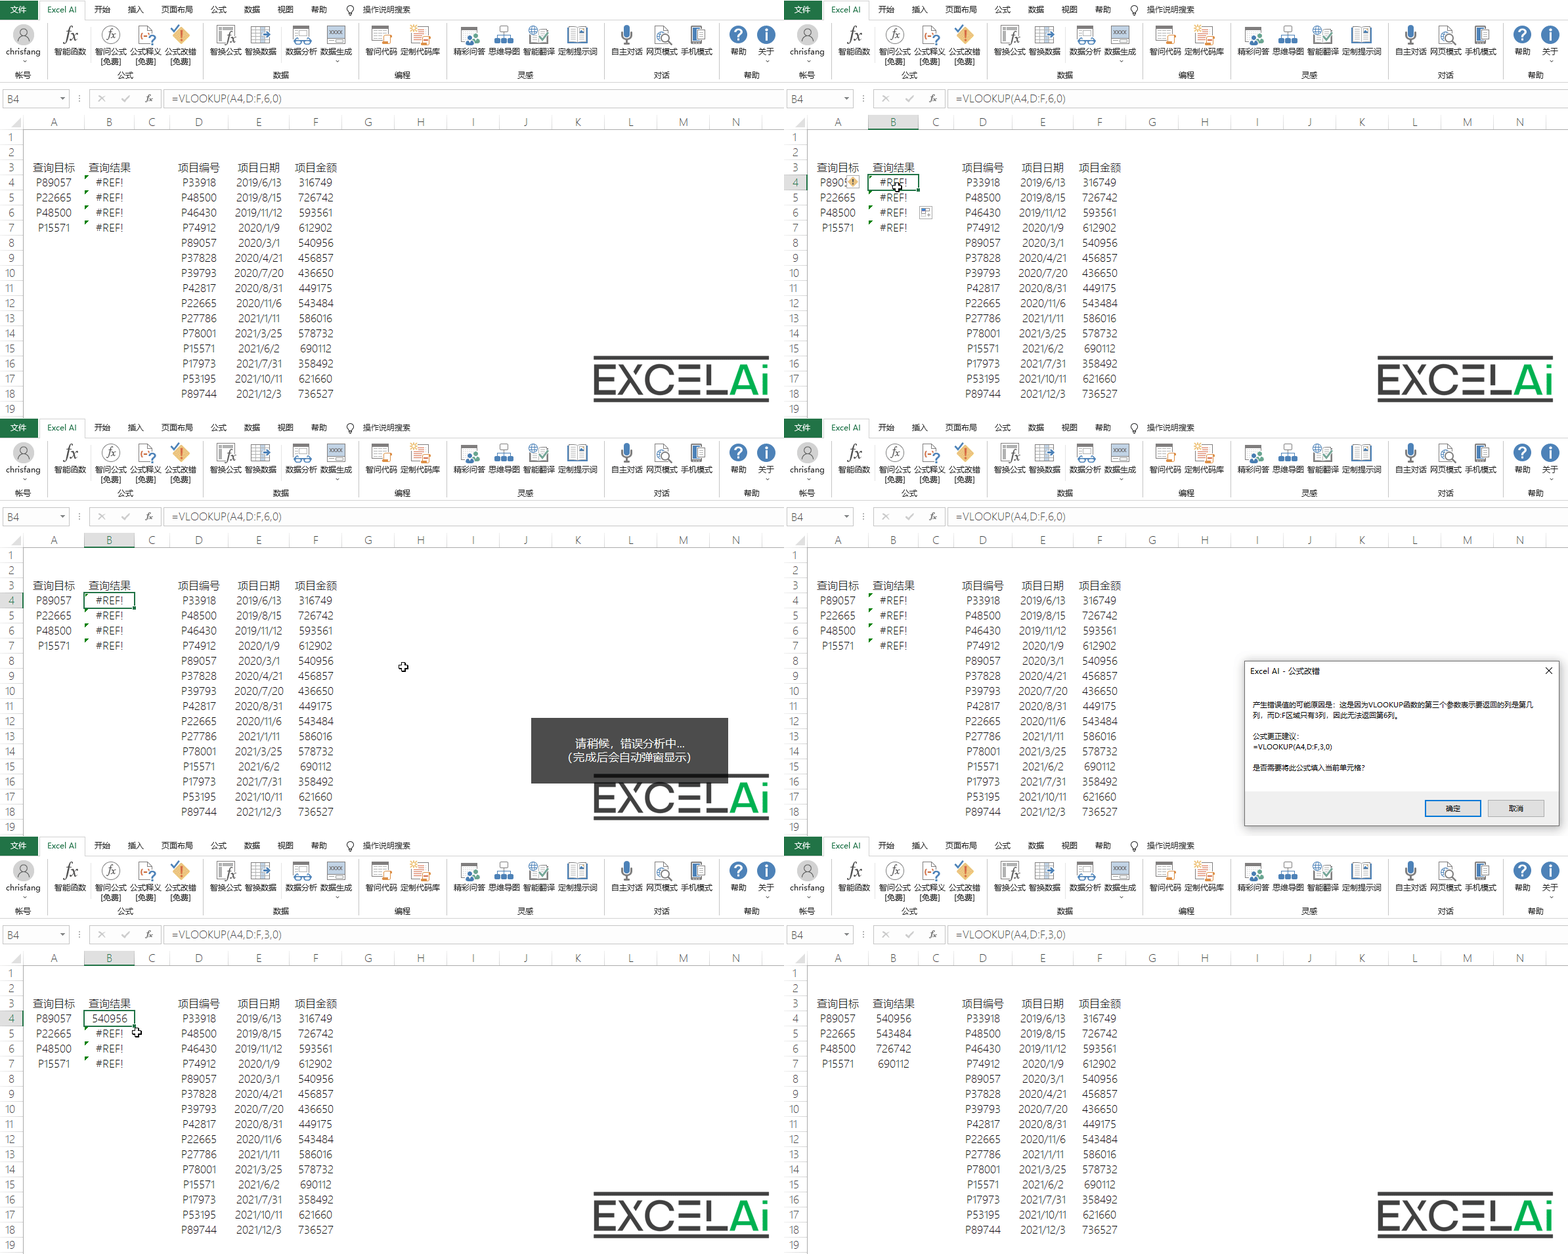 Right-click operations for formula correction
Situations requiring attention
- When the selected active cell does not contain a formula, the formula correction menu in the context menu will be grayed out and unavailable.
5, Wisdom Exchange Formula (Wisdom Exchange Formula)
Smart Conversion Formulas can automatically generate conversion formulas based on the conversion target of the data, or based on the conversion examples you provide.
Tip: This feature is free in regular mode and paid in enhanced mode.
When you have a column of data at hand and want to extract some of the information from it or convert the data to another style according to some rules, you may have a big headache - after all, writing a complex formula is not an easy task. You may even have a hard time describing this conversion in words, so you can't ask valid questions to search engines. This is where the Wise Conversion Formula feature can help you! Using this feature, you only need to provide a few examples before and after the conversion, and then you can let AI design an efficient conversion formula for you, freeing you from the tedious task of writing formulas.
Specifically, this function is based on a column of data you selected, AI help you design a formula that can be filled down to complete the batch conversion of all the data. All you need to do is to put forward the conversion requirements or give a few examples of conversion.
Position of the buttons in the tabs
Operating Points: Select the column of data to be converted and click on the menu.
- Select a column of data in the table, try to select only the target data to be converted. For example, if the data column contains the title, do not select the title in order to avoid misjudgment caused by the program.
- Then click on the [Wise Change Formula] button in the menu bar to open the dialog box
- In the upper left column of the conversion requirements, describe your needs and goals in words, e.g., extracting the numbers in the middle of the word "road" and the word "number".
- In the conversion example column on the upper right, give the result you want to generate in the form of an example, for example: 398, if you need to fill in more than one example, you can enter a new line and continue to fill in. Note that the order of the examples should be consistent with the order of the currently selected data, with one-to-one correspondence. For example, the example in the following picture "398"corresponds to the first data in the selected target."398 Hefei Road, Huangpu District, Shanghai, China".
- Then click the [Submit] button, the answer column below will show "formula generation...", indicating that the AI is analyzing the data and trying to generate the formula
- After the formula generation is completed, the formula content will be automatically displayed in the answer column below.
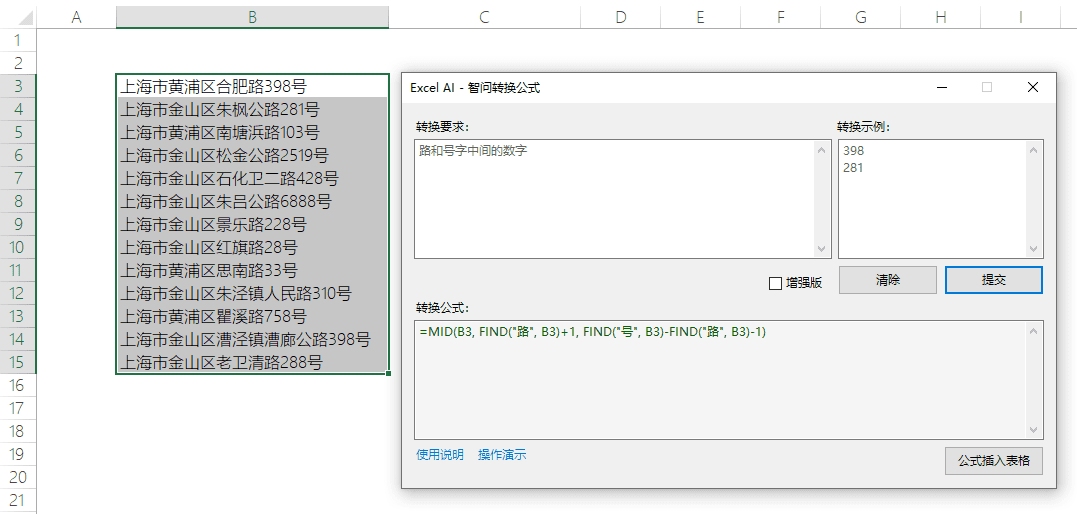
The dialog box for the Wise Question Formula
Filling in only the conversion requirements, or only the conversion examples can also be operational, but may reduce the accuracy of the formula generation. Often, providing a clearer description of the requirements and more examples will help produce more accurate formulas.
- Checking the [Enhanced] checkbox will switch to the Enhanced mode, and the system will call a more advanced AI model to generate formulas. Enhanced version uses GPT-4o model by default, you can switch to other models in [Personal Center].
Note: Enhanced Mode is not a free feature, it will consume your AI power!
- If you want to apply the generated formulas to the table, you can directly click on the window of the [Formulas Inserted into Table] button, the program will be in the currently selected active cell to the right to insert a new column of cells to fill in the formula. Of course, you can also manually copy the formula from the answer bar to wherever you need.
 The effect of inserting a formula into a table Note: Inserting a new column to fill in the formula requires your confirmation.
Operation Demonstration
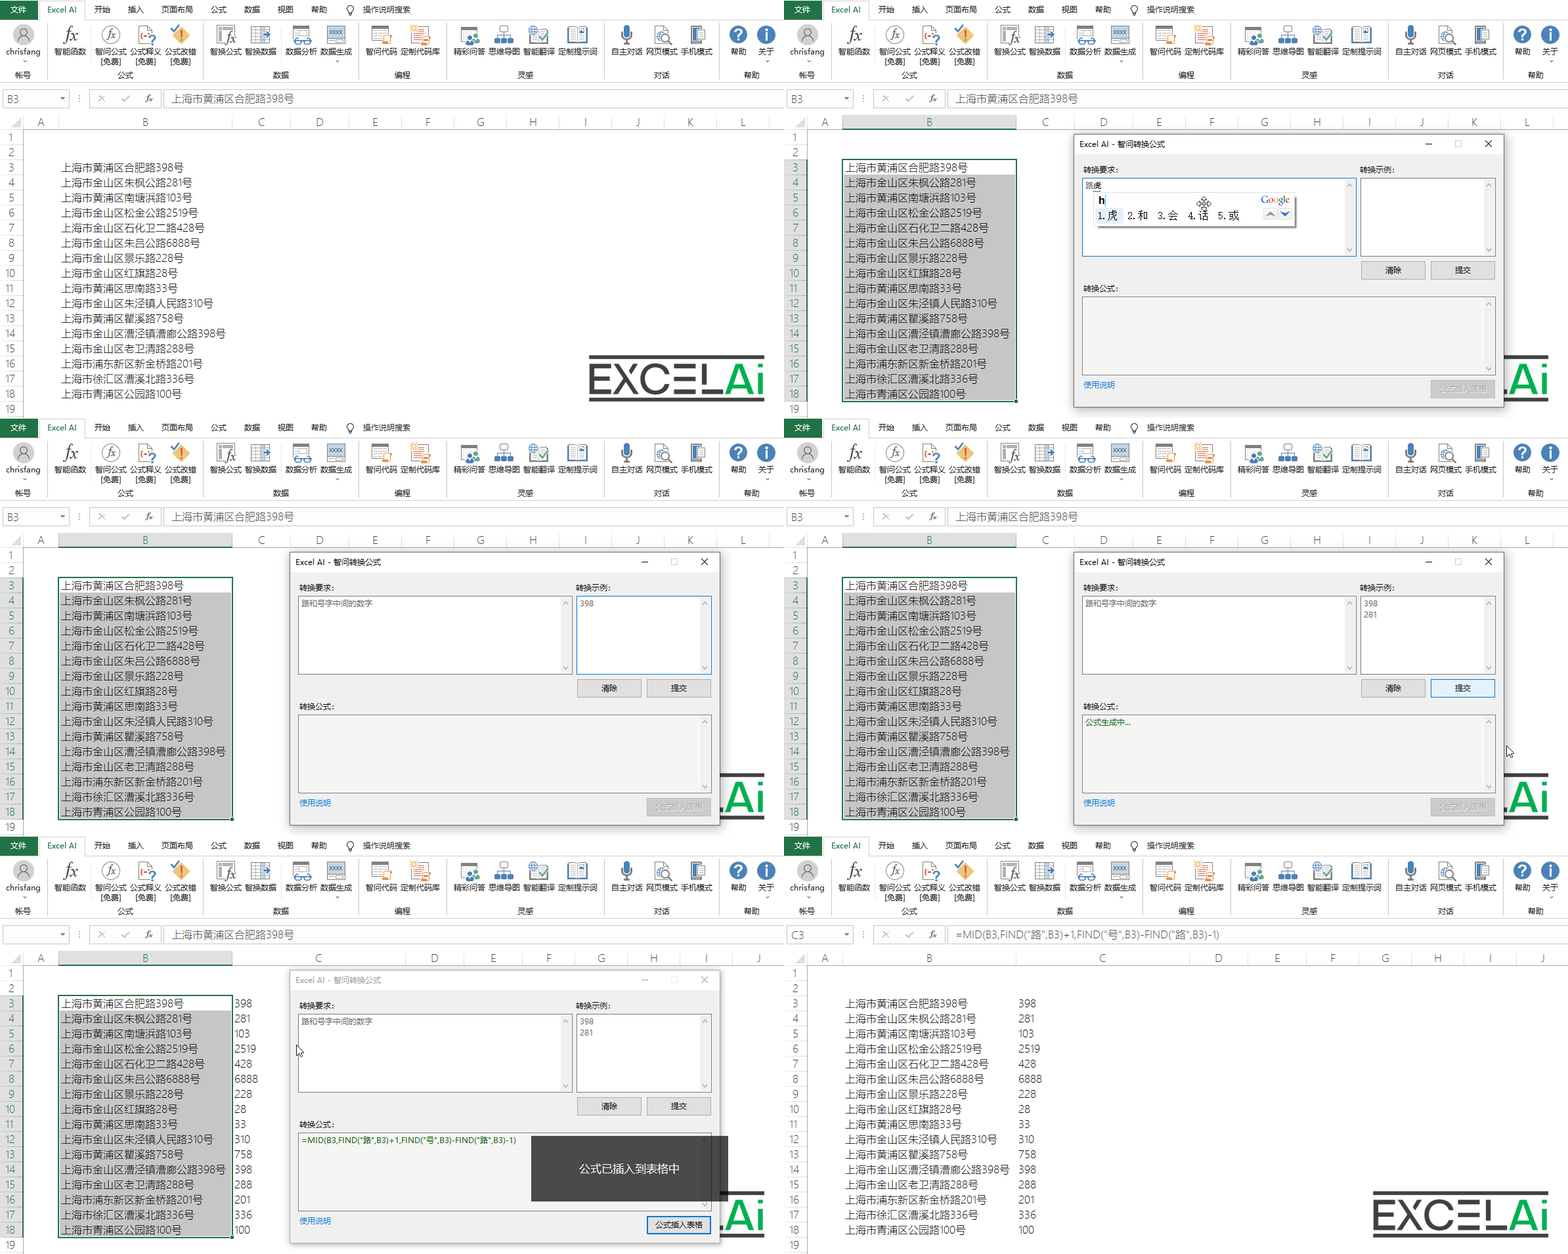 wisdom exchange formula
quick operation
Operating Points: Fill in the conversion examples on the right side of the data columns that need to be converted, select the data columns of the conversion examples, and then click the right-click menu.
Note: The objects that need to be selected for right-click shortcut operations are different from those for regular operations, so please be careful to distinguish them.
- This feature also supports right-click menu shortcuts.
- Fill in the conversion example in the blank column to the right of the target data column where the conversion formula is to be generated.
- Then select all the target areas in this column where formulas need to be generated (at least two rows need to be selected)
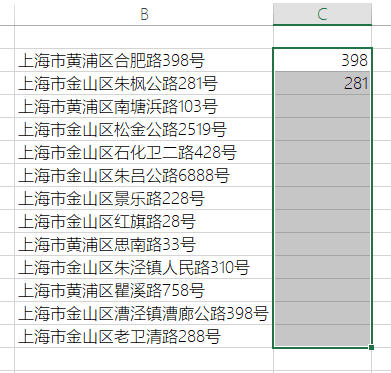
Fill in the example to the right of the target data and check the area where the formula needs to be generated.
- Next, right-click, in the context of the right-click menu, select [Smart Ask conversion formula], the program will automatically fill in the example to determine the conversion of the target and the way in the selected cell to automatically generate the conversion formula
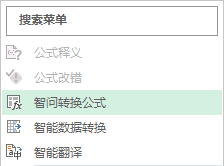
context menu (computing)
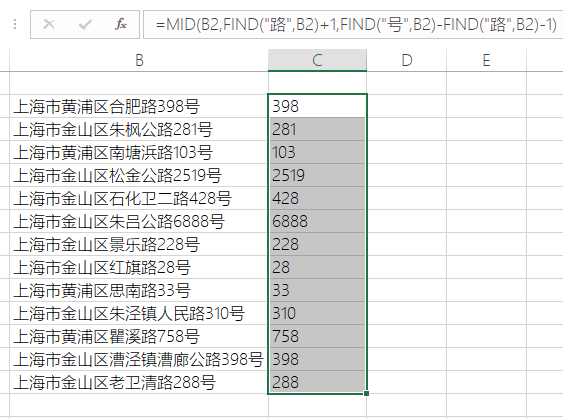
The effect after generating the formula
Friendly reminder, due to the right-click shortcut operation mode of [SmartQ Convert Formula] does not have the condition of describing the conversion requirements in text, so it is usually necessary to provide more conversion examples to get more accurate formula generation results.
Operation Demonstration
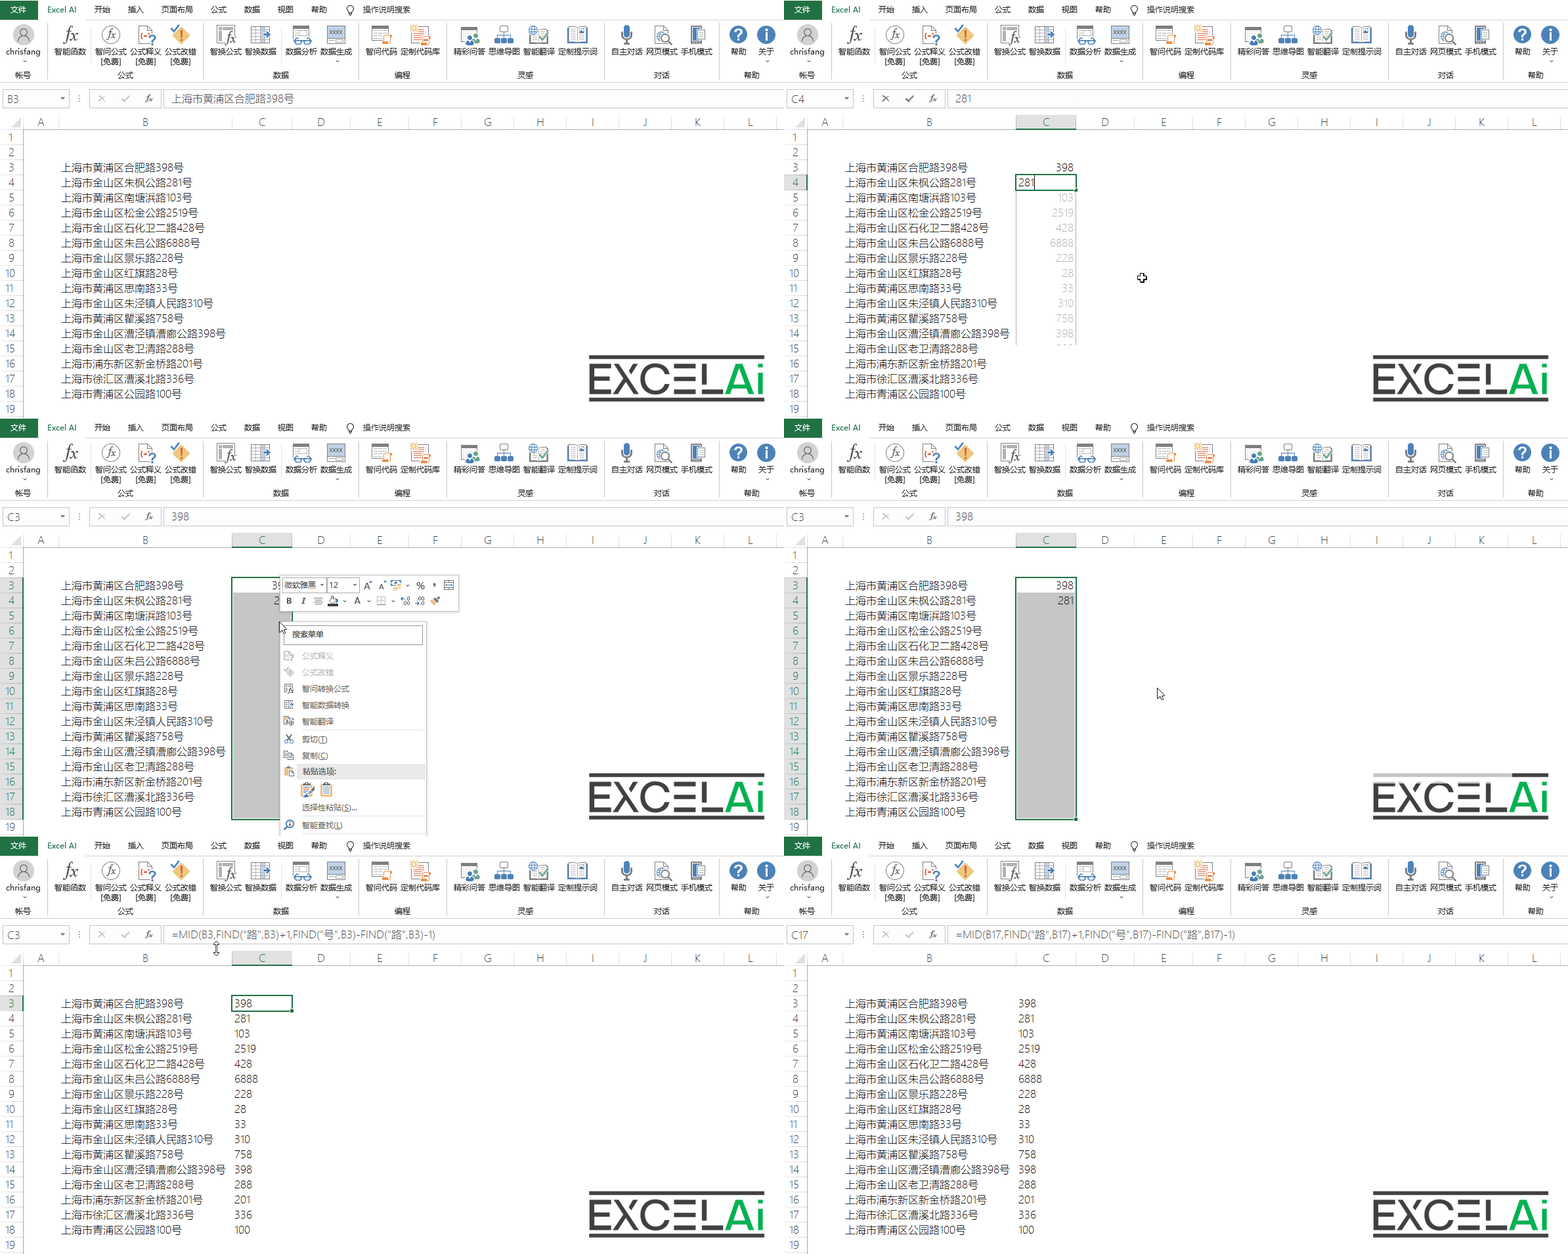 Right-click operation of Wise Conversion Formula
Situations requiring attention
- If the left side of the selected cell does not contain the target data during a right-click shortcut, an error message will pop up.
- Right-click shortcut operation, if the selected active cell does not contain a conversion example, the right-click menu in the [Wise Conversion Formula] menu will be grayed out and unavailable.
- Right-click shortcut operation, if the selected cell area is less than two rows, the right-click menu in the [Wise Conversion Formula] menu will be grayed out and unavailable.
- If there are not enough examples or reference data to generate formulas, it will show "Failed to generate conversion formulas", you can try to add more conversion examples.
6, Intelligent Data Exchange (Intelligent Data Conversion)
Smart Conversion Data can automatically generate converted data based on the conversion target of the data, or based on the conversion examples you provide.
Tip: This feature is free in regular mode and paid in enhanced mode.
In a similar scenario to the previous [Smart Exchange Formula], perhaps you do not need to write a formula, but simply want to get the results of the conversion, then you can use the [Smart Exchange Data] function.
Specifically, this function is based on your selected column of data, and then you put forward the conversion requirements or conversion examples given by the AI to help you complete the batch conversion of all the selected data. What is different from the [Smart Formula] function is that since there is no need to generate formulas here, some associative conversions that could not be realized with formulas can also be realized, with richer application scenarios.

Position of the buttons in the tabs
Operating Points: Select the column of data to be converted and click on the menu.
- Select a column of data in the table, try to select only the target data to be converted. For example, if the data column contains the title, do not select the title in order to avoid misjudgment caused by the program.
- Then click the [Smart Change Data] button in the menu bar to open the dialog box.
- In the top left conversion request field, describe your needs and goals in words, e.g. capital city and national day.
- In the conversion example field on the top right, give the result you want to generate in the form of an example, for example: Beijing; October 1st. If you need to fill in more than one example, you can enter a new line and continue to fill in. Note that the order of the examples should be consistent with the order of the currently selected data, with one-to-one correspondence. For example, the following picture in the example "Beijing; October 1"corresponds to the first data in the selected target."sino".
- Then click the [Submit] button, the answer column below will show the words "Data processing...", indicating that the AI is analyzing the data and trying to generate conversion results.
- Once the data conversion is complete, the results will be automatically displayed in the answer box below.
 Wise Change Data dialog box
Filling in only the conversion requirements, or only the conversion examples can also be operational, but may reduce the accuracy of the data conversion. Often, providing a clearer description of the requirements and more examples will help produce more accurate data conversion results.
- Checking the [Enhanced] checkbox will switch to the enhanced mode, and the system will call a more advanced AI model to generate the conversion results. Enhanced version uses GPT-4o model by default, you can switch to other models in [Personal Center].
Note: Enhanced Mode is not a free feature, it will consume your AI power!
- If you want to place the generated conversion results into a table, you can directly click the [Save in Table] button in the window, and the program will fill in the data in the currently selected cell area. Of course, you can also manually copy the content from the answer bar to wherever you need it.
Note: This operation overwrites the existing contents of the currently selected cell area, so Excel AI will inform you of the risks of this operation and require your confirmation. If you do not want to overwrite the existing data, you can first select a nearby blank area in the table, and then click this button.
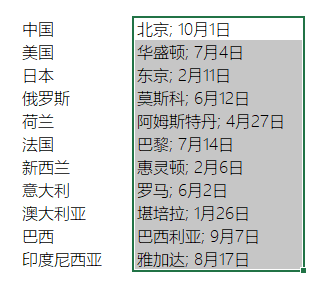
Select a blank area to store the conversion results
Operation Demonstration
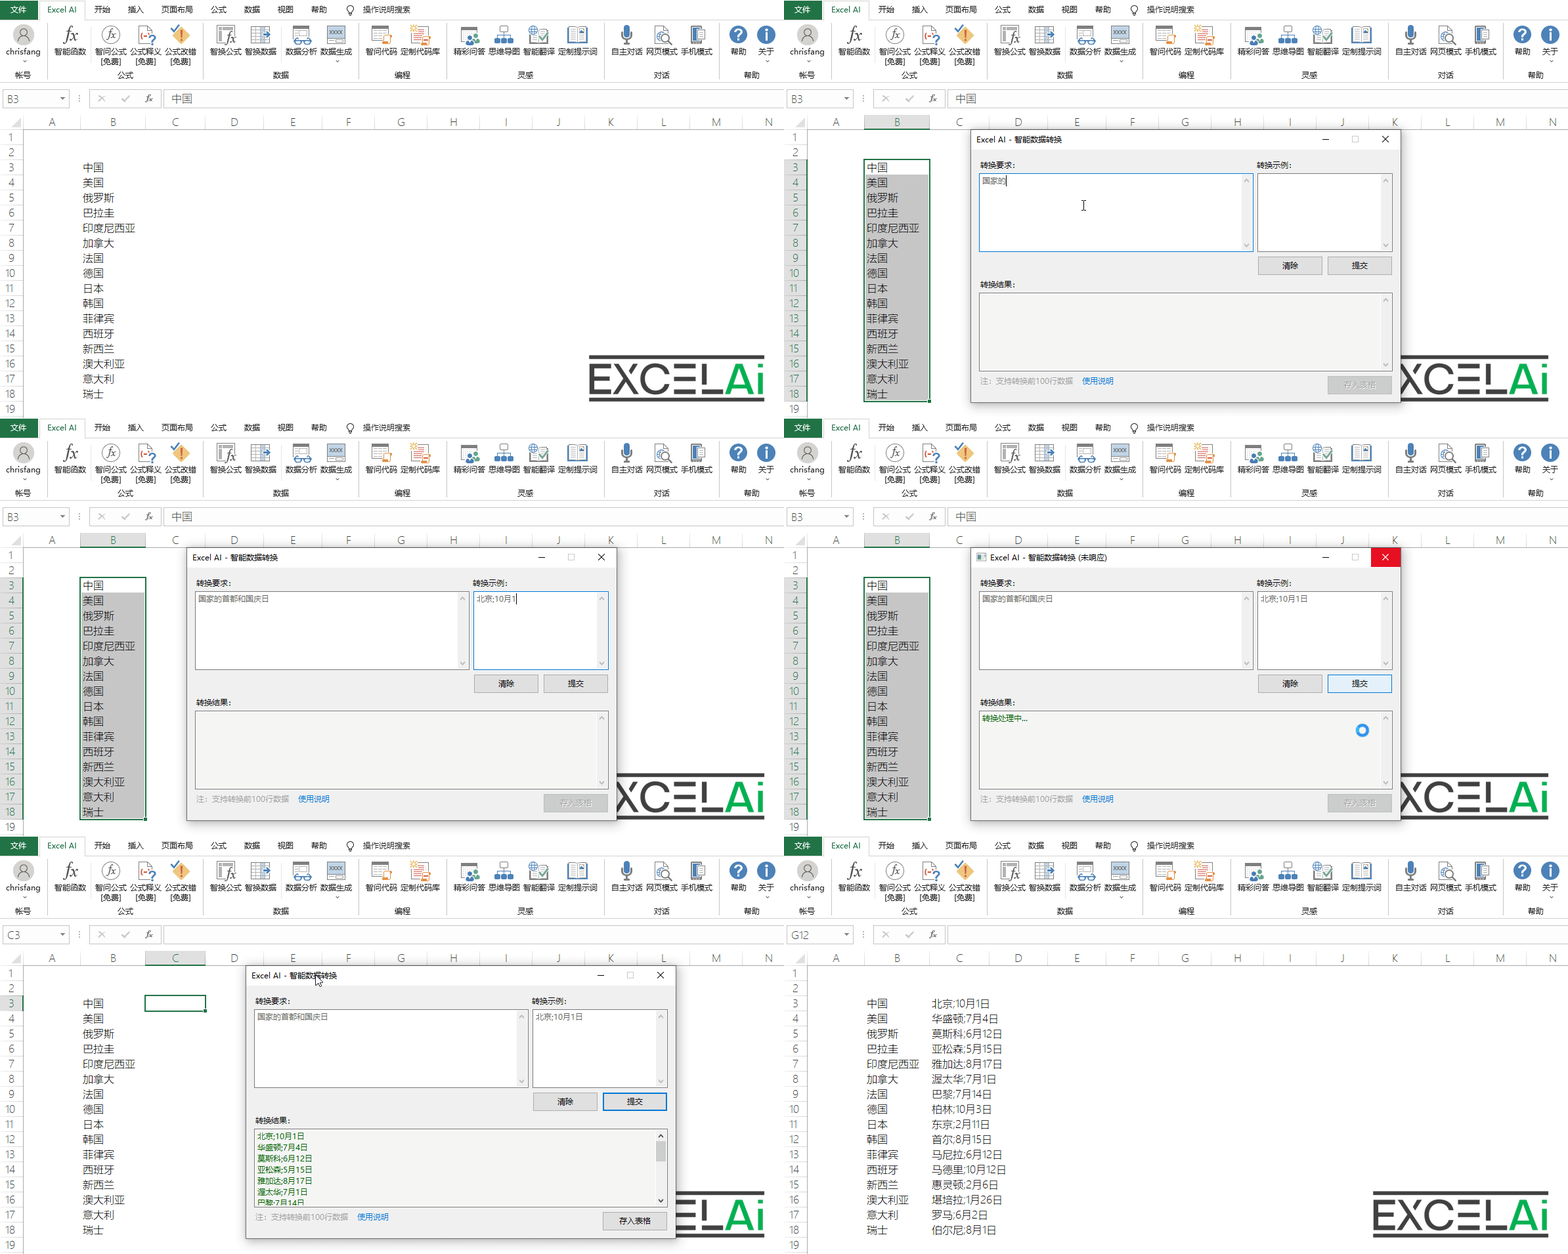 Smart Exchange Data (SED), Chinese company specializing in data exchange
quick operation
Operating Points: Fill in the conversion examples on the right side of the data columns that need to be converted, select the data columns of the conversion examples, and then click the right-click menu.
Note: The objects that need to be selected for right-click shortcut operations are different from those for regular operations, so please be careful to distinguish them.
- This feature also supports right-click menu shortcuts.
- Fill in the conversion example in the blank column to the right of the target data column to be converted.
- Then select all the target areas in this column (at least two rows need to be selected) that need to be generated as a result of the conversion.
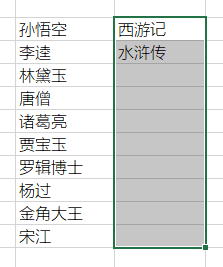
Fill in the example to the right of the target data and check the result storage area.
- Next, right-click, in the context of the right-click menu, select [Intelligent Data Conversion], the program will be automatically filled in according to the example to determine the conversion of the target and the way in the selected cell is automatically filled in the results of conversion
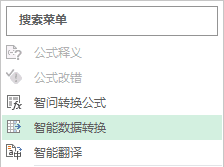
context menu (computing)
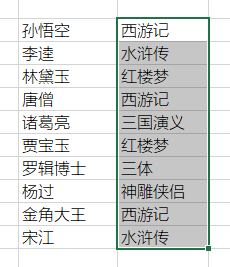
Data conversion results
Friendly reminder, because the right-click shortcut of [Smart Data Conversion] does not have the condition of describing the conversion requirements in text, so it is usually necessary to provide more conversion examples to get the accurate conversion effect.
Operation Demonstration
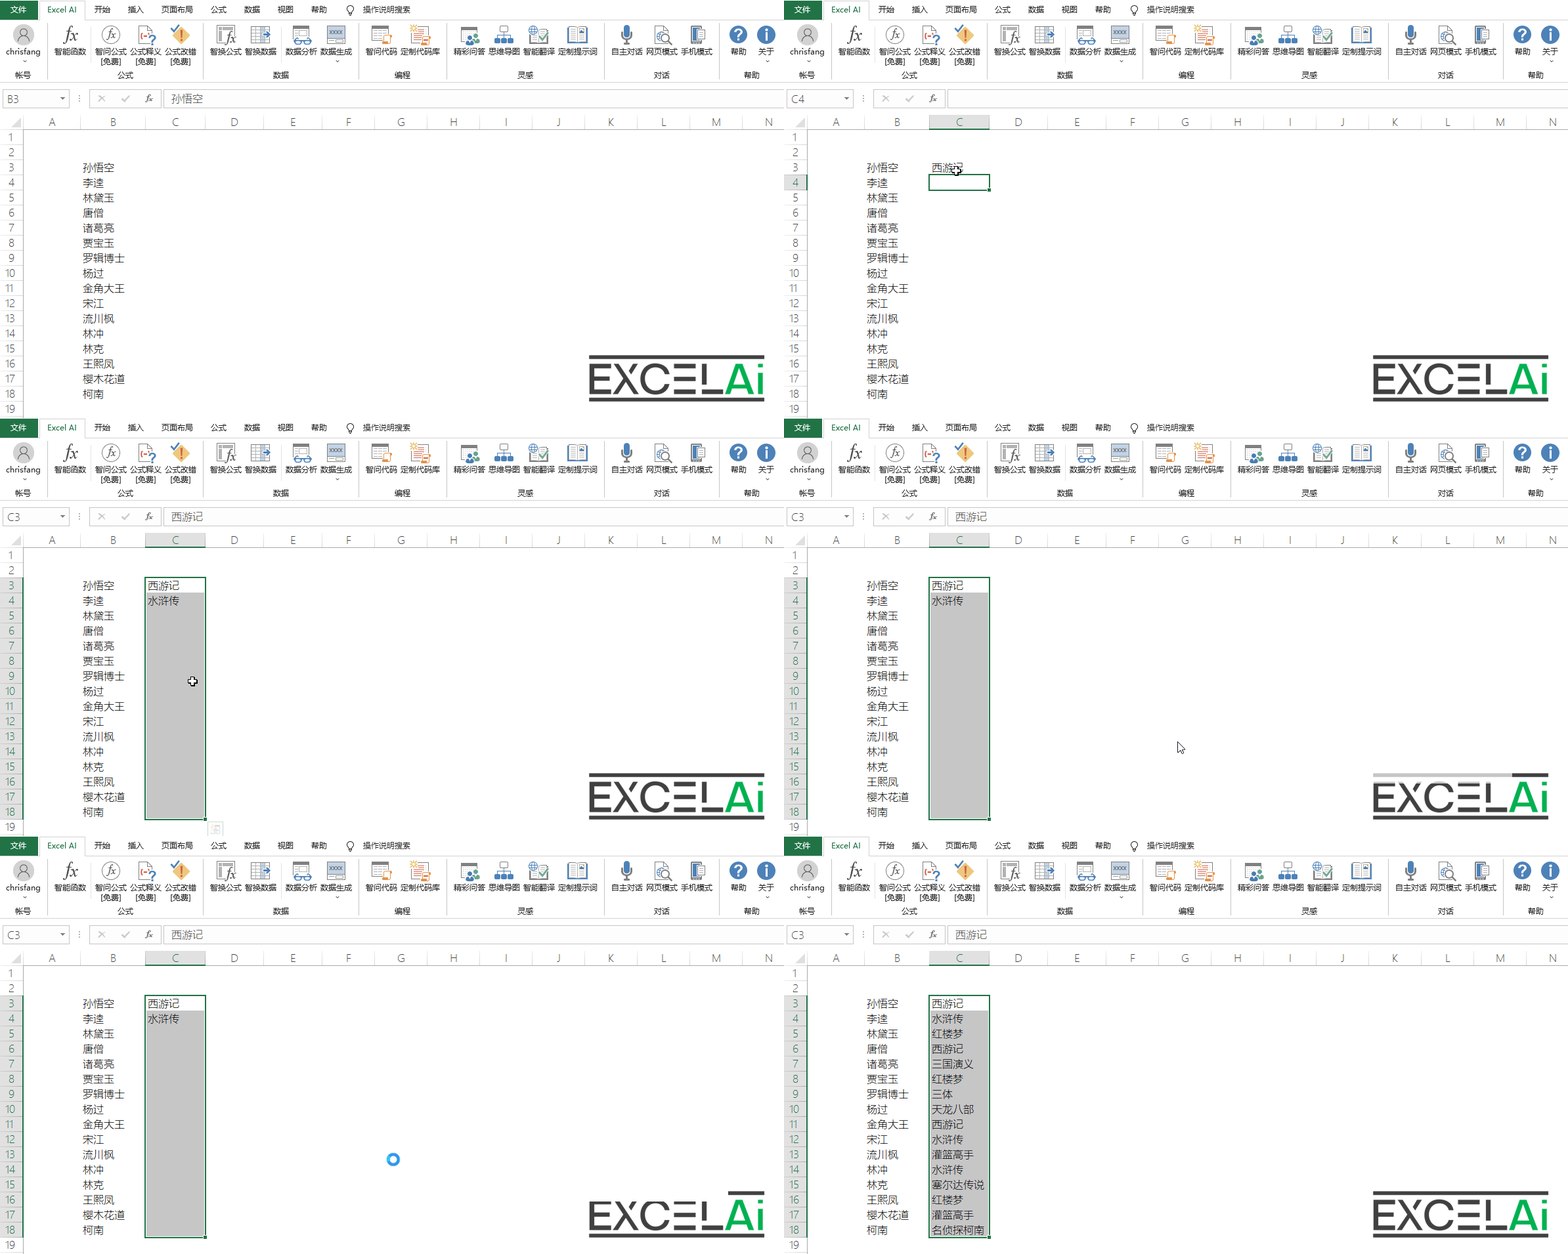 Right-click operation of Wise Conversion Data
Situations requiring attention
- If the left side of the selected cell does not contain the target data during a right-click shortcut, an error message will pop up.
- During the right-click shortcut operation, if the selected active cell does not contain a conversion example, the [Smart Convert Data] menu in the right-click menu will be grayed out and unavailable.
- When the selected cell area is less than two rows during the right-click shortcut operation, the [Intelligent Data Conversion] menu in the right-click menu will be grayed out and unavailable.
- If there are not enough examples or reference data to generate the conversion result, it will show "Data conversion failed", you can try to add more conversion examples.
7, Data analysis
Data analysis can be performed automatically based on the provided data tables and analysis objectives, presenting the conclusions of the analysis.
Tip: This feature is free in regular mode and paid in enhanced mode.
When you are faced with a data table or a statistical report and want to understand the meaning of the data and find problems from it but have no way to do so, you may want to try the [Data Analysis] function. This function can rely on AI to quickly interpret the data for you, help you find the patterns and trends, so as to make more informed decisions. For those who are clueless about data analysis, this feature is definitely a godsend.
Position of the buttons in the tabs
Operating Points: Select the data table (with headings) to be analyzed before clicking on the menu.
- In the form of data tables need to analyze the selected range (in order to allow the software to better identify the meaning of the data, the selection of the range should try to include the content of the title), and then click on the menu bar in the [data analysis] button to open the dialog box
- In the upper right corner of the [Analysis Angle] in the need to analyze the angle, including trend analysis, comparative analysis, risk analysis, predictive analysis and opportunity analysis several options. You can also select [Customize] to set up other analysis methods.
- If necessary, other specific requirements can be added to the [Analysis Requirements] text box (not mandatory), for example: focus on the last three months of data observation
- Then click the [Submit] button, the lower result column will display "Data Analysis in Progress...", indicating that the AI is analyzing the data and trying to generate analysis results.
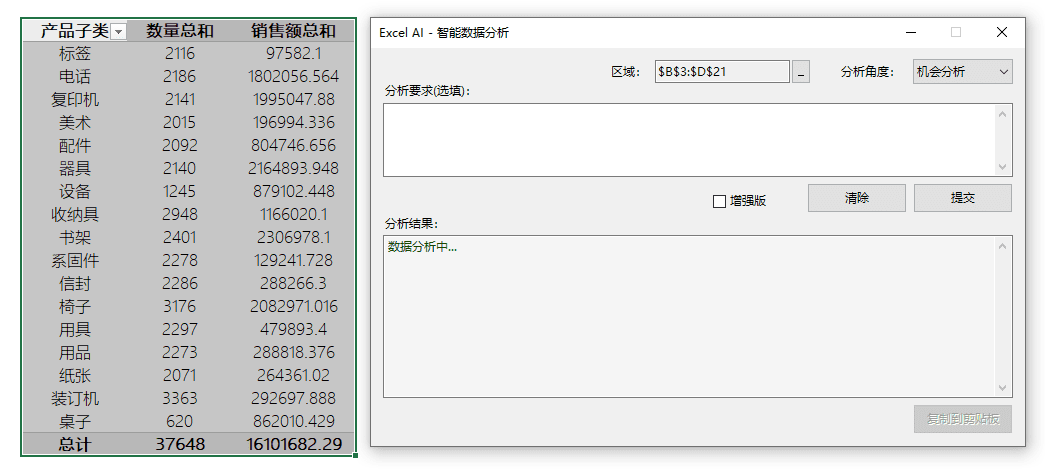
Dialog boxes for data analysis
- Once the data analysis is complete, the results are automatically displayed in the results column below.
- Checking the [Enhanced] checkbox will switch to the Enhanced mode, and the system will call a more advanced AI model for data analysis. Enhanced mode uses GPT-4o model by default, you can switch to other models in [Personal Center]. Note: Enhanced mode is not a free feature, it will consume your AI power.
- If you wish to copy the generated analysis conclusions elsewhere, you can click on the [Copy to Clipboard] button in the window, and the contents of the results column will be stored in the system clipboard, so you can paste them wherever you need them. Of course, if you prefer, you can also manually copy the results directly from the answer bar.
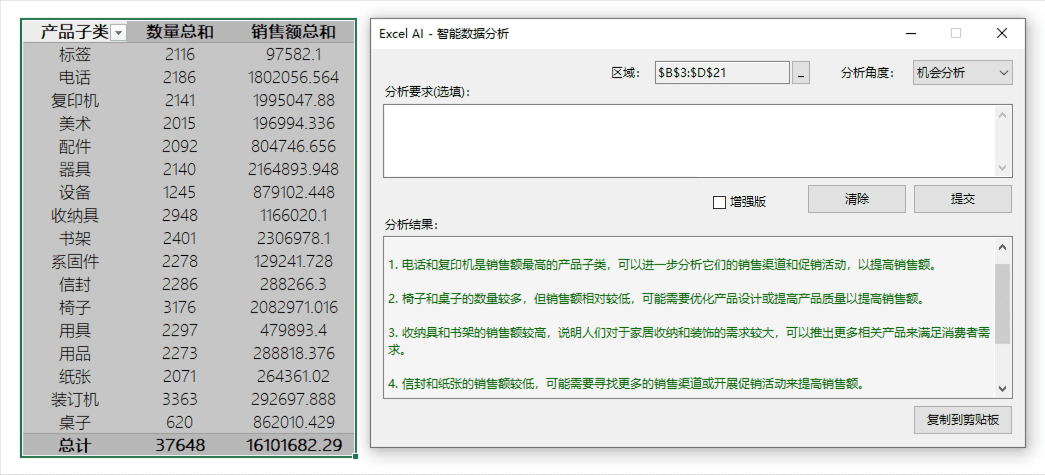
The results of the data analysis showed that
Operation Demonstration
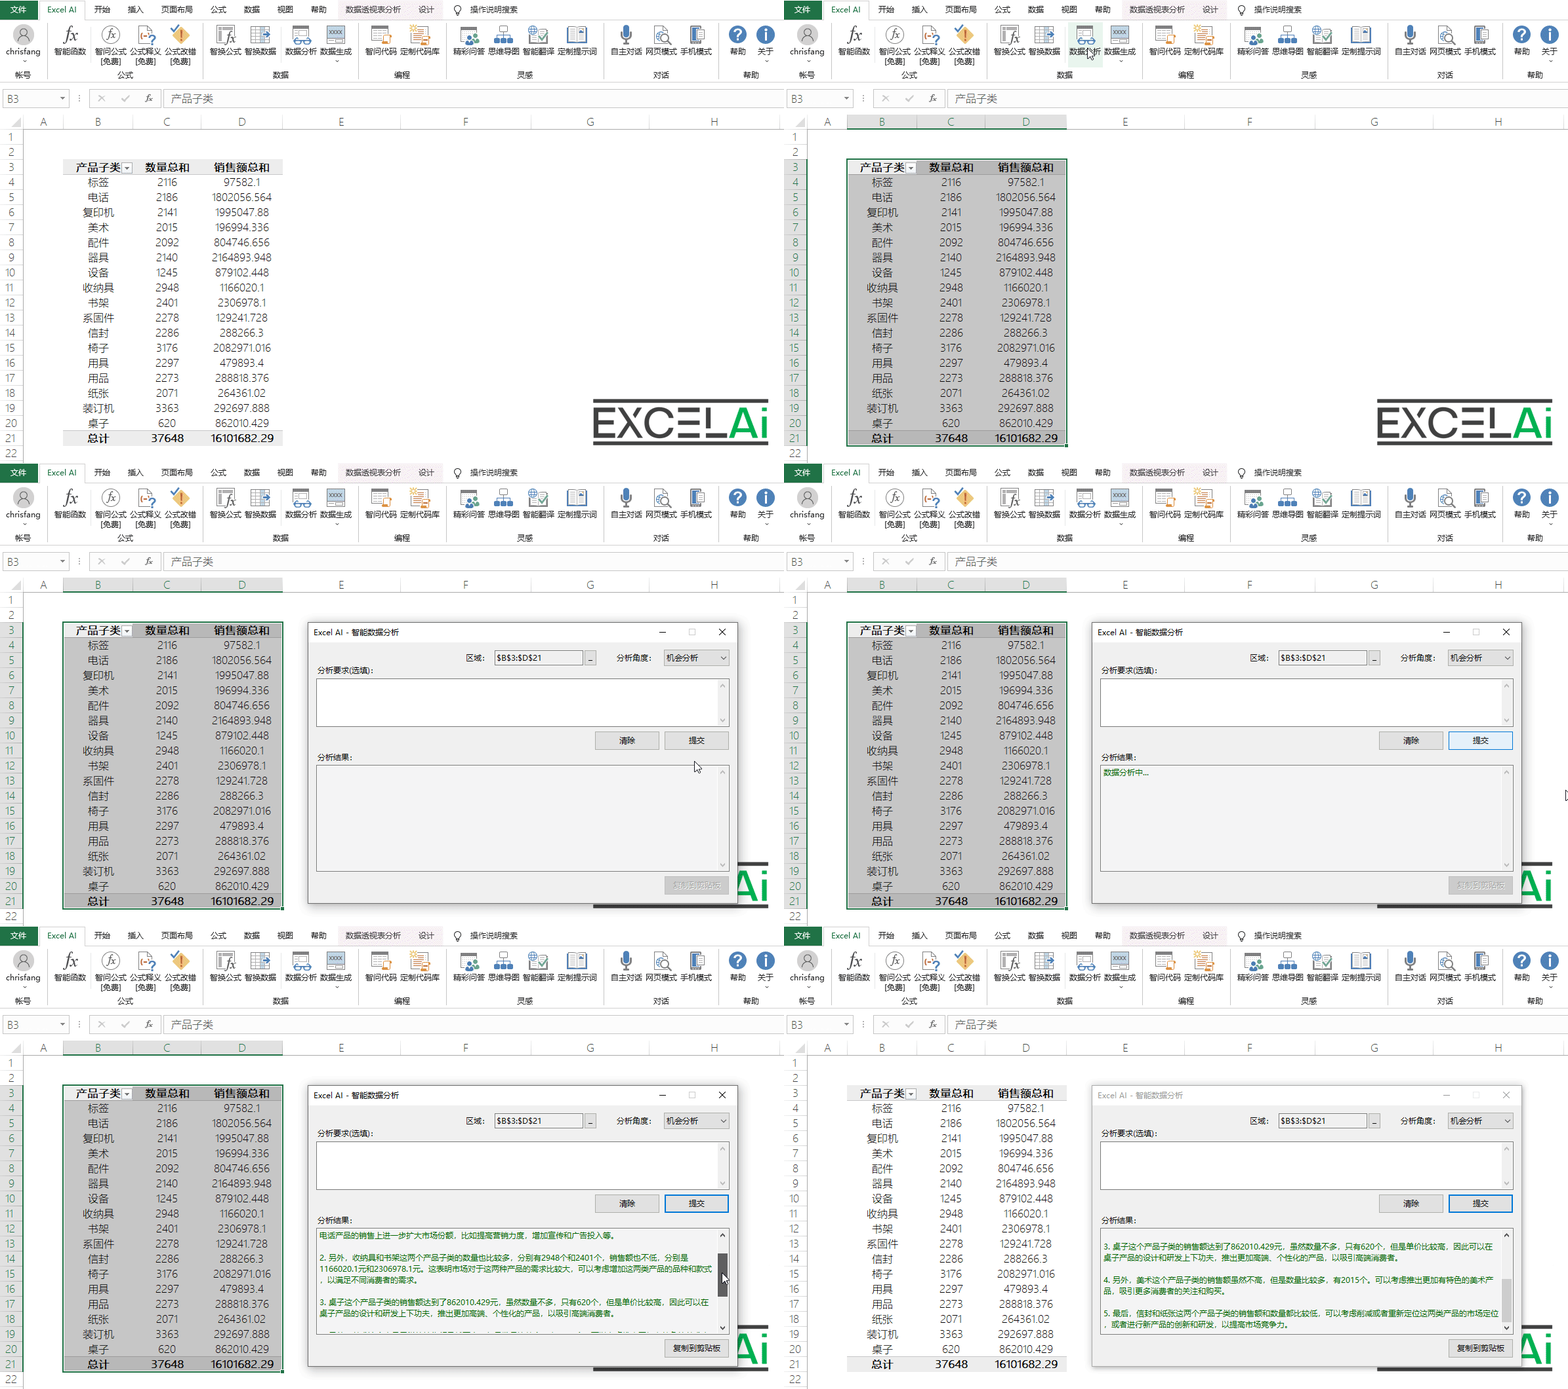 data analysis
8, Data generation
Data generation can generate virtual data from time dimension or personnel dimension for multiple industries, positions and KPI indicators.
Sometimes, when we want to validate some data processing logic, data analysis methods, or demonstrate and share some cases, we need to create some simulated test data. In the past, we may need to spend a lot of time to write and fill in these simulated data, or use some simulated data generation tools to generate. But now, the AI-enhanced [Data Generation] function can accomplish this task more easily.
Position of the buttons in the tabs
Data generation is divided into two modes [Time Dimension] and [Personnel Dimension], which can be selected from the menu below the button
8-1 Time Dimension
- Click the [Data Generation] - [Time Dimension] button in the menu bar to open the dialog box.
- Select and set these generation options below:
- Language: The generated data can support both Chinese and English languages.
- Number of rows: you can set the number of rows of data generated, with more rows consuming more AI interface traffic (the options for the number of rows will vary depending on the time granule selected. For example, if month is selected for the time granule, the number of rows will be a multiple of 6 or 12)
- Industry: you can choose from more than ten major industry types such as construction, catering, tourism, commerce, etc.
- Functions: you can choose common functions in the enterprise, such as human resources, financial management, marketing and sales, quality management, etc.
- Performance Indicators: Based on the industry and function you select, AI will automatically map out what KPIs need to be assessed for the position, and the data generated by the AI simulation will use these indicators as data fields. You can choose the number of indicators in this option to determine the size of the final data set, there are 3/5/10 Three options.
- Time Granularity: In the time dimension model, the data rows generated are granulated in time units. Specific time units can be selected in this option, there are Days/week/month/quarter/year These five choices. The choice of time particles affects the row The optional.
- After the completion of the above options, click on the bottom of the [Generate] button to start the generation of virtual data, the preview bar below will show "data generation..." words.
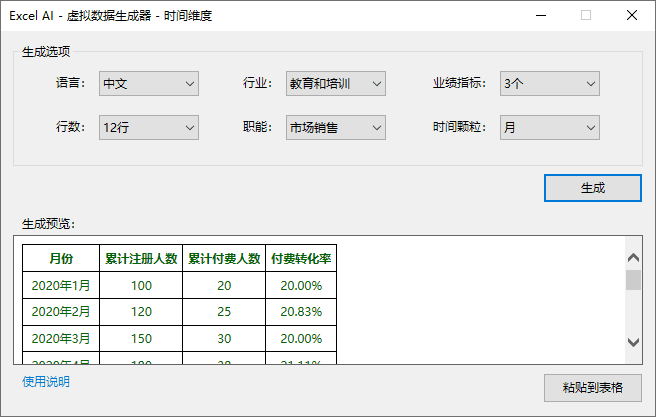
Data generation - dialog box for time dimension
- After the completion of data generation, will be displayed in the preview column to generate the table style data, you can click the [Paste to Form] button to paste the results directly into the table to form a data table Note: This operation will overwrite the current active cell as the starting point of the data area has been content, so Excel AI will prompt you to do so the risk of the operation, and need your confirmation. If you do not want to overwrite existing data, you can select a nearby blank area in the table before clicking this button.
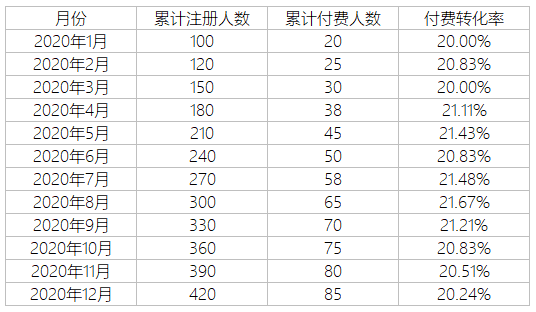
Data pasted into tables
Operation Demonstration
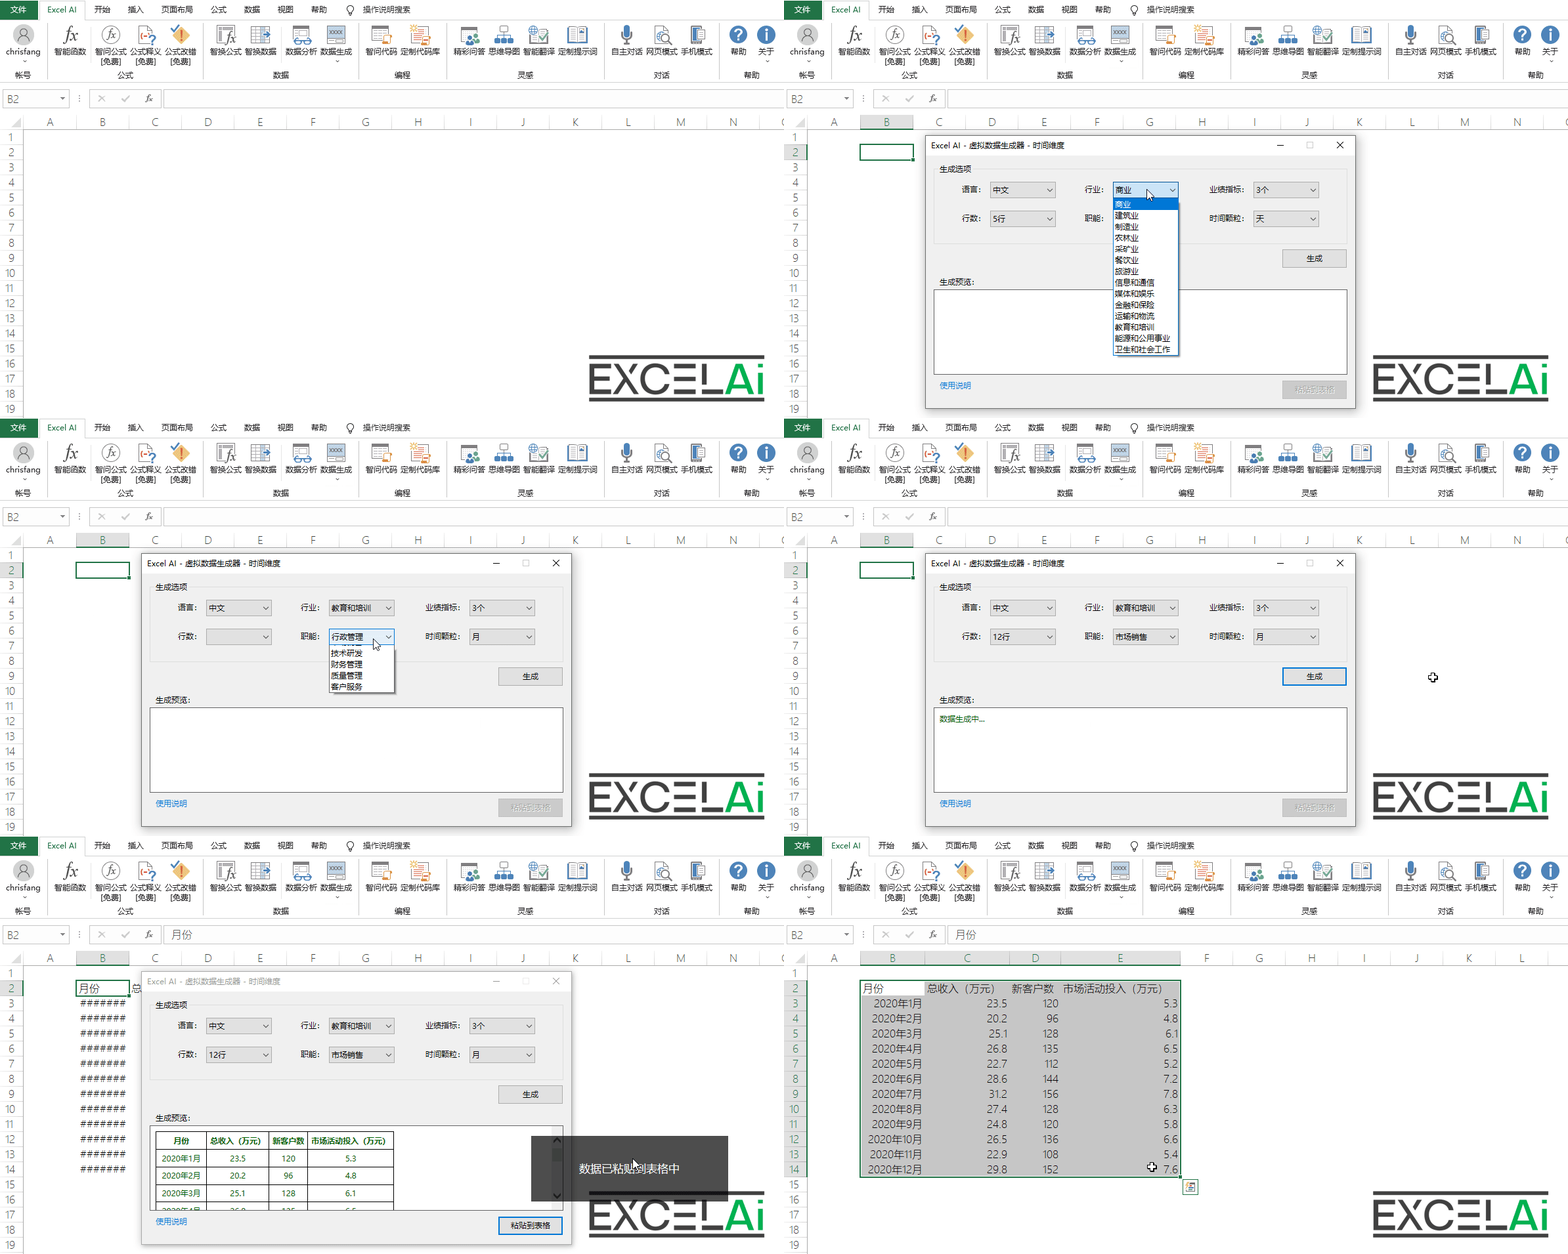 Data generation - time dimension
8-2 Personnel Dimension
- Click the [Data Generation] - [Personnel Dimension] button in the menu bar to open the dialog box.
- Select and set these generation options below:
- Language: The generated data can support both Chinese and English languages.
- Number of rows: you can set the number of rows of data generated, the more rows will consume more AI interface traffic
- Industry: you can choose from more than ten major industry types such as construction, catering, tourism, commerce, etc.
- Functions: you can choose common functions in the enterprise, such as human resources, financial management, marketing and sales, quality management, etc.
- Performance Indicators: Based on the industry and function you select, AI will automatically map out what KPIs need to be assessed for the position, and the data generated by the AI simulation will use these indicators as data fields. You can choose the number of indicators in this option to determine the size of the final data set, there are 3/5/10 Three options.
- People Fields: In the People Dimension model, the data rows generated are based on people as the main data granule. This checkbox allows you to select the people fields that need to appear in the dummy data, such as age, gender, job title, company name, etc. (If you do not select any people fields, the default will be name as the people dimension in the resulting data table). (If no personnel fields are selected, the default will be name as the personnel dimension in the resulting data table.)
- After the completion of the above options, click on the bottom of the [Generate] button to start the generation of virtual data, the preview bar below will show "data generation..." words.
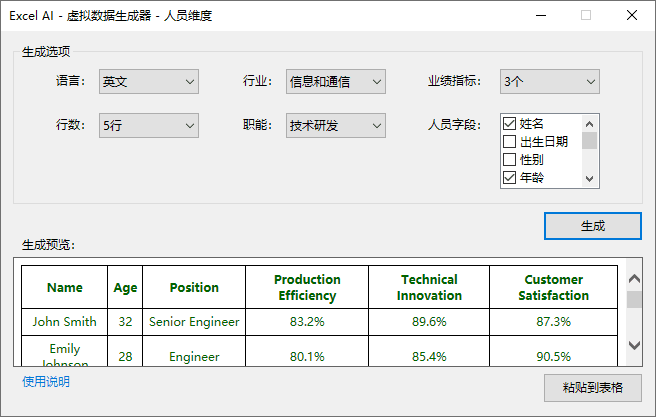
Data Generation - Dialog Box for Personnel Dimension
- After the completion of data generation, will be displayed in the preview column to generate the table style data, you can click the [Paste to Form] button to paste the results directly into the table to form a data table Note: This operation will overwrite the current active cell as the starting point of the data area has been content, so Excel AI will prompt you to do so the risk of the operation, and need your confirmation. If you do not want to overwrite existing data, you can select a nearby blank area in the table before clicking this button.

Data pasted into tables
Tip: Too many fields or too many rows settings may cause the AI interface to fail due to timeout or exceeding the number limit. If you want more data results, try generating several more times with fewer parameters and splicing the results each time.
Operation Demonstration
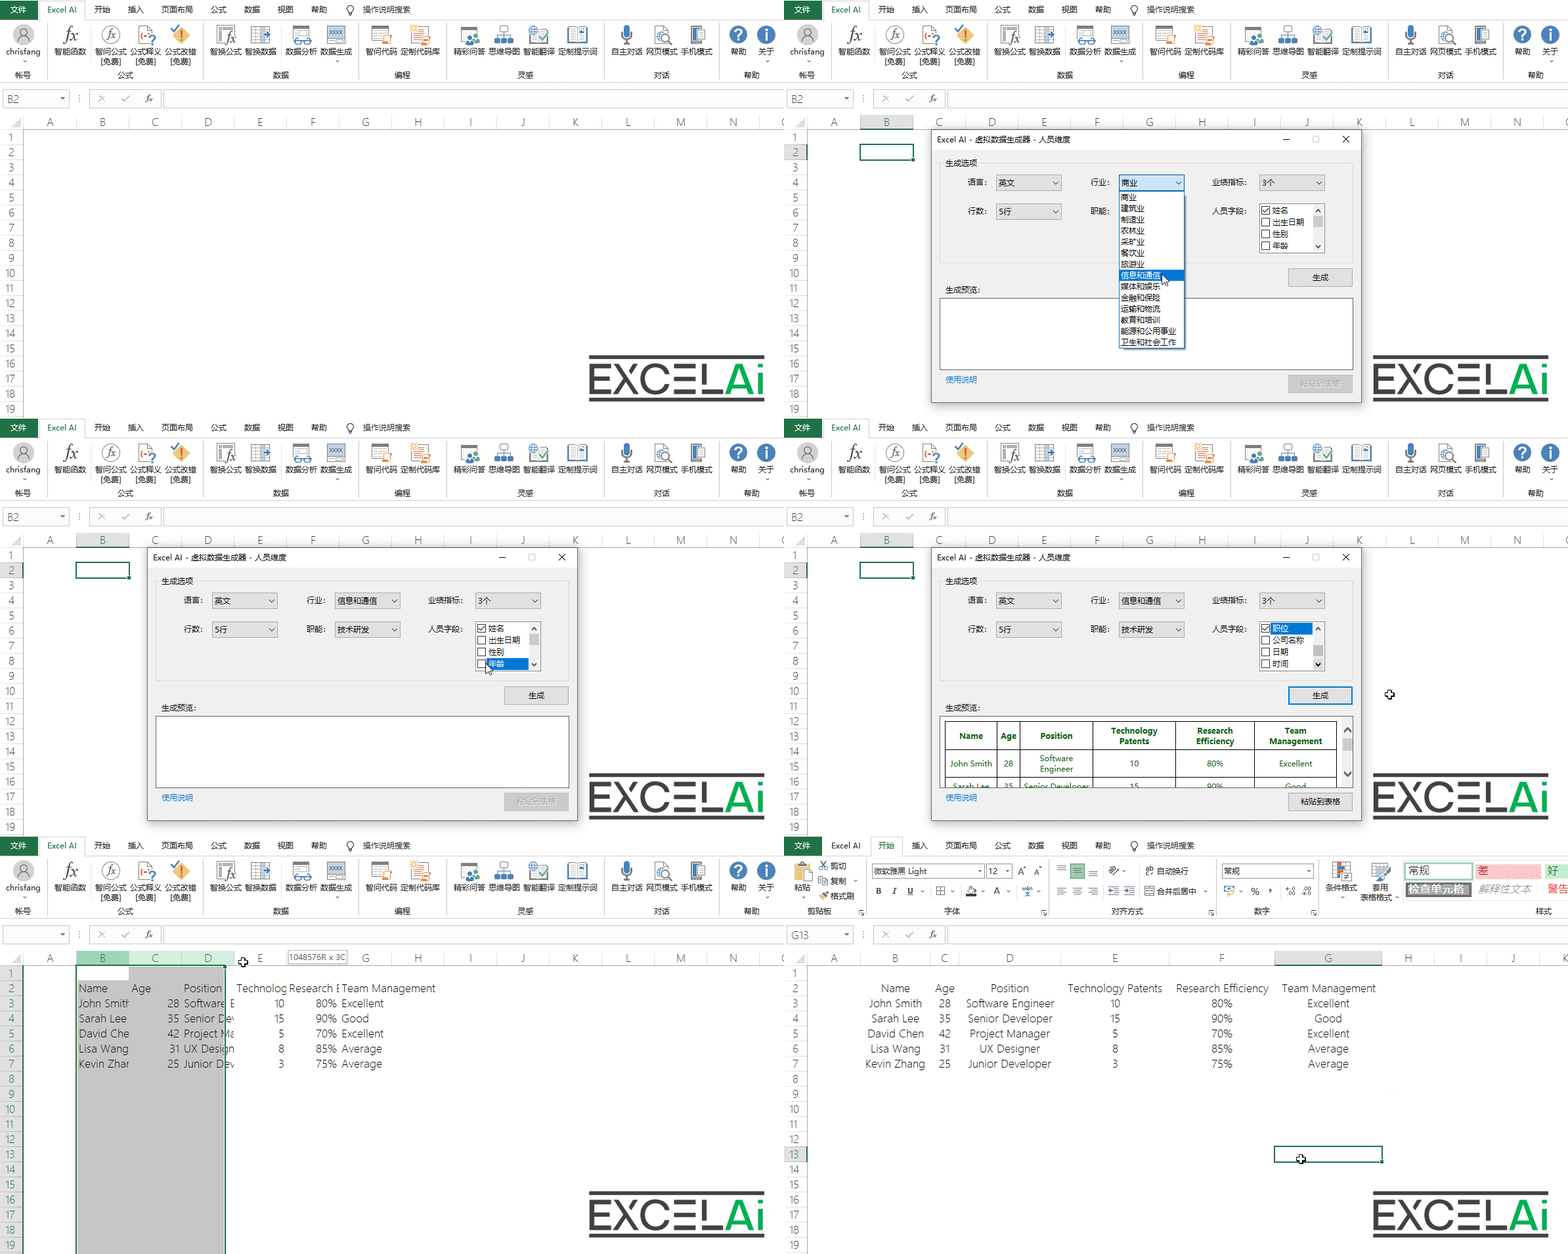 Data generation -- personnel dimension
Situations requiring attention
- If the amount of data requested is too large and causes the network interface access timeout, the message "AI Service Request Failed" will pop up, you can try to reduce the number of selected fields or rows, and then submit again.
9, Data charts
Data charts can be easily and quickly generated through the existing data templates, dozens of beautifully shaped commonly used charts.
Tip: This feature is currently free!
In the use of Excel comes with the data charting function in the process, the chart type is less, the chart is set up complexity is the common groove of many people.
[Data Chart] is the hope that the chart design aspects of the program to deal with, so that white users can also quickly draw a professional and beautiful data charts, simply move the button to switch between different styles.

Position of the buttons in the tabs
The use of [Data Chart], is the first in the form of the need to draw a chart of the data area, and then click on the [Data Chart] button, select the desired type of chart and style can be.
If you have no idea about the data source needed to draw the chart, you can click [Import Sample Data] in the bottom menu, the plug-in will automatically generate a detailed sample data for you, you can refer to the sample data to experience the effect of each type of chart.
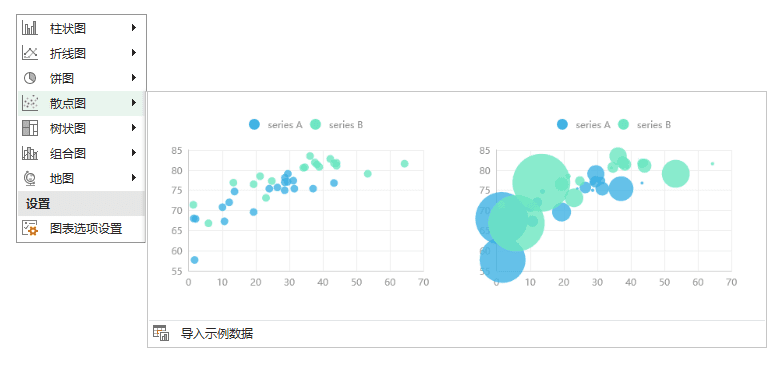
Chart type selection and importing sample data
The charts drawn are displayed in the sidebar by default, and you can choose to insert them into the table in the form of a picture, or save them as a separate picture file, and the corresponding operation buttons are [Copy to Table] and [Export Picture] in the lower right corner of the chart window, respectively.
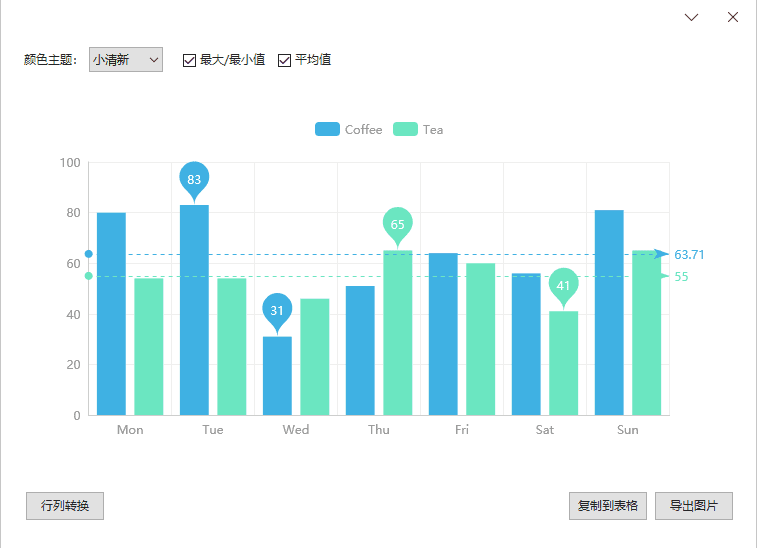
Chart generation results
10, Wisdom Code
Smart Ask Code can seek code by asking questions in natural language and currently supports four types of code: VBA, DAX, SQL and Python.
Tip: This feature is free in regular mode and paid in enhanced mode.
In Excel data processing applications, there are times when we may try to automate certain processes using programming languages such as VBA and Python. However, for many professionals with a non-programming background, writing code can be a bit of a hassle. Finding applicable code examples, understanding algorithms, and resolving errors can consume a lot of time and effort.
[Smart Ask Code] is designed to solve this problem. All you have to do is ask a natural language question and our AI system will return the code you need. Whether you want to merge worksheets with VBA, or write a formula for a metric value with DAX, or query specific information in a database with SQL, or even write a crawler tool for web data in Python, [Smart Ask Code] can help you find the answer and make programming less difficult!
We also provide in itOnline Code LibraryThis is a collection of classic code examples for common application scenarios, in which you can directly find and select the code you need without consuming AI power.
The online code base will be supplemented with various code examples from time to time.

Position of the buttons in the tabs
- Click the [Ask Code] button in the menu bar to open the dialog box.
- Select the type of target code you wish to generate in [Code Type] at the bottom, for example:
VBA - Fill in the text box below with the function or goal that you need the code to accomplish, for example:
将Folder目录下的所有Excel文件名称显示在A列当中 - Then click on the bottom of the [Generate] button, wait a few moments in the upper part of the code editing column will be displayed in the AI automatically generated code results
Friendly reminder: the generated code sometimes need specific software version to support, or the use of the environment and the scene has certain requirements, so it can not be completed to ensure that the code is fully applicable and accurate!
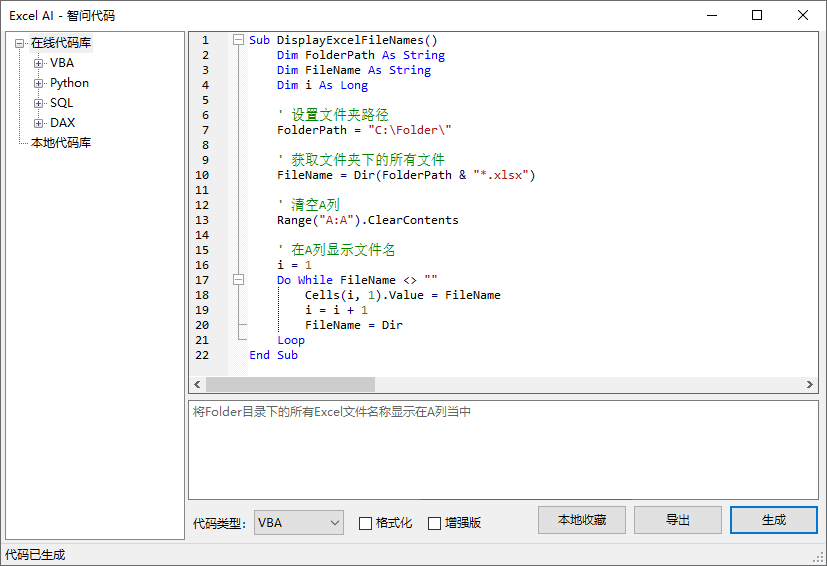
Dialog box for the Wisdom Ask code
- The content of the code displayed in the code editing field can continue to edit and modify, also supports copy and paste
- Checking the [Enhanced] checkbox will switch to the Enhanced mode, and the system will call a more advanced AI model to generate code. Enhanced mode uses GPT-4o model by default, you can switch to other models in [Personal Center]. Note: Enhanced mode is not a free feature, it will consume your AI power.
Operation Demonstration
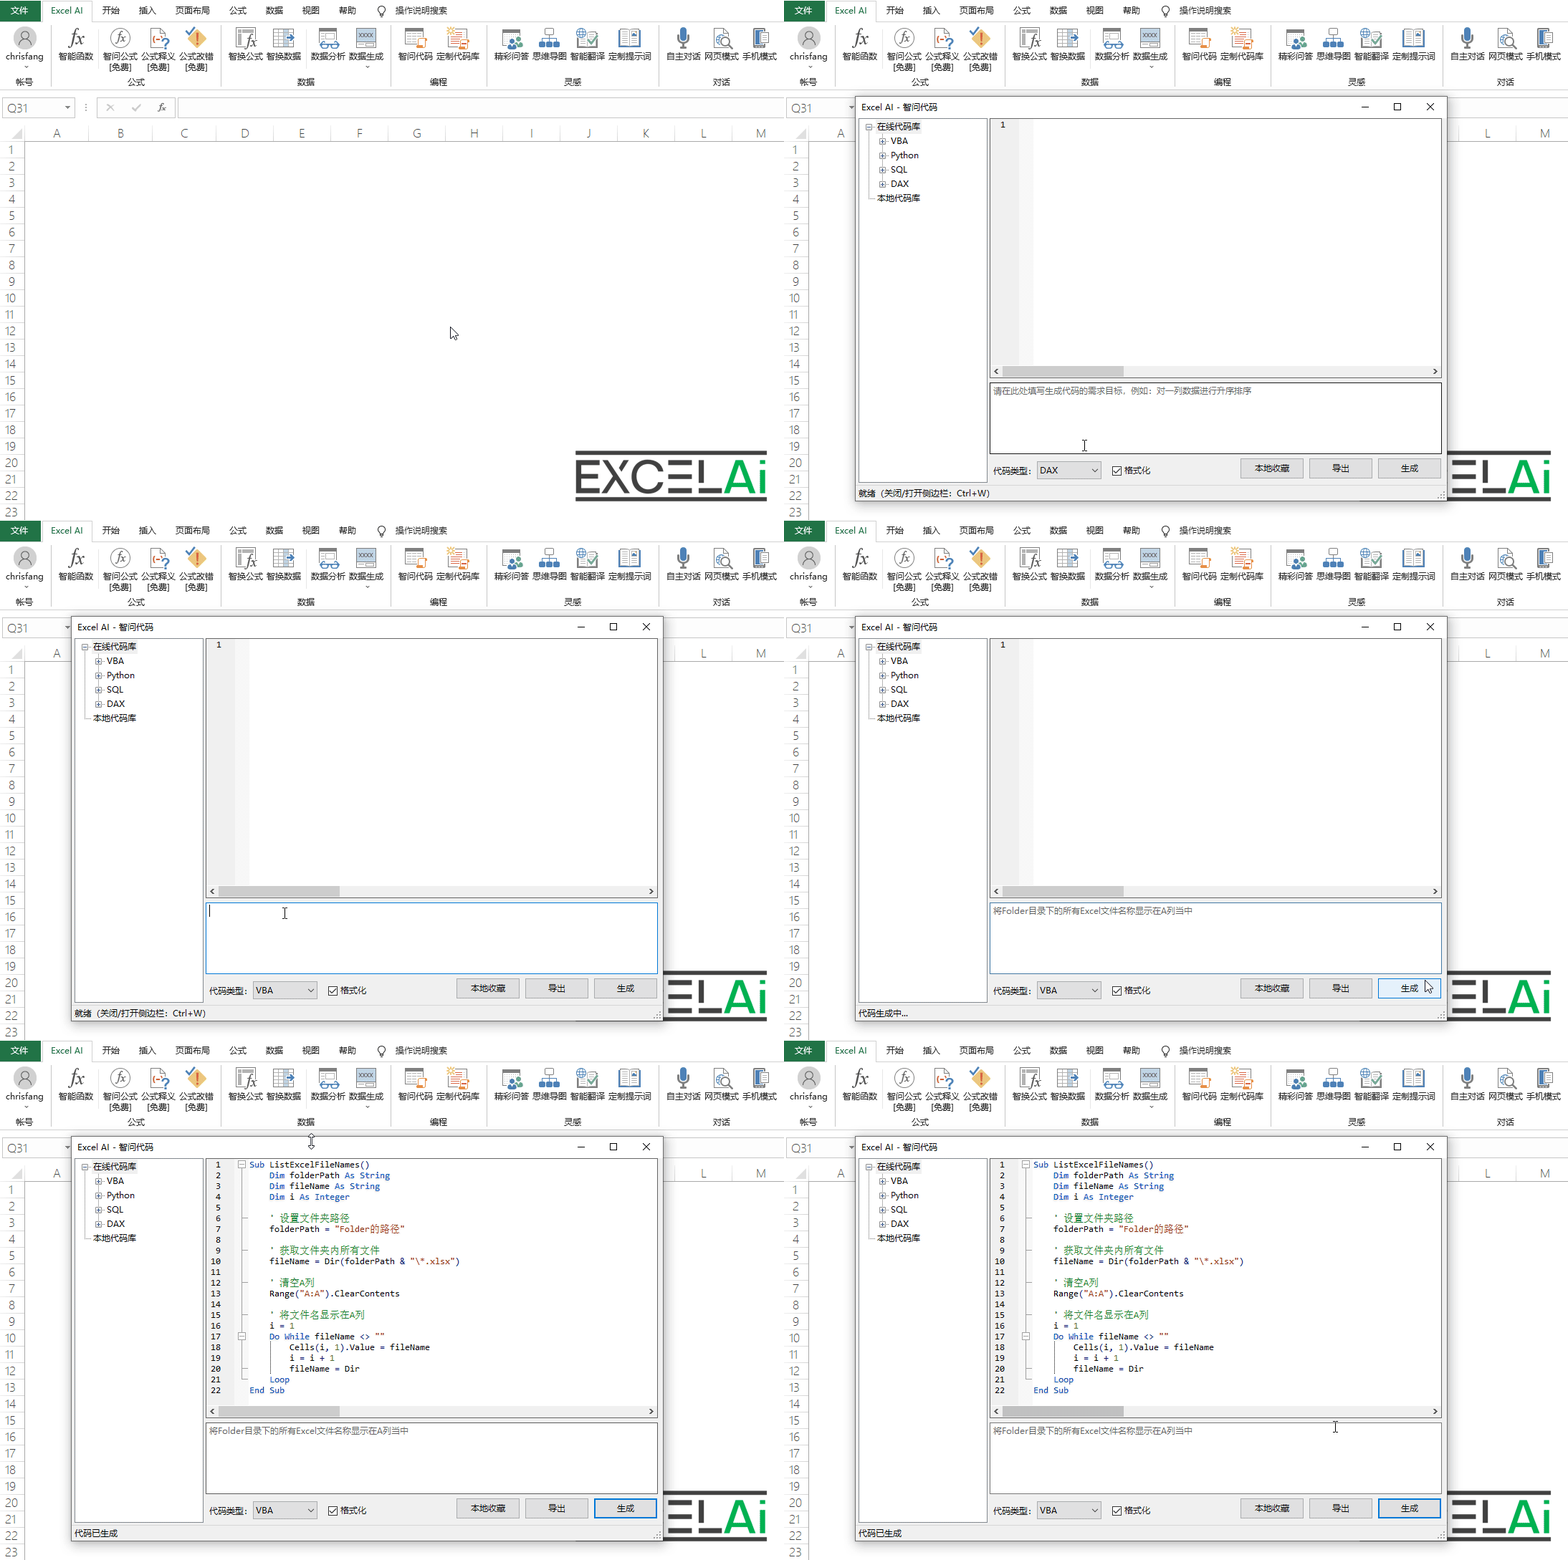 Smart Ask Code - Generate
Save file
- If necessary, you can click the [Export] button at the bottom of the dialog box to export the currently displayed code content to a file for storage.
- By default, VBA code will be saved in basic file format (.bas); Python code will be saved in python file format (.py); SQL code will be saved in sql file format (.sql); DAX code will be saved in csv file format (.csv)
Favorite Codes
If you feel that the current code has a collection value, and hope to be able to quickly find and use this group of code in the future, you can also choose to collect it in the local code base provided by the plug-in, the operation method is to click on the bottom of the dialog box of the [Favorite Code] button.
Friendly note: The saved code will take the content in the current question text box as the title text of the code by default. The name of the subcategory where the code is saved can be set in the [Customize Code Library] function, and the default name is [Uncategorized].
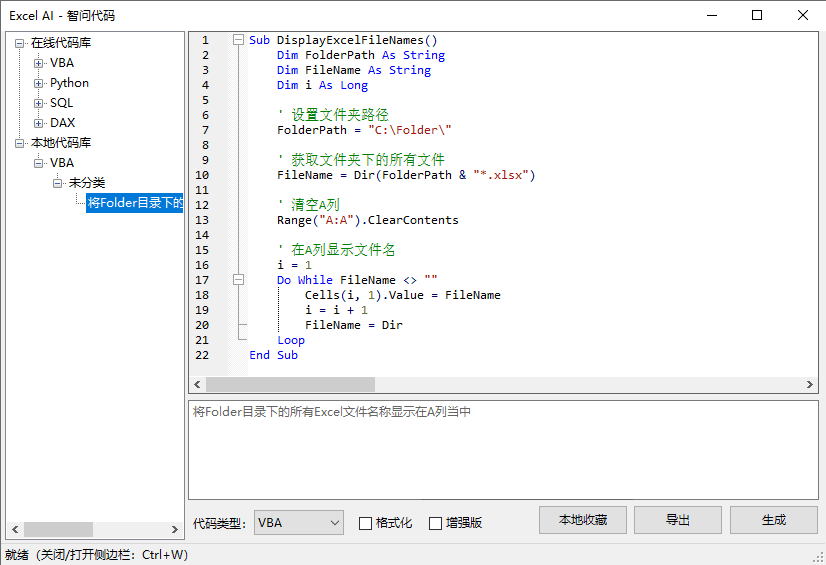
Bookmarking code to local codebase
Operation Demonstration
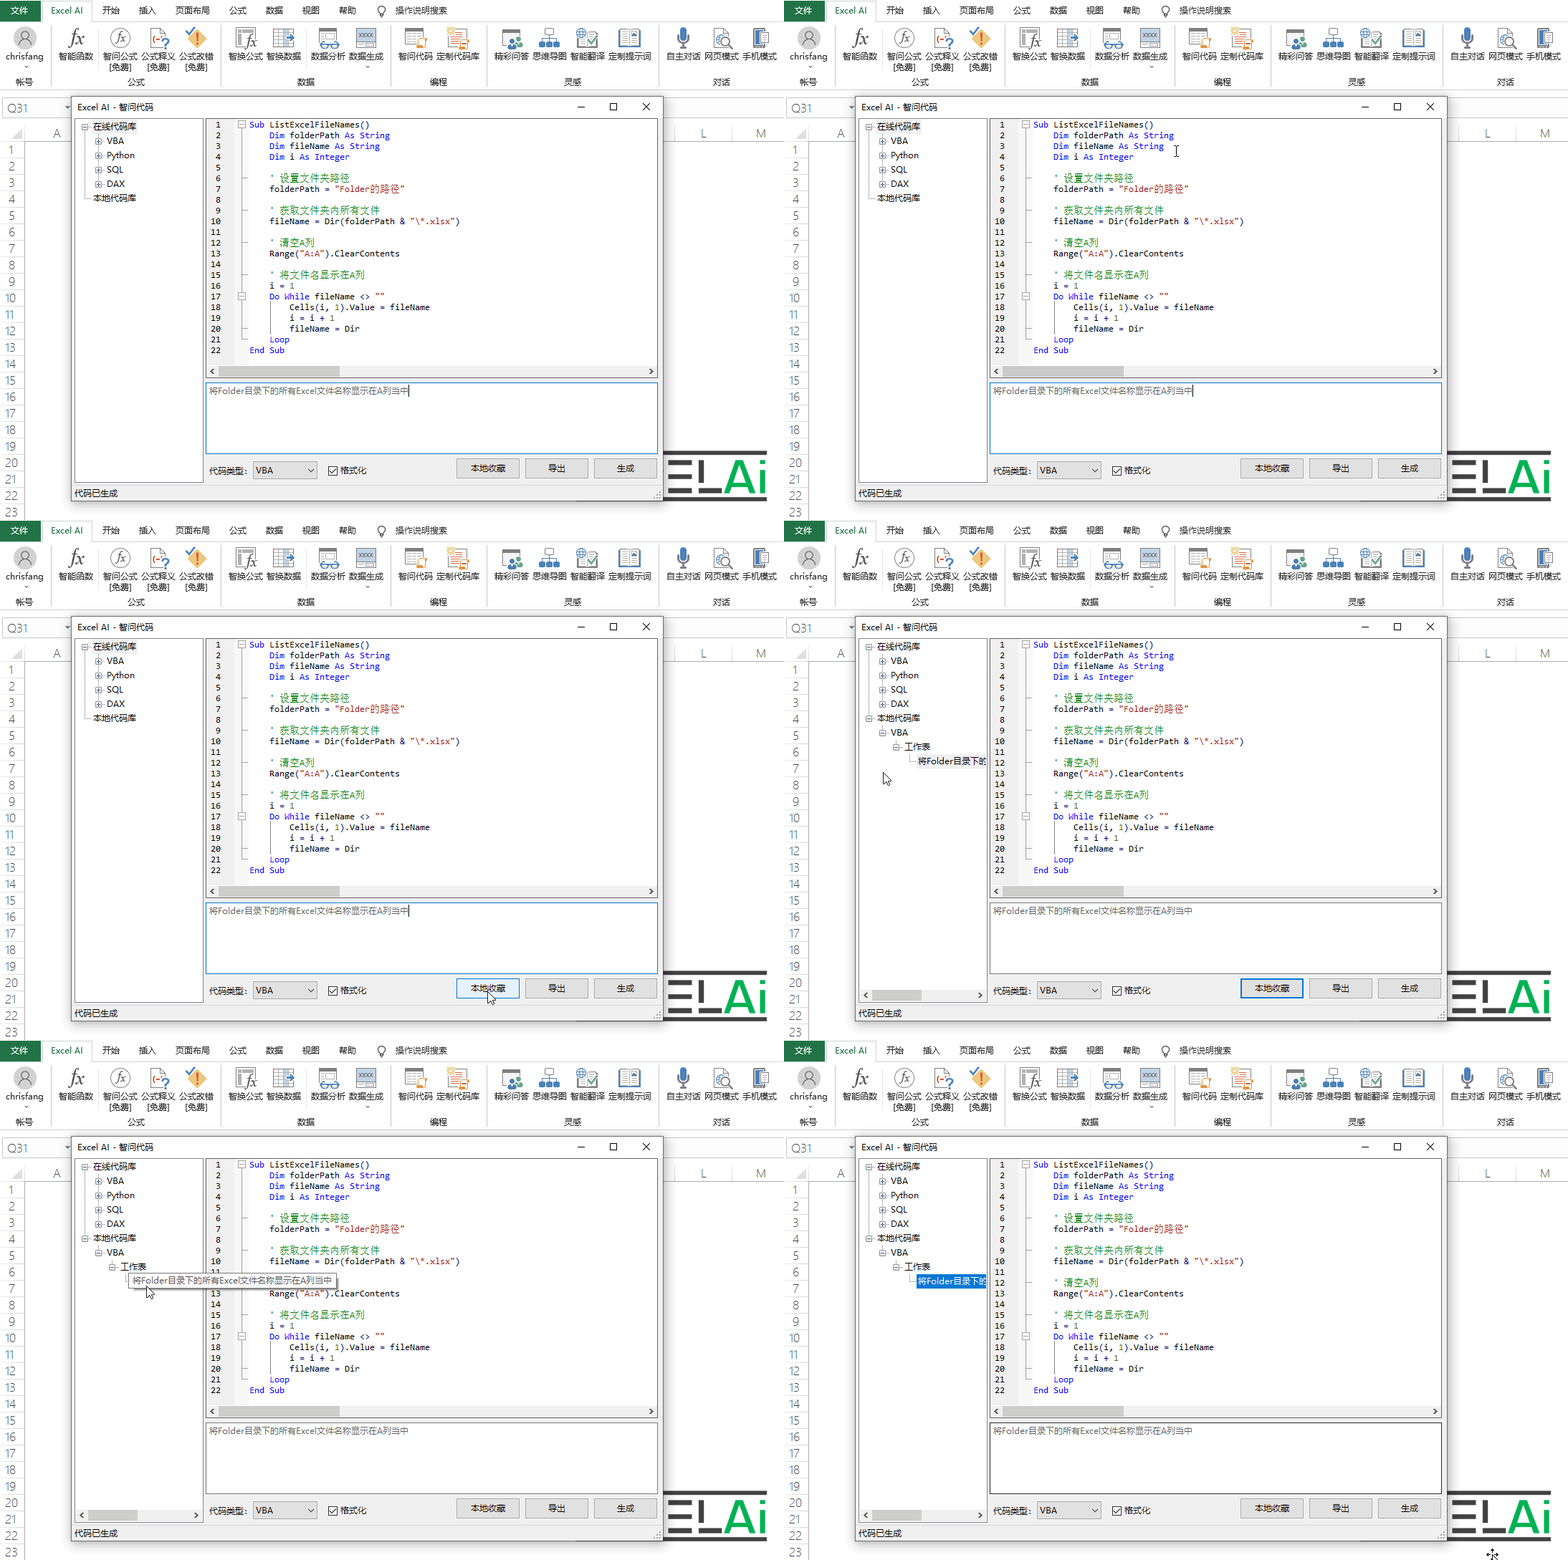 Wisdom Ask Code-Collection
Online Code Library
In addition to relying on their own collection of organization, we Excel AI's official also prepared for you a set of online code library, which has a collection of classic code examples of common application scenarios that we have collected and organized for you, so that it is convenient for you to quickly call.
Tip: Using the features associated with the online codebase will not consume your AI power!
- Find the online code library in the tree diagram on the left side of the dialog box, according to your needs, expand the categories at all levels, find the code you need, select it, right-click, click on the [Read Code] menu, wait a few moments, the specific code content will be displayed in the code editing column!
- The code in the local code base can also be read and displayed using the method above
Tips: When the code in the online code library is presented in the code editing column, you can also click on the [Favorite Code] button to bookmark it locally!
Tip: Press the shortcut key to hide or show the codebase tree on the left.
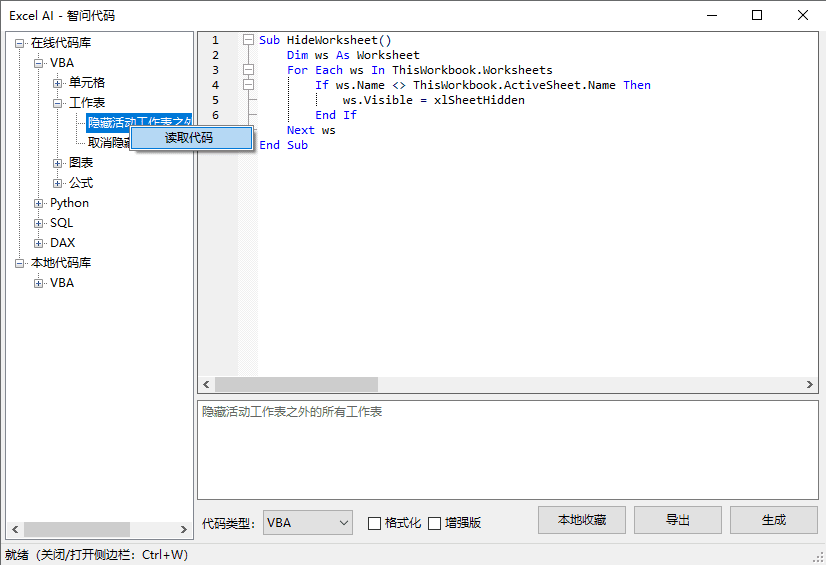
Read the online code
Operation Demonstration
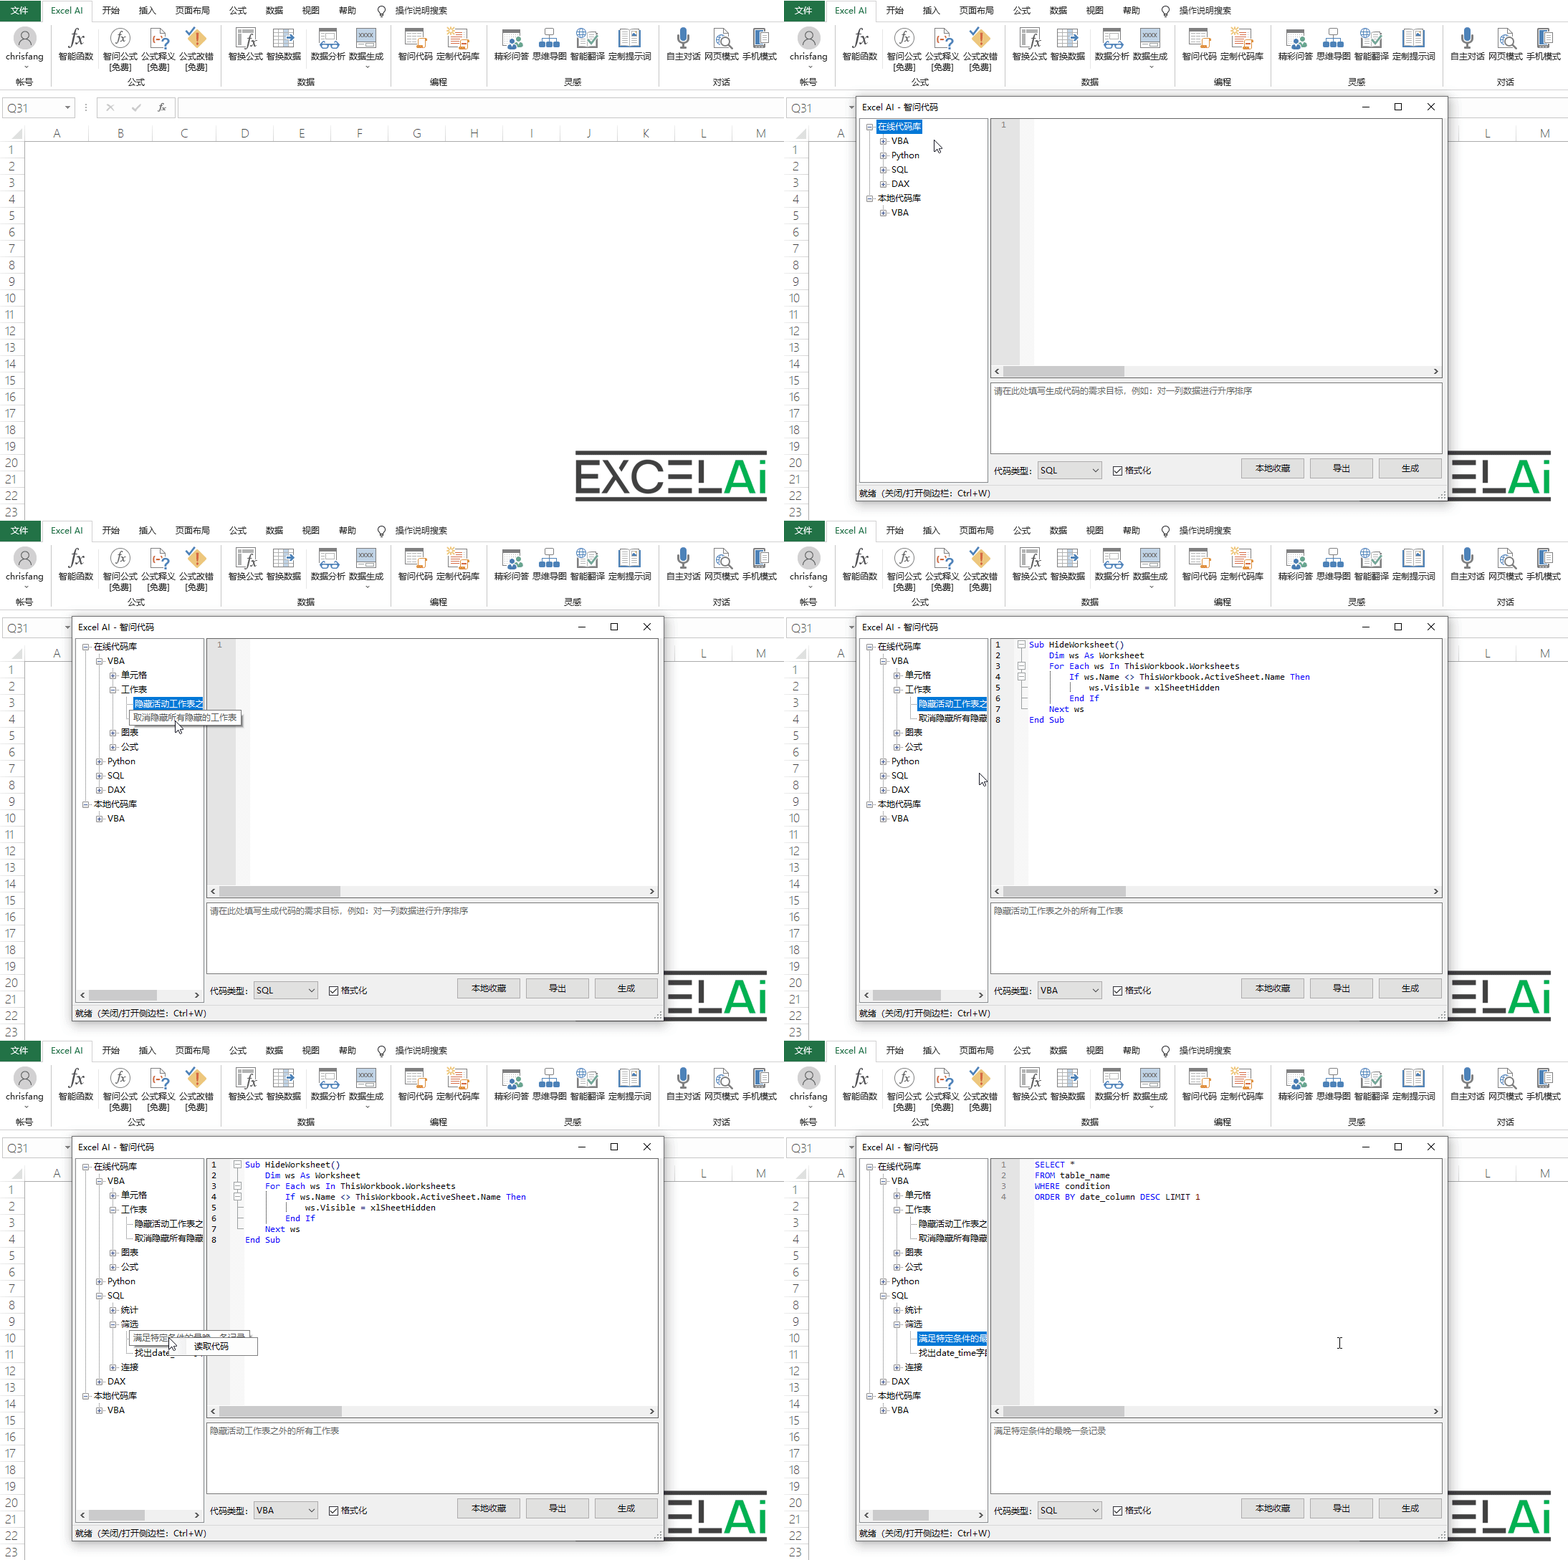 Wise Code - Online Code Library
formatting
If you want the code displayed in the code editing field to have better formatting effects, you can try to check the [Formatting] checkbox at the bottom of the dialog box. After checking this option, the code editing column will have automatic line breaks, automatic indentation, automatic adjustment of keywords, such as letter case after the beautification of the layout of the effect.
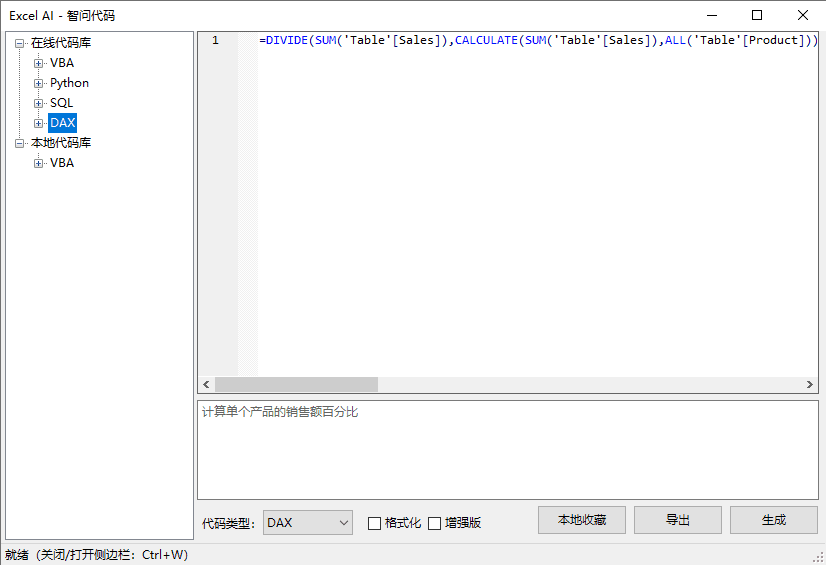
Before Formatting
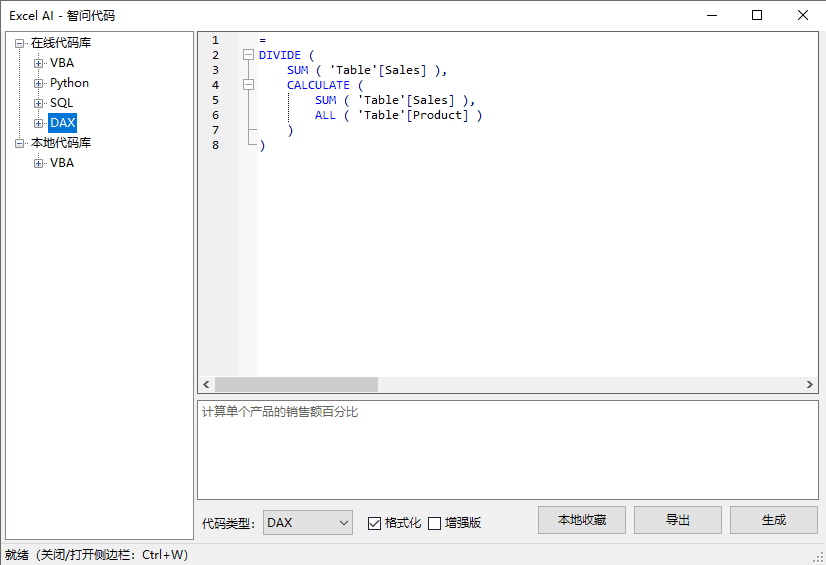
After formatting
Note: The formatted code cannot be restored to the pre-formatted display
Note: If the formatted code is modified by an editor, the formatting effect may be changed or lost. If you want to format the edited code, you need to turn off the [Formatting] option and then turn it on again.
11, Customized code base
Customized code libraries can be added, deleted, modified, and imported and exported to the local code library collection of maintenance and management operations.
If you often use the code collection function and have collected a lot of codes in the local code base, you can use the [Customize Code Base] function to organize and maintain these codes. You can also add new code to your collection directly through [Customize Code Library].
In addition, you can export or import your entire local codebase, and in this way you can share or exchange your favorite codes with your friends. Code lasts forever, collections last forever, sharing knows no boundaries, and inspiration never ends.
Friendly reminder: None of the functions related to [Customized Code Library] will consume your AI power!
Tip: Press the shortcut key to hide or show the codebase tree on the left.

Position of the buttons in the tabs
Add Code Collection
- Click the [Customize Code Base] button in the menu bar to open the dialog box
- Fill in the code edit field above with the content of the code that needs to be added to the collection
- At the bottom, select the type of code (VBA/Python/SQL/DAX), fill in the name of the subcategory, and fill in the title of the code in order, e.g., Code Type Selection:
Python, subcategory names are filled in:表格, code headings are filled in:将excel表格中的A、B两列数据纵向拼接后存储在C列 - Finally, click on the bottom of the [Add] button, you can bookmark this code to the local code base, and categorized in the appropriate types and sub-categories, in the tree on the left side of the title of the code will be displayed!
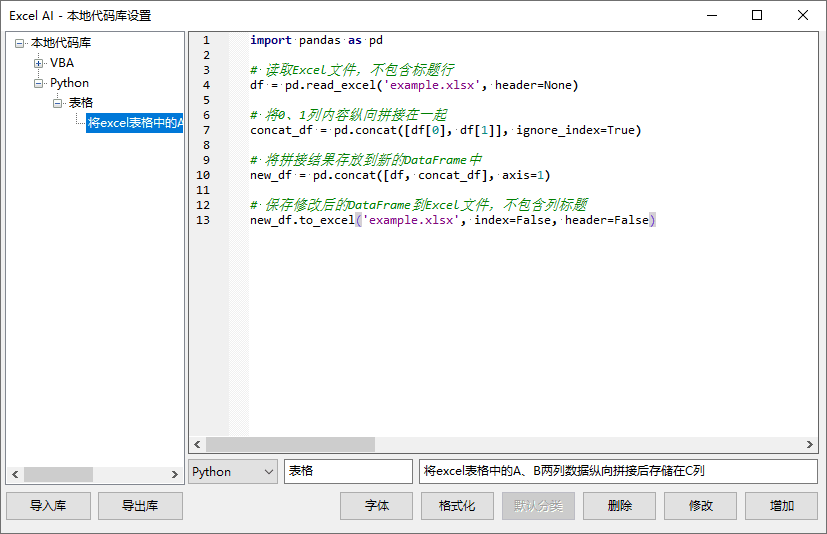
Adding code to the local code base
Operation Demonstration
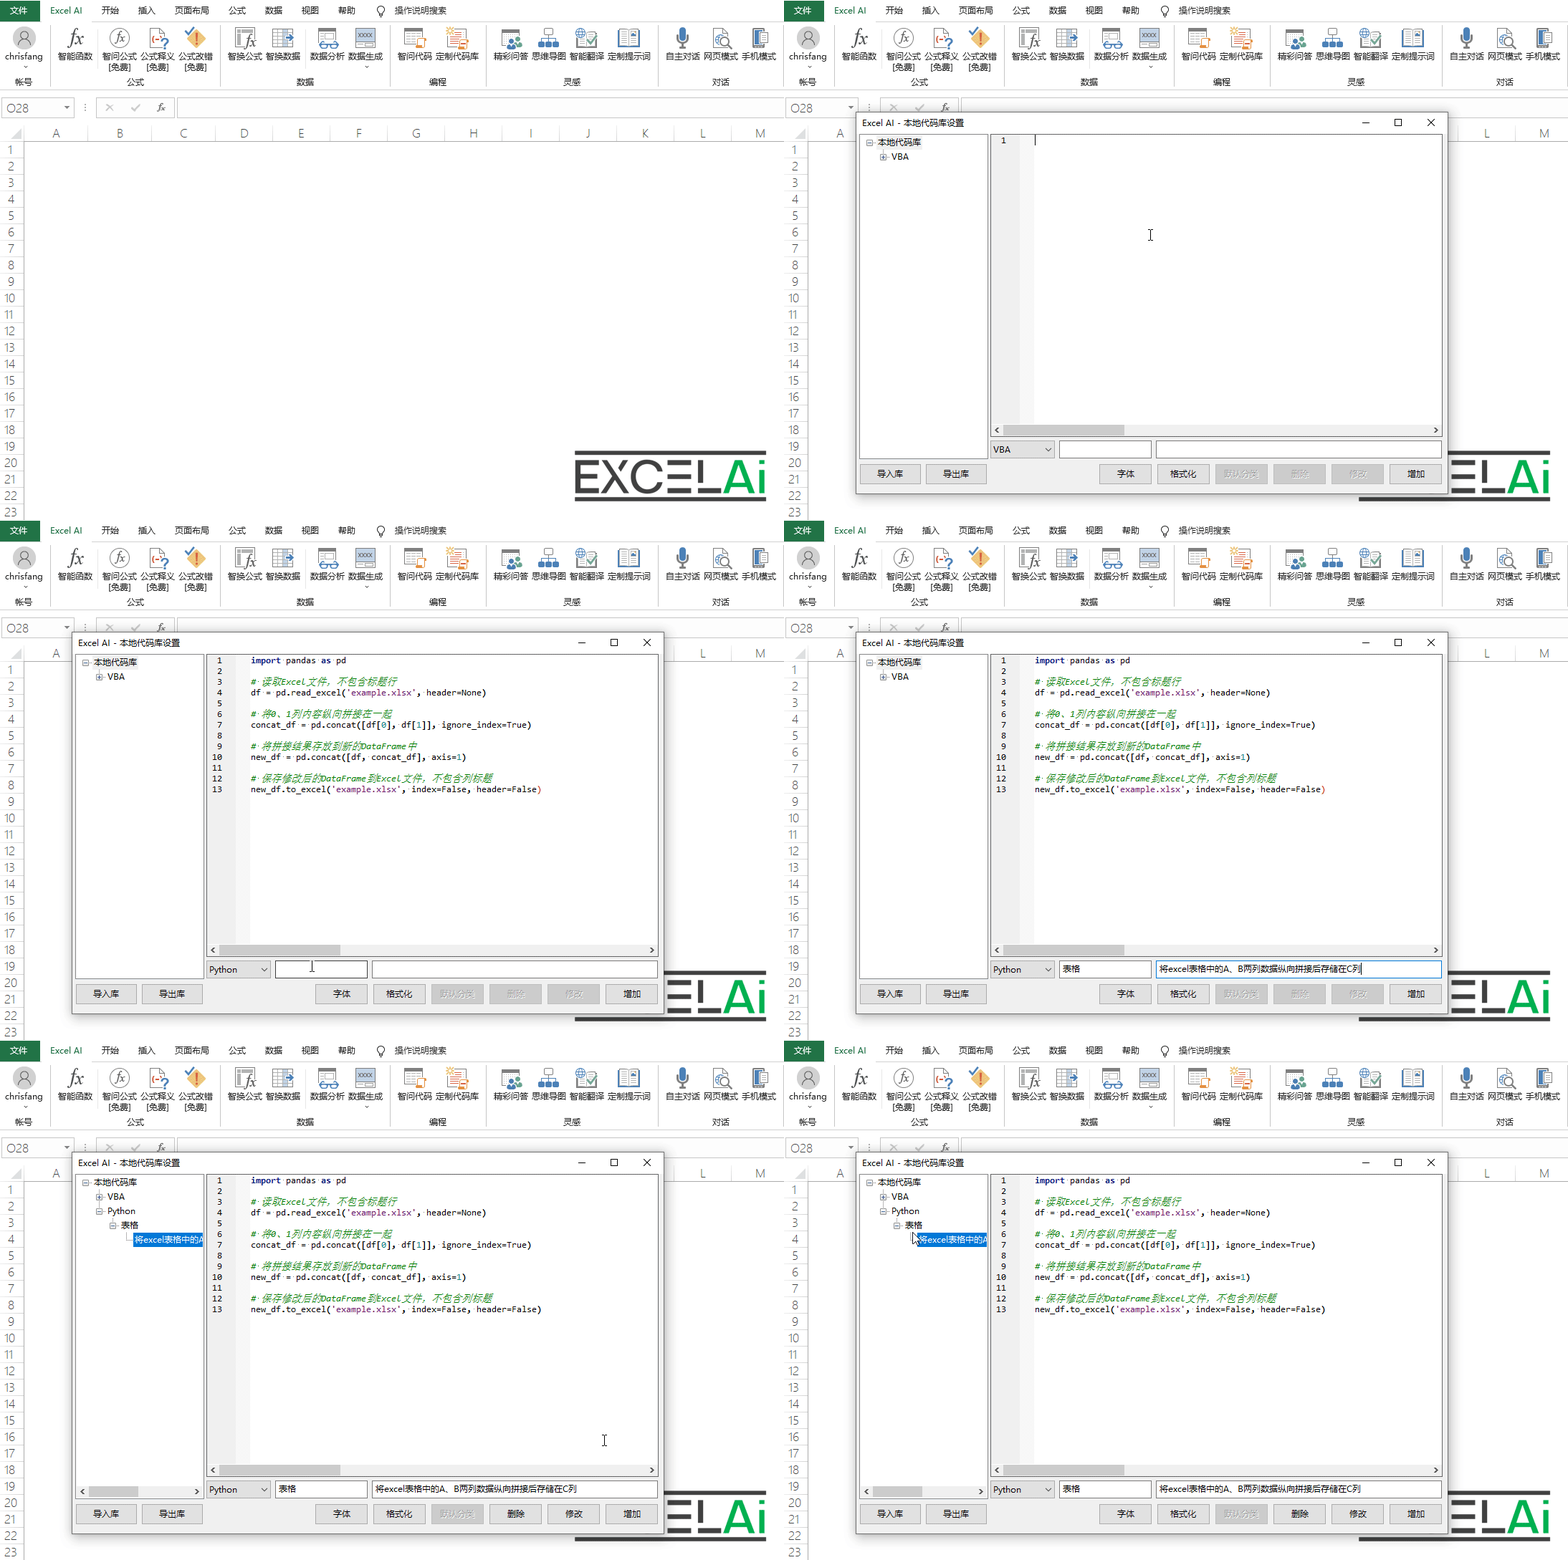 Customized Code Library - Add Code Collection
modifications
In the tree on the left side of the dialog box, all the codes that have been collected in the local code base will be displayed. If you select a specific code title, the specific code content will be displayed on the right side of the code editing column, and its code type, subcategory name, and title content will be displayed at the bottom of the dialog box. If necessary, you can modify the content of the code, or modify its code type and other related properties.
- Modify the content of your code in the code editing field, or modify its code type, subcategory name or title content below, and then click the [Modify] button to complete the modification.
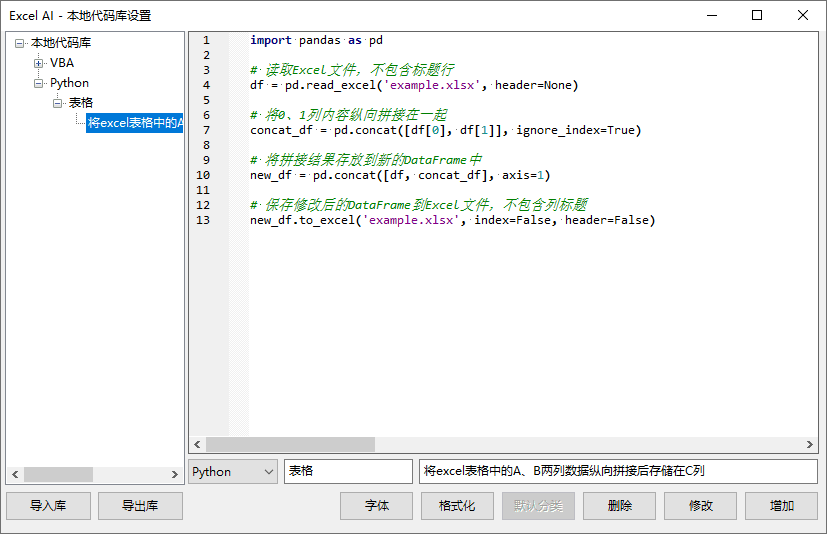
before modification
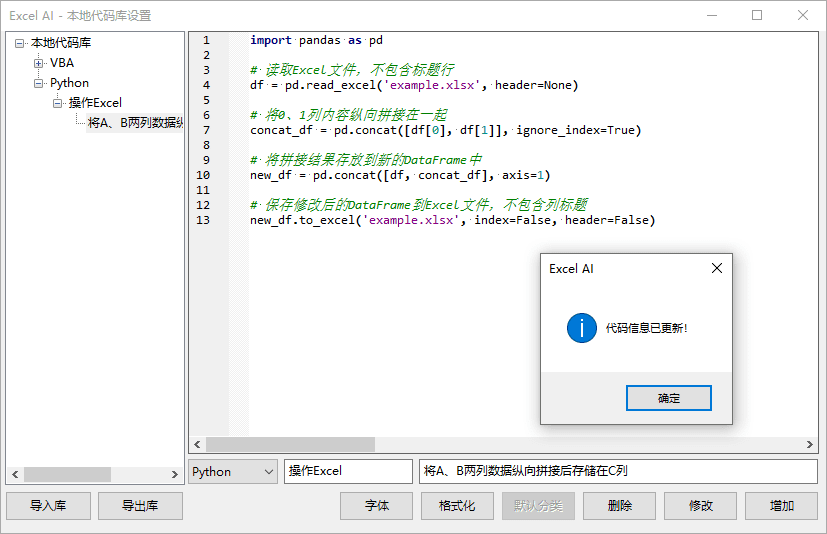
Modified (subcategory and title change)
Operation Demonstration
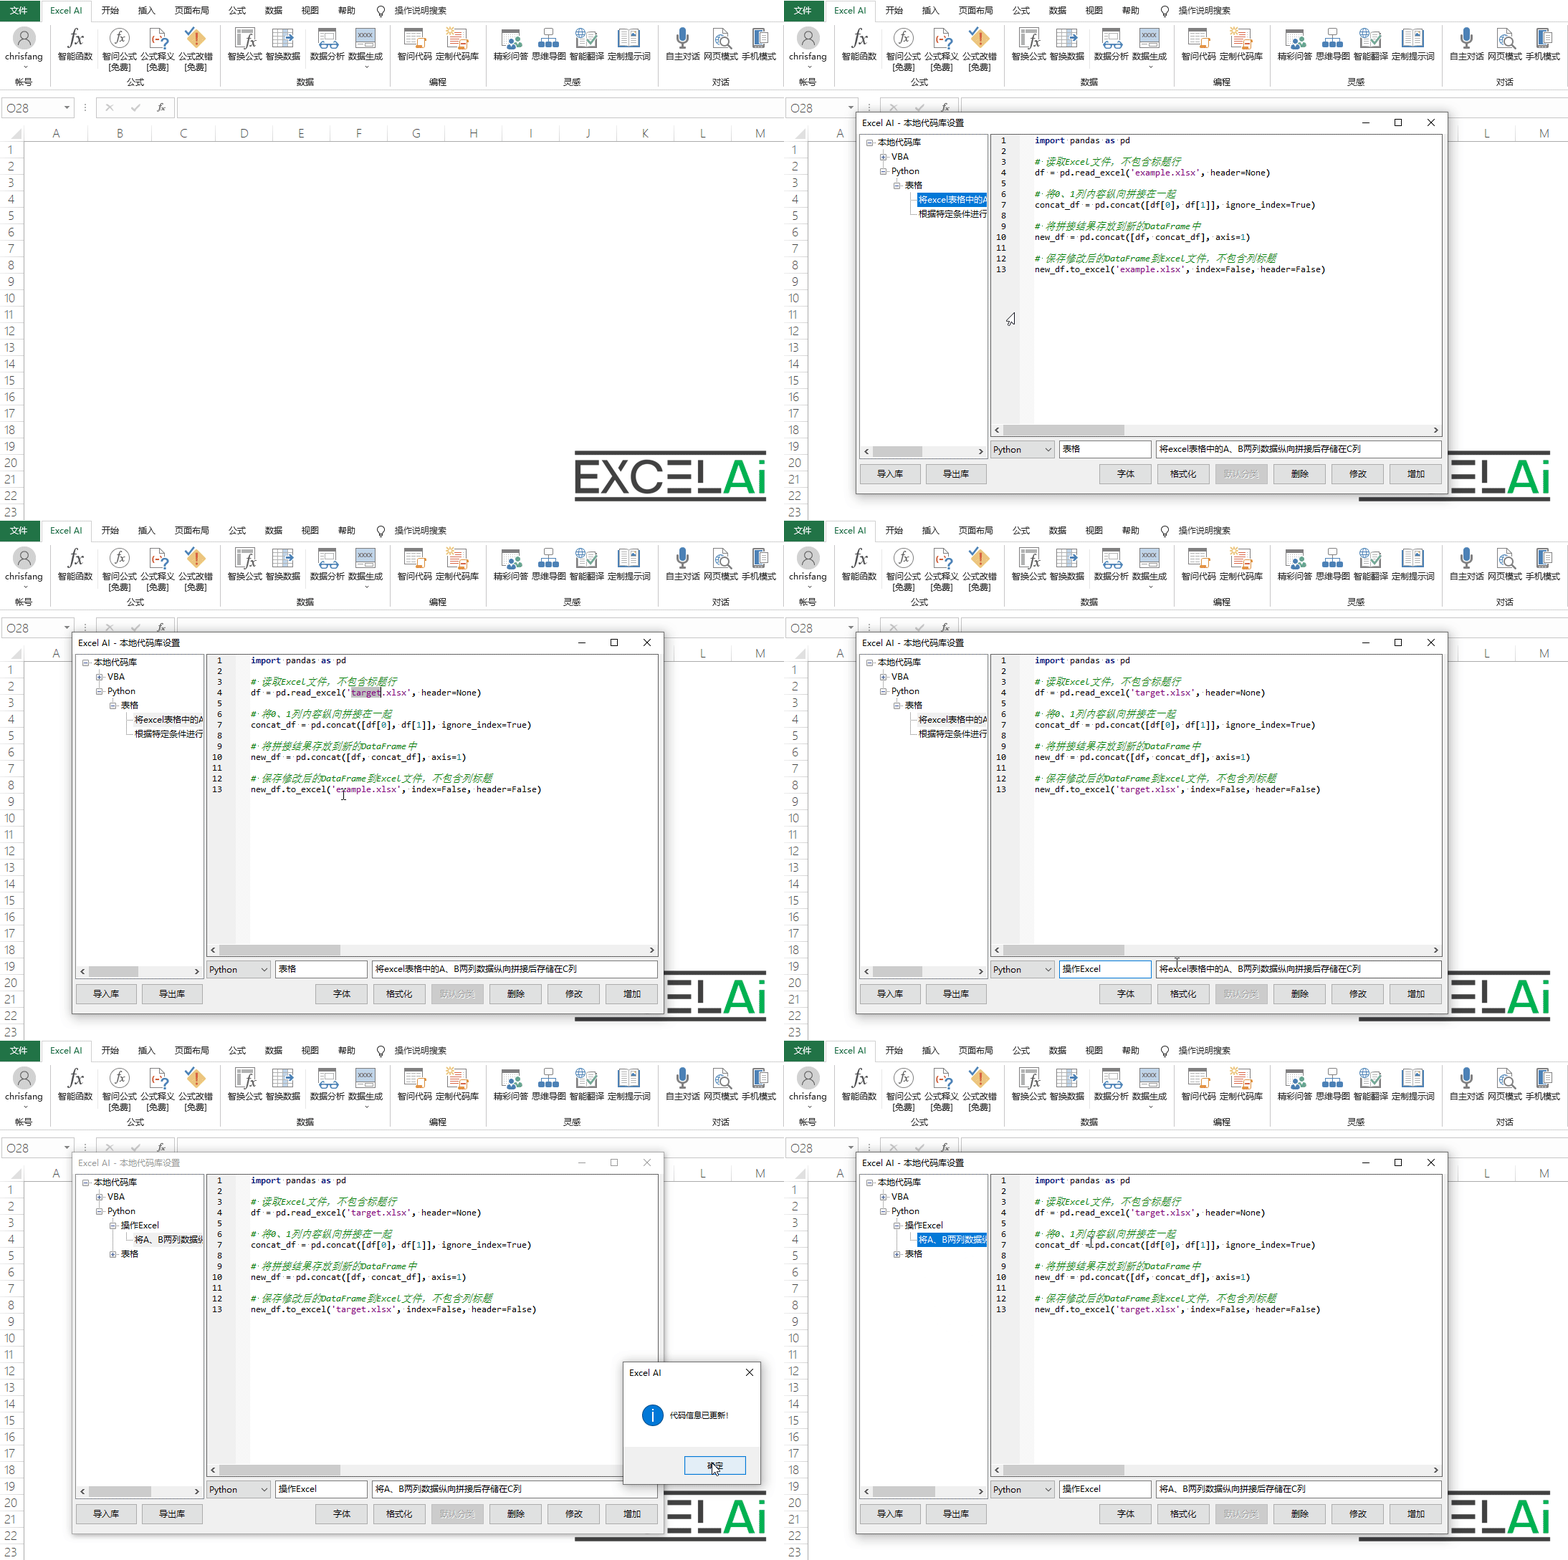 Customizing the code base - modifying code information
removing
Codes can be deleted or subcategories (containing all codes under this category) can be deleted if necessary:
- In the tree diagram on the left side of the dialog box, select the code title that needs to be deleted, and then click the [Delete] button at the bottom of the right side, you can delete this code collection from the local code base.
- In the tree diagram on the left side of the dialog box, select the name of the subcategory that needs to be deleted, and then click on the [Delete] button at the bottom of the right side to delete this subcategory and all codes under this subcategory from the local code base.
Delete Code and Delete Subcategory operations also support right-click shortcut operations:
- Right-click on the target object selected in the left tree diagram, the right-click menu [Delete] will be displayed, the same can be deleted!
Description: If the deleted code is the only code in a subcategory, this subcategory will also be deleted at the same time during the delete operation.
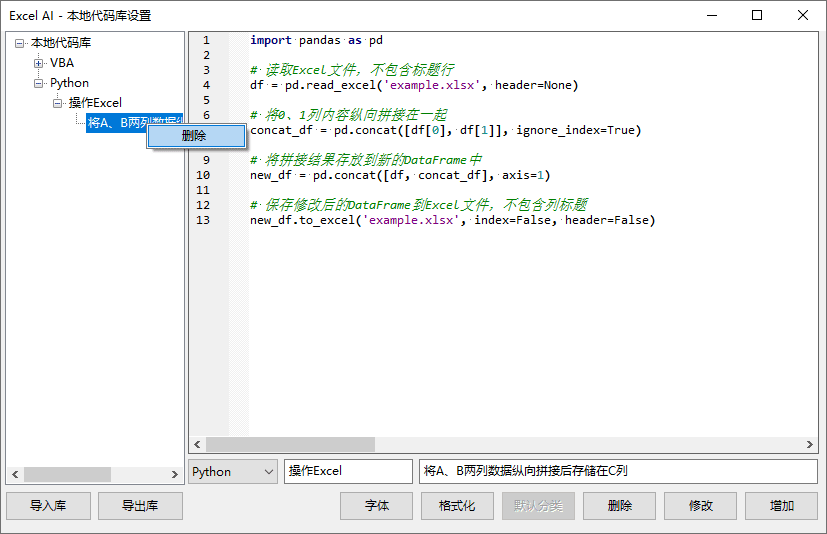
Right-click menu for [Delete] operation
Operation Demonstration
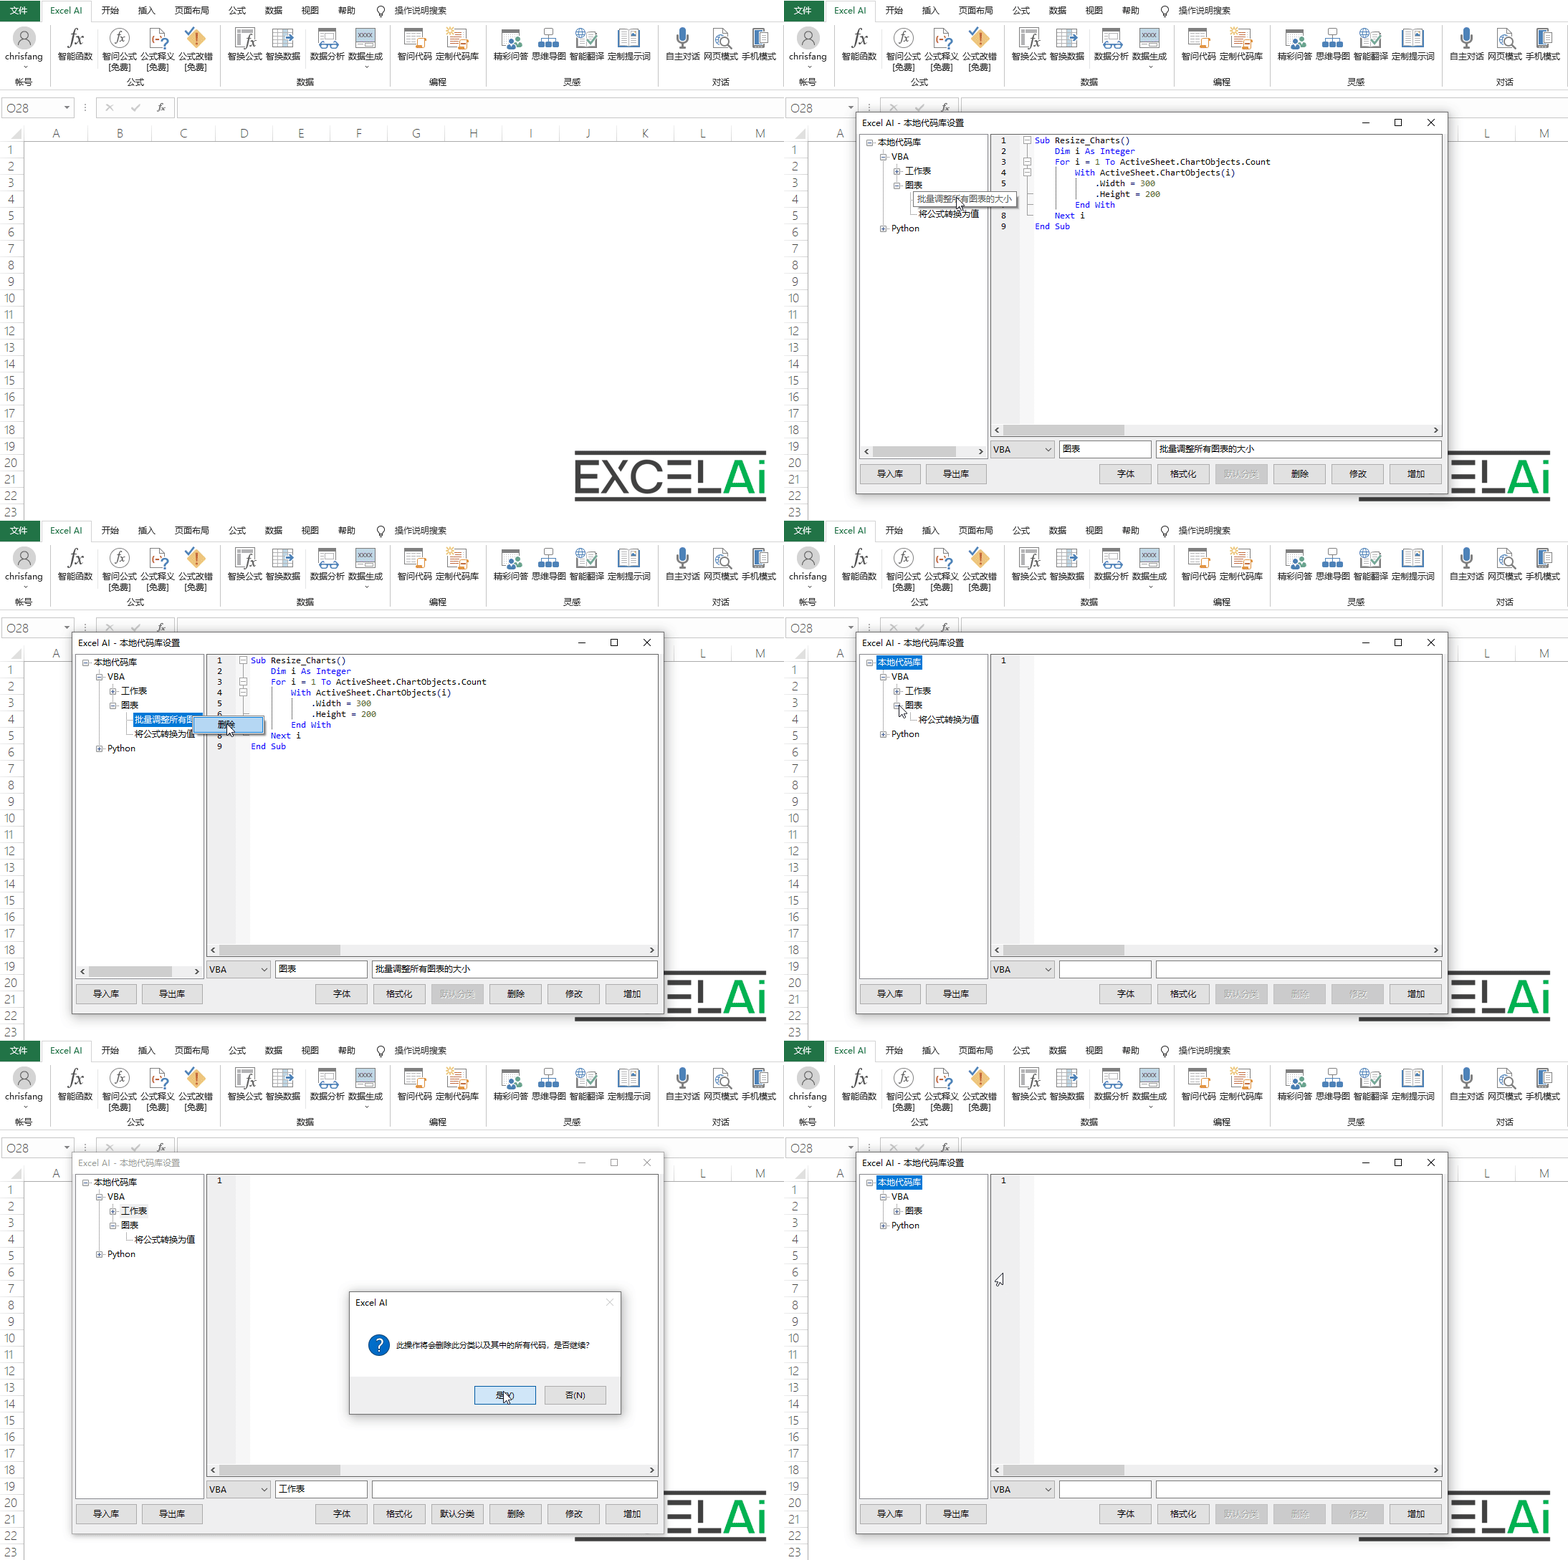 Customizing the codebase - deleting codes and deleting categories
Setting the Default Category
When using the [Local Favorites] function in [Smart Code], in order to simplify the operation, the program does not require the user to set the name of the subcategory of the code collection, but will be automatically categorized asDefault Classification. This.Default Classification, which can be set in the [Customize Code Base] window.
Tip: If you don't set a default category, the code for local favorites will be automatically categorized as 未分类 This subcategory.
- In the tree diagram on the left side of the dialog box, select the name of the subcategory that needs to be set as the default category, and then click the [Default Category] button at the bottom of the right side to set the current subcategory as the default category under this code type.
Note: Each of the four code types, VBA, Python, SQL, and DAX, can set their own default categories.
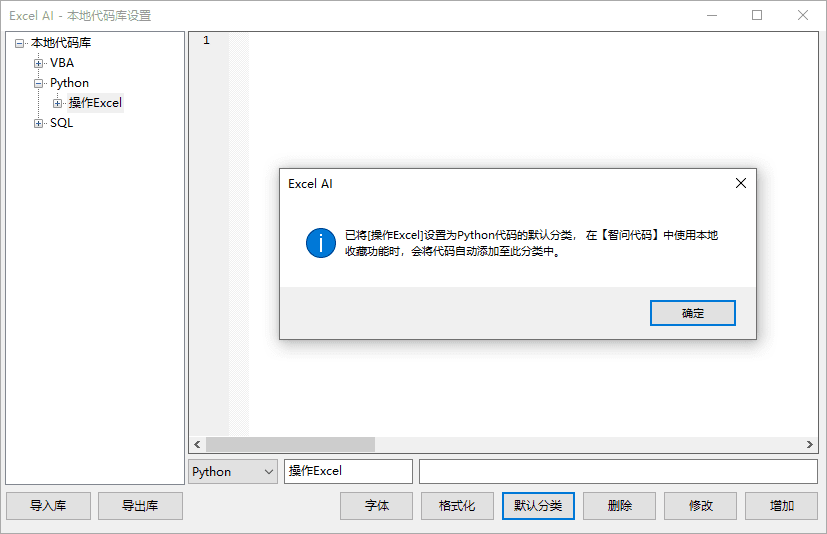
Setting the Default Category
This feature also supports right-click shortcuts:
- Right-click on the target subcategory in the left tree diagram to display the right-click menu of [Set as Default Category], which can also be set.
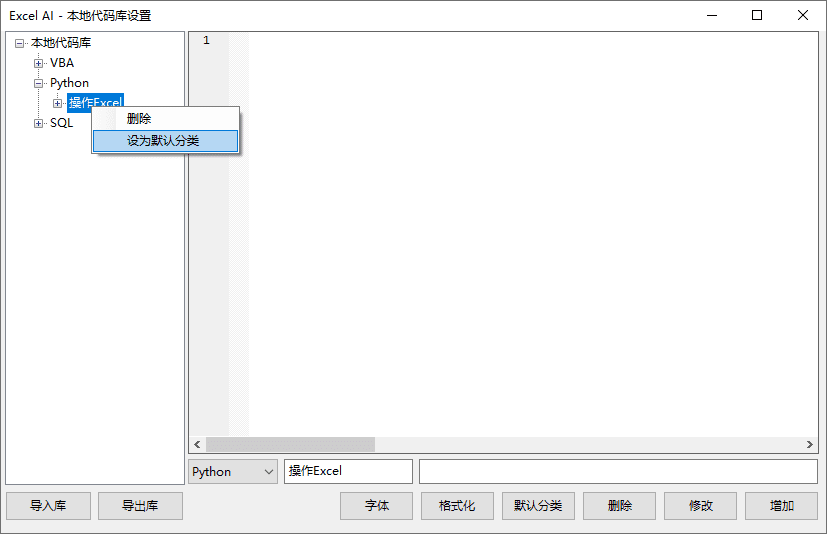
Setting the right-click menu for the default categories
Export/Import library
If you need to transfer code libraries between two computers or share your code libraries with friends, you can do so with the [Export Library] and [Import Library] functions.
- Click the [Export Library] button in the dialog box to export and save the local code base as a Json file, which you can backup or share with other users.
- In the dialog box, click the [Import Library] button, select the local code library archive file (Json format), you can import the collection of code in this file to the current computer's local code library.
- Support for [Import] operationsOverride replacementcap (a poem)Adding an incrementThere are two modes of operation, and a dialog box will pop up at the time of import for the user to confirm which mode to use. If you select "Yes", then theOverride replacementmode, the existing code in the current codebase will be deleted and the whole codebase will be replaced by the imported new codebase; if you select "No", the codebase will be replaced by theAdding an incrementmode, the current codebase remains, and additional code from the imported libraries is added to the current codebase.
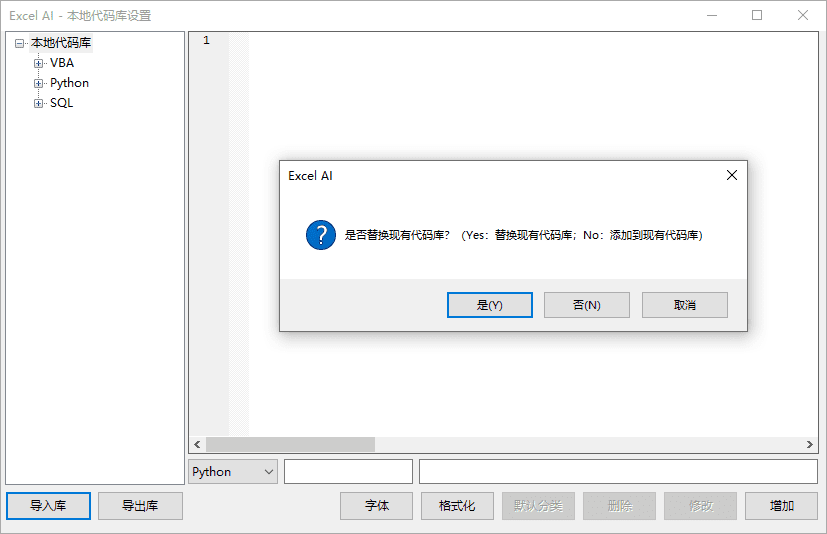
Two modes of operation of [Import]
Operation Demonstration
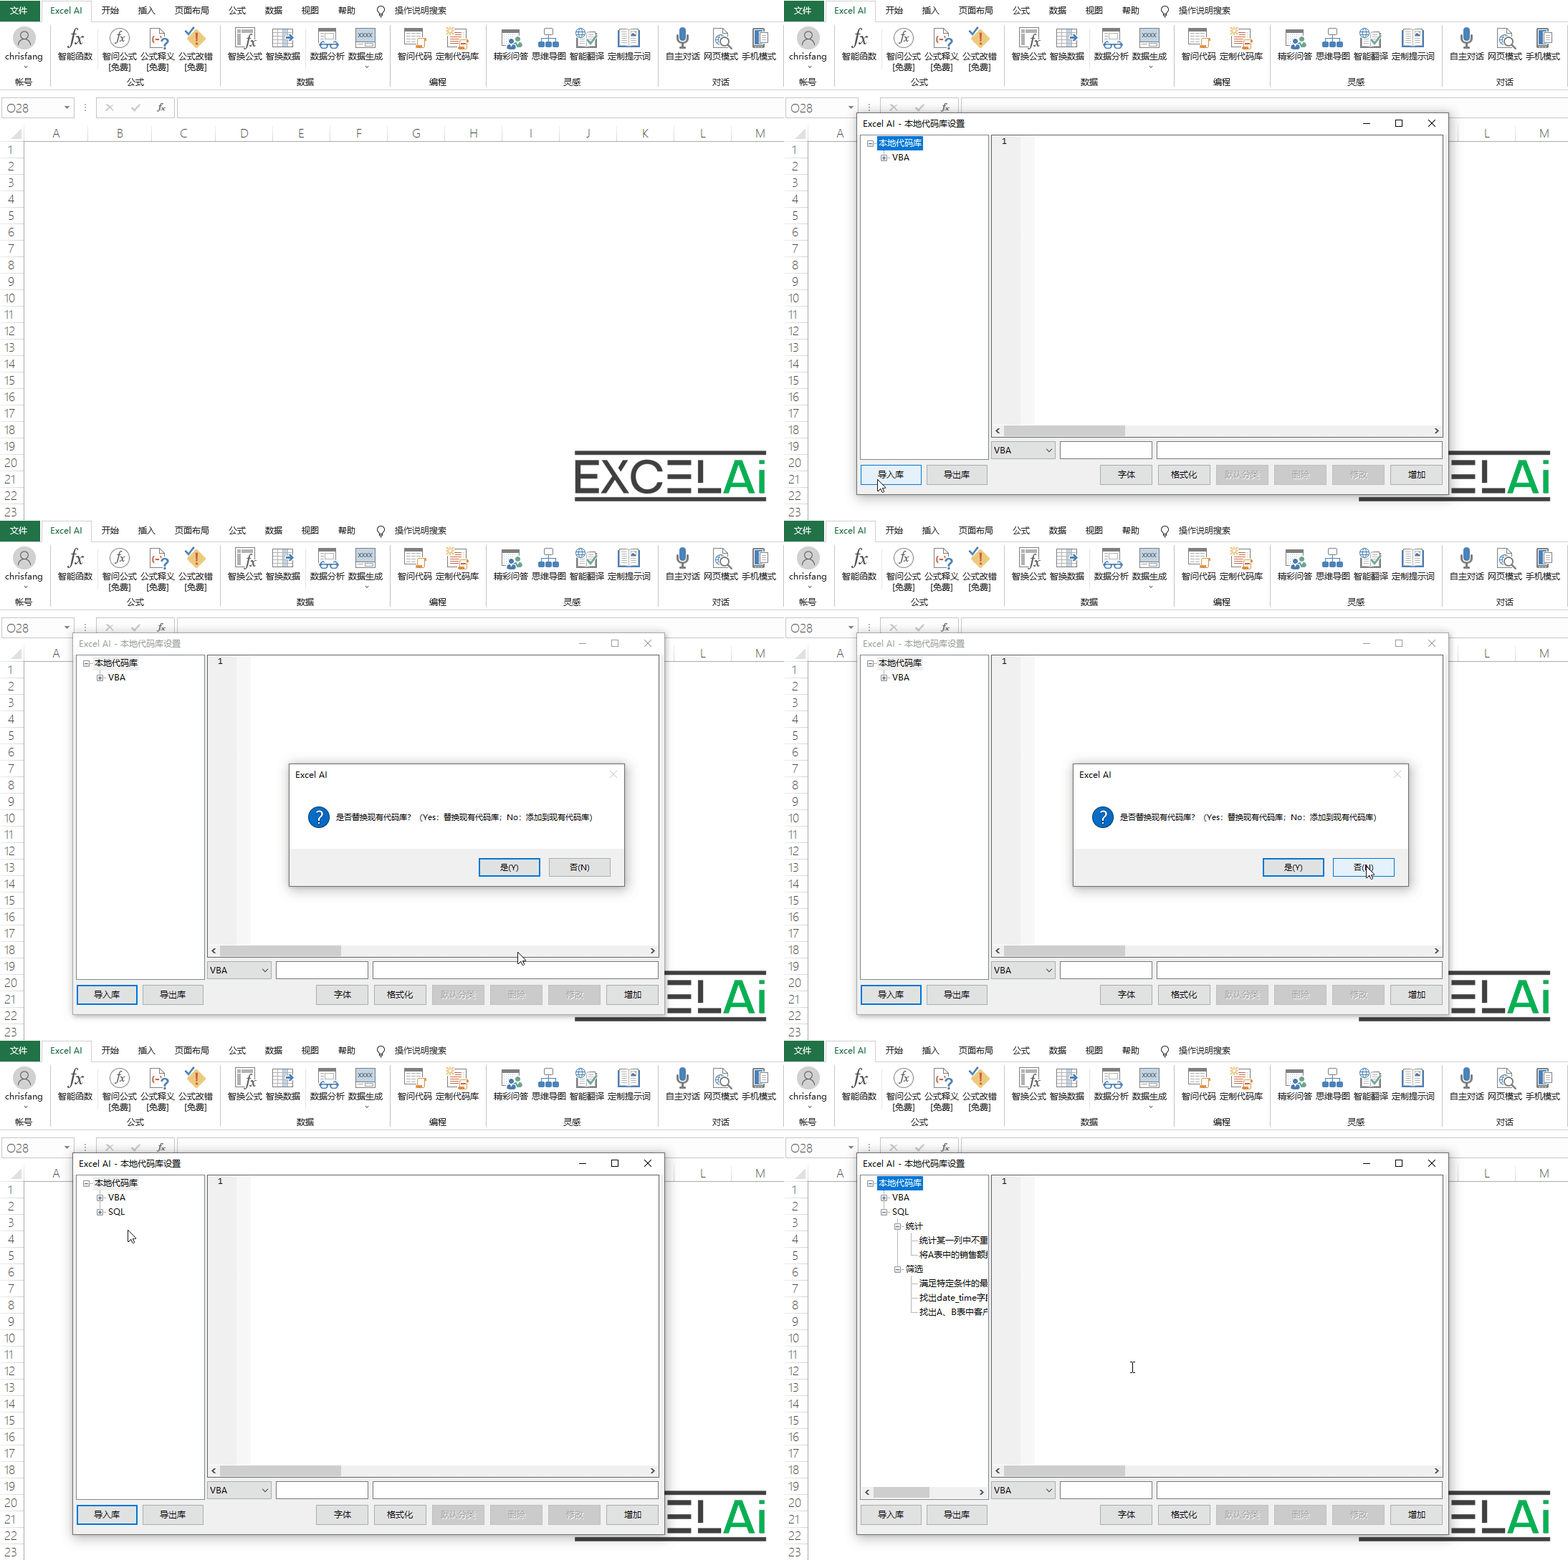 Customizing the codebase - Importing the codebase
Situations requiring attention
- If the content of the target Json file is not recognized correctly, or the code IDs in the target Json file overlap with the code IDs in the current codebase, it will not be imported and an error message will be popped up.
Formatting
If you want to collect the code to have a better format layout effect, you can try to click the [Formatting] button at the bottom of the dialog box. After clicking this button, the code currently displayed in the code editing column will be automatically line breaks, indentation, keyword letter case adjustment and other beautification and layout processing.
Tips: After formatting the code also need to click on the [Add] or [Modify] button will be typeset after the effect of the code library to save!
If you want to personalize the font and font size of the displayed code, you can click the [Font] button at the bottom of the dialog box, and modify the settings in the pop-up font dialog box. This font setting is also valid for the code displayed in the [Ask Code] function.
Note: The [font] setting in the font dialog box is invalid, and the "regular" font is used uniformly.
12, Great Questions and Answers
Wonderful Q&A can show the wonderful Q&A cases generated from the use of [Smart Question Formula], which come from the active sharing of users.
While AI is able to understand your question better than most search engines, it's not foolproof, and sometimes we need a few tricks to ask good questions. Great questions often require some skill to get great answers. So before you start asking AI questions, it's worth checking out the great questions and answers that others have shared, to borrow and learn from them, and maybe even find the answers you need directly from them.
The [Wonderful Q&A] function provides a platform for users to display and share their wonderful Q&A, from which anyone may benefit.
Position of the buttons in the tabs
- Click on the menu bar in the [Wonderful Q&A] button to open the dialog box, which will automatically display a question and answer from the system randomly recommended by the user to share!
- The bottom left corner will show the number of likes for this quiz, and from which user it was shared.
- If you like this Q&A, you can click [Like] at the bottom of the dialog box, which will increase the number of likes for this Q&A and also increase the exposure of this Q&A.
- The [Like] button will be grayed out after liking a Q&A to avoid repeated likes.
- Click [Change] at the bottom of the dialog box, and another great quiz will be randomly generated again!
- If you find the answer useful, feel free to copy the answer you need from the answer box!
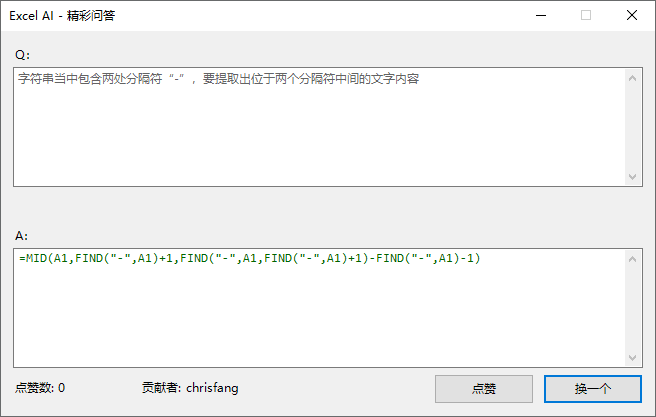
A dialog box for great questions and answers
Friendly reminder: the content of the wonderful Q&A comes from the user's initiative to share, as the operator, we will be the content of a certain screening and identification, but still can not guarantee that all the answers to the questions are completely correct and effective, so please identify your own in the use of your own.
Operation Demonstration
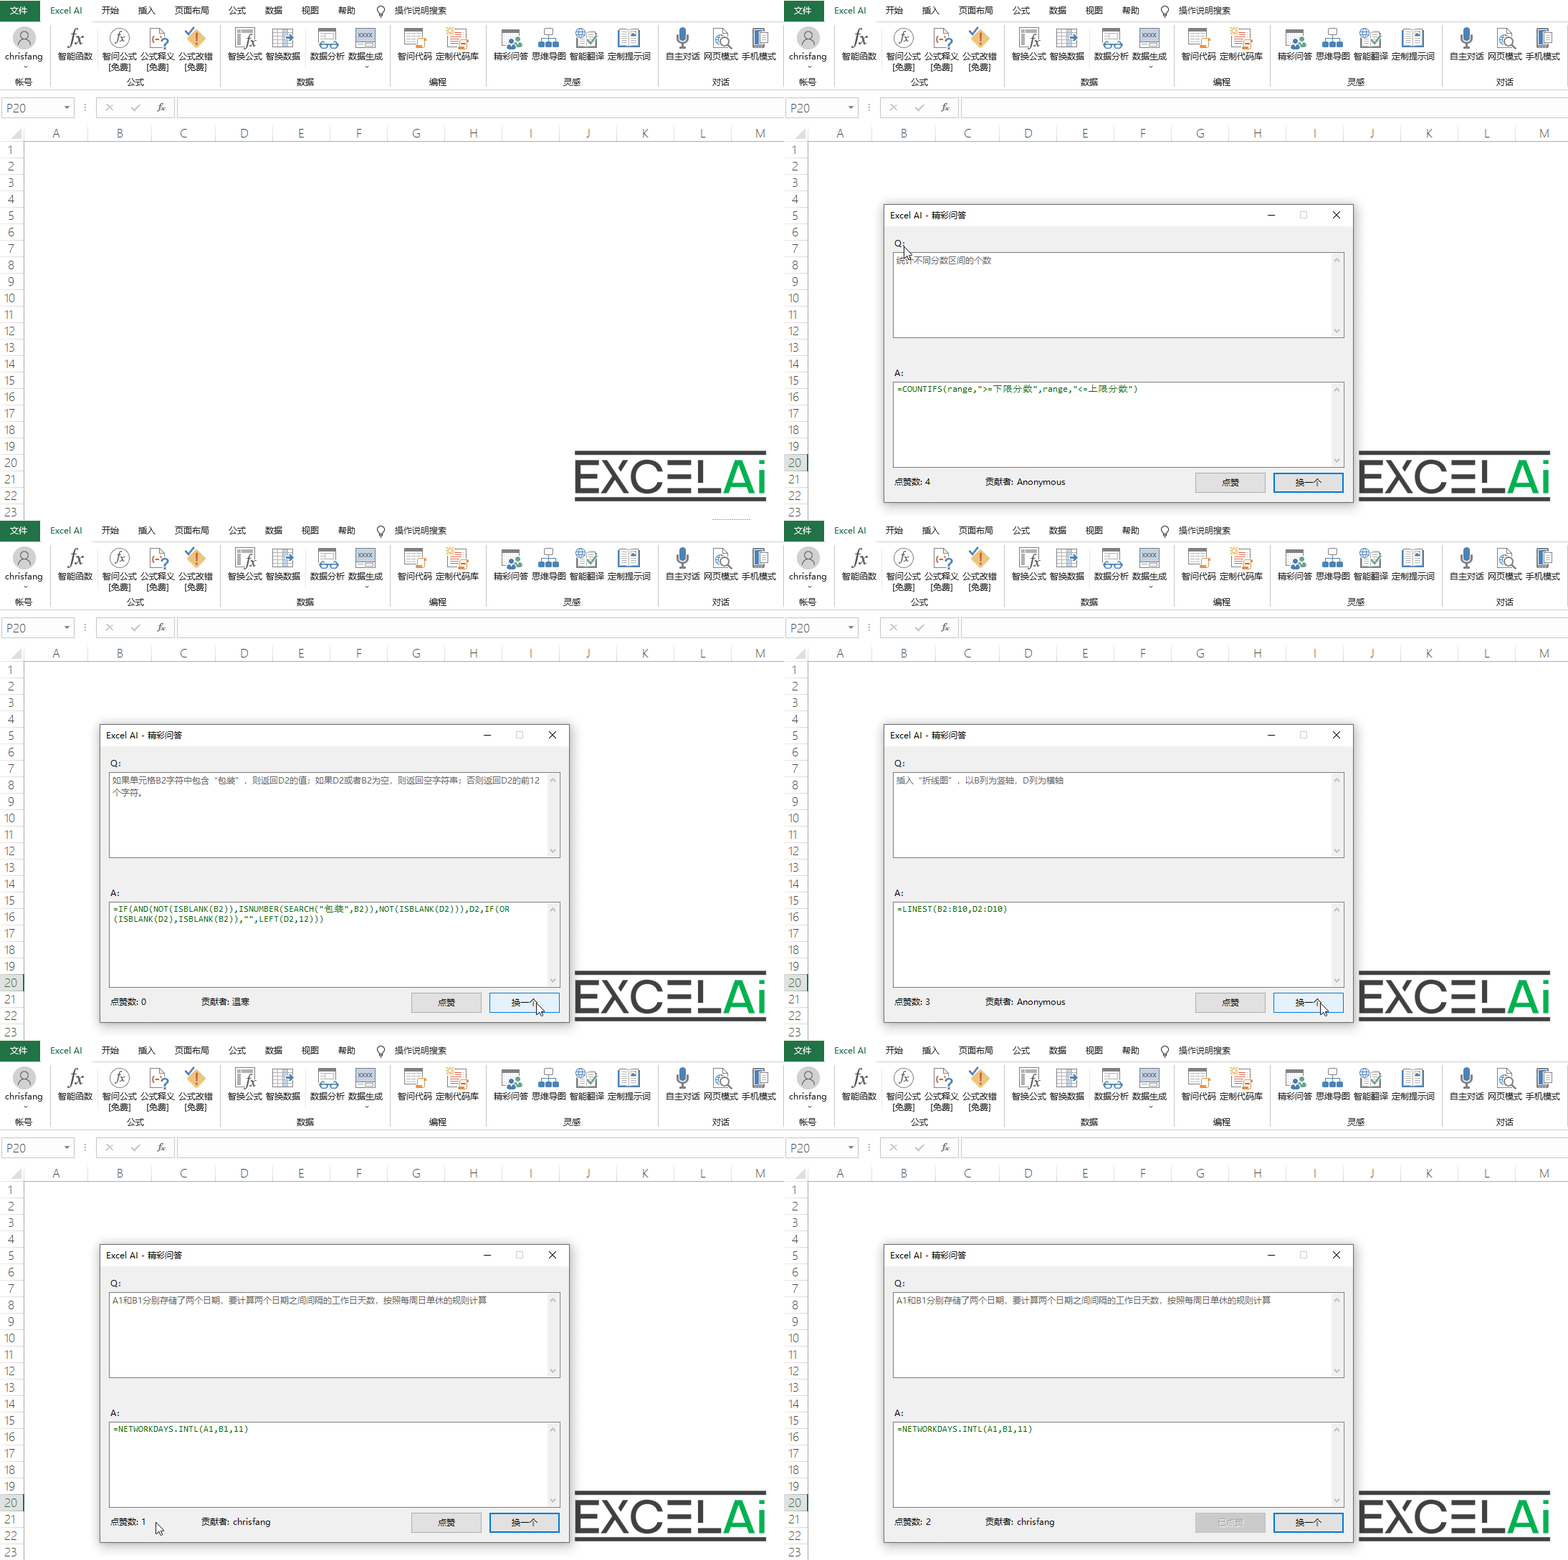 Wonderful Q&A
13, Image Generation
Image Generation can automatically generate images or photos with artistic designs based on text descriptions through AI.
Tip: This is a paid function
Whether in creative design or in daily work, we often encounter the situation that we have a specific picture or scene idea, but lack the drawing skills or time to bring it to fruition. In this case, the [Image Generator] function, which conveniently and efficiently converts text descriptions into images, can greatly simplify the process.
With the [Picture Generation] function, you only need to provide a detailed text description, which can include information about the content, style, and color tone of the picture you have in mind, and our artificial intelligence will be able to automatically generate a matching picture based on this description. In short, using this intelligent text-to-picture function can help us quickly transform the thoughts and ideas in our mind into visualized pictures, generating works that meet the requirements of the description and are rich in artistry.

Position of the buttons in the tabs
- Click the [Image Generator] button in the menu bar to open the sidebar
- Fill in the text box below with the content of the cue word you want to generate the image for, for example:
a beautiful dog - If you are not sure how to fill in the prompt, you can click on the right side of the [prompt] button, let the program to help you select, generate and optimize the prompt!
- Fill in the prompt word, click on the right side of the 【Generate】 button, will begin to generate the picture processing, this process takes about 30 seconds to 2 minutes or so ranging
- After the picture generation is completed, the preview effect of four kinds of resultant pictures will be displayed in the four small squares above, and clicking on any one of them can display a large picture in the center area.
- Right clicking on a large image displays a context menu, through which you can fine-tune the image, or save it, or even set it as your ExcelAI Add-in user avatar!

Image Generation Function
- You can set the size ratio of the image generated
- You can choose between two different image generation speeds
- You can use the image generation mode (pad mode) to generate images
- All of the above functions can be selected by clicking the [Settings] button in the lower right corner of the window
14, Thinking Maps
Mind maps can be automatically generated by AI in SmartArt format as editable mind maps according to the target topic, and web page mode is provided for interactive presentation and editing.
Tip: This feature is free!
Whether in work or study, we often encounter the situation that, faced with a complex task or learning objective, we are often at a loss as to where to start or forget some important key points.
With the [Mind Mapping] function, you only need to provide a topic, which can be a learning objective or a planned task, and our AI is able to automatically generate the key points related to that topic and display them as a mind map in the form of SmartArt. In short, using this intelligent mind mapping feature can help us quickly sort out the key points related to a specific topic and build a blueprint of the steps or elements needed to achieve the goal.
This feature has a wide range of application scenarios. In work, it can be used for making project plans, sorting out business processes, etc. In learning, it can be used to summarize knowledge points, make learning plans, sort out learning roadmaps and so on. Whether in work or study, this feature can help users better organize and understand the information, so that complex tasks and learning goals become clearer and more feasible.

Position of the buttons in the tabs
- Click the [Mind Map] button in the menu bar to open the dialog box.
- Fill in the [Theme] text box with the content of the theme to be created, for example:
怎样学习VBA编程 - On the right, select the maximum display level of the mind map, for example:
3 - If necessary, you can also fill in the [Requirements] below with relevant incidental requirements, for example:
以Excel开发为目标,列举四个最重要的学习模块 - Finally, click on the [Generate Mind Map] button below, wait a few moments after the current activity worksheet will automatically generate a SmartArt graphic presented by the mind map!
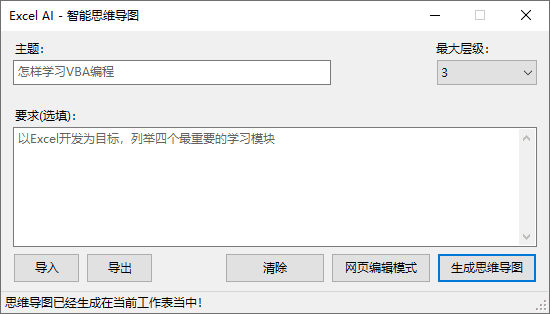
Thinking Maps dialog box
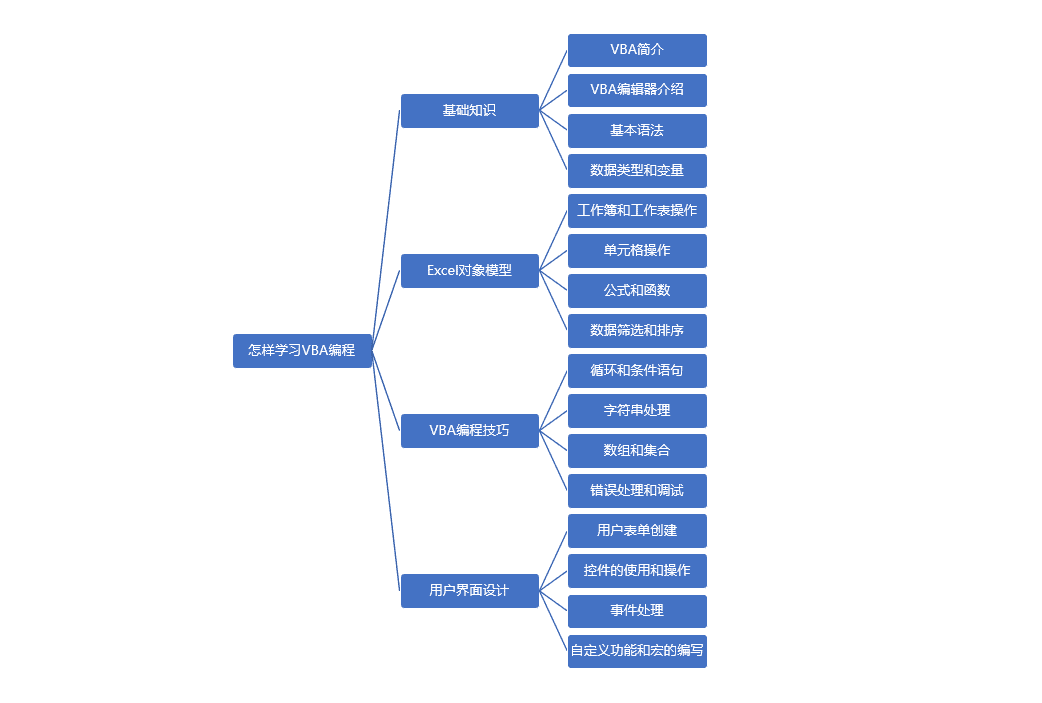
Generated mind maps
Operation Demonstration
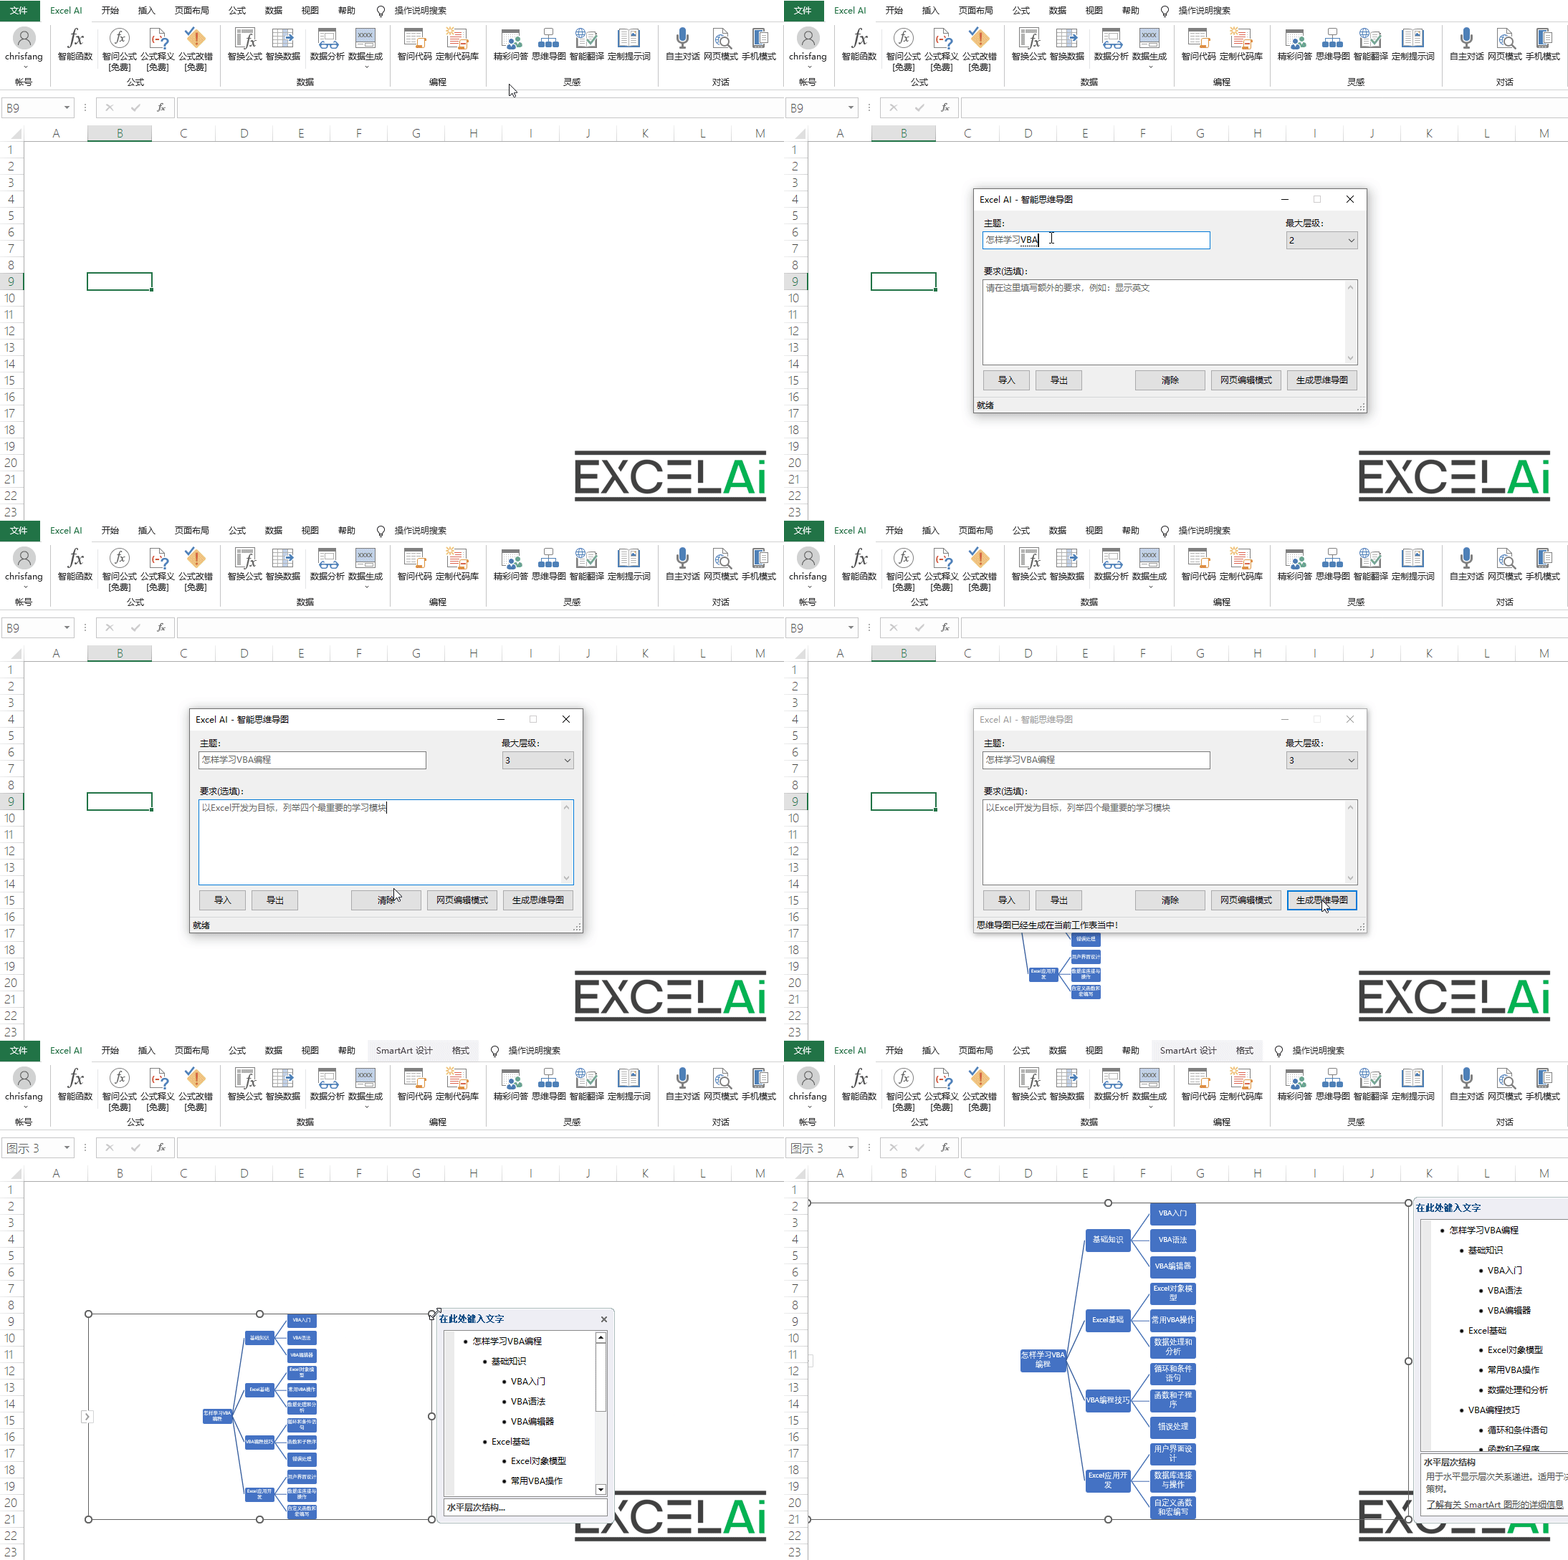 Thinking Maps - Generation
Editing mind maps
- The generated mind map is a SmartArt structured graphic, so it can be edited with the help of SmartArt's related functions, including changing the text content, adding or deleting nodes, adjusting the level of nodes, and so on.
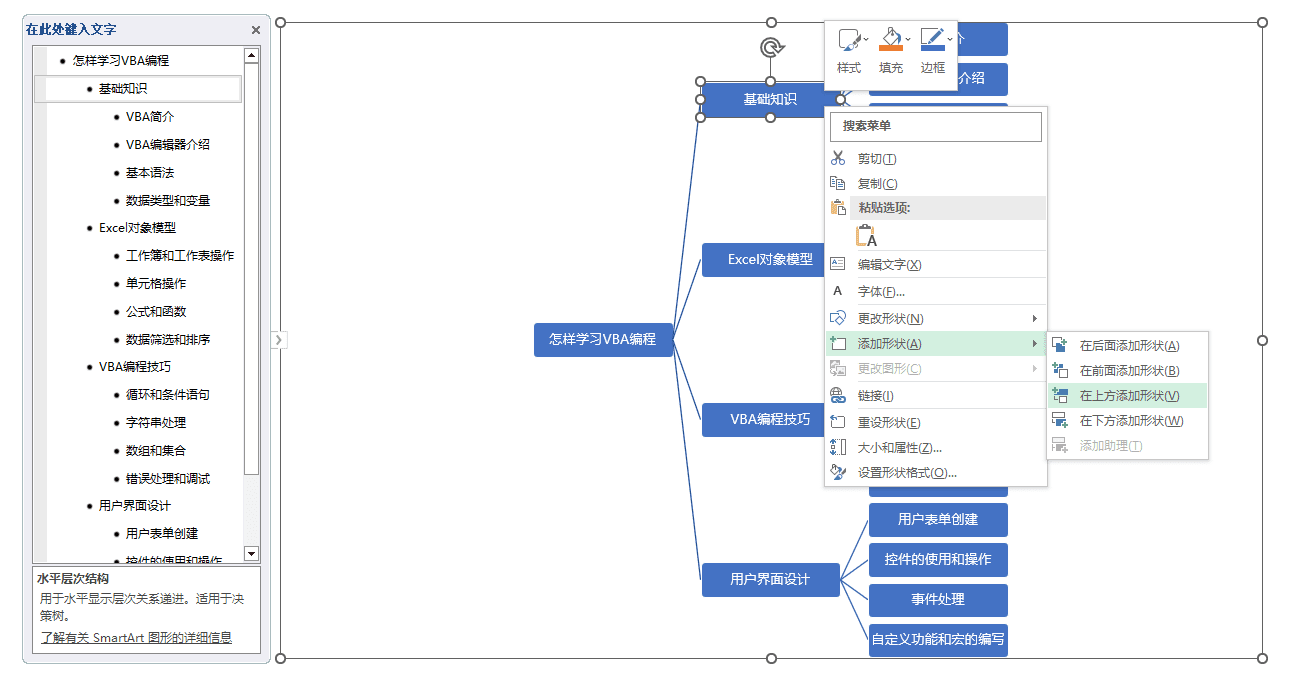
SmartArt editing
- In addition, we also provide a special webpage editing mode, when you select the mind map in the table, click [webpage editing mode] at the bottom of the dialog box, it will open a webpage in your browser, in which you can see another style of mind map and support further editing changes.
- These operations can be performed in the web page editing mode:
- Different theme colorways can be selected in the upper left corner of the
- You can adjust the placement of nodes or connect objects by dragging and dropping nodes with the mouse.
- Double-click on a node to edit the text content.
- Selecting a node and pressing enter adds a new node at the same level.
- Selecting a node and pressing Ctrl+Enter adds a new node at the next level of the hierarchy.
- Select a node and press Delete to delete it.
- After the final editing, you can also save it as an image by using the export image function in the upper left corner
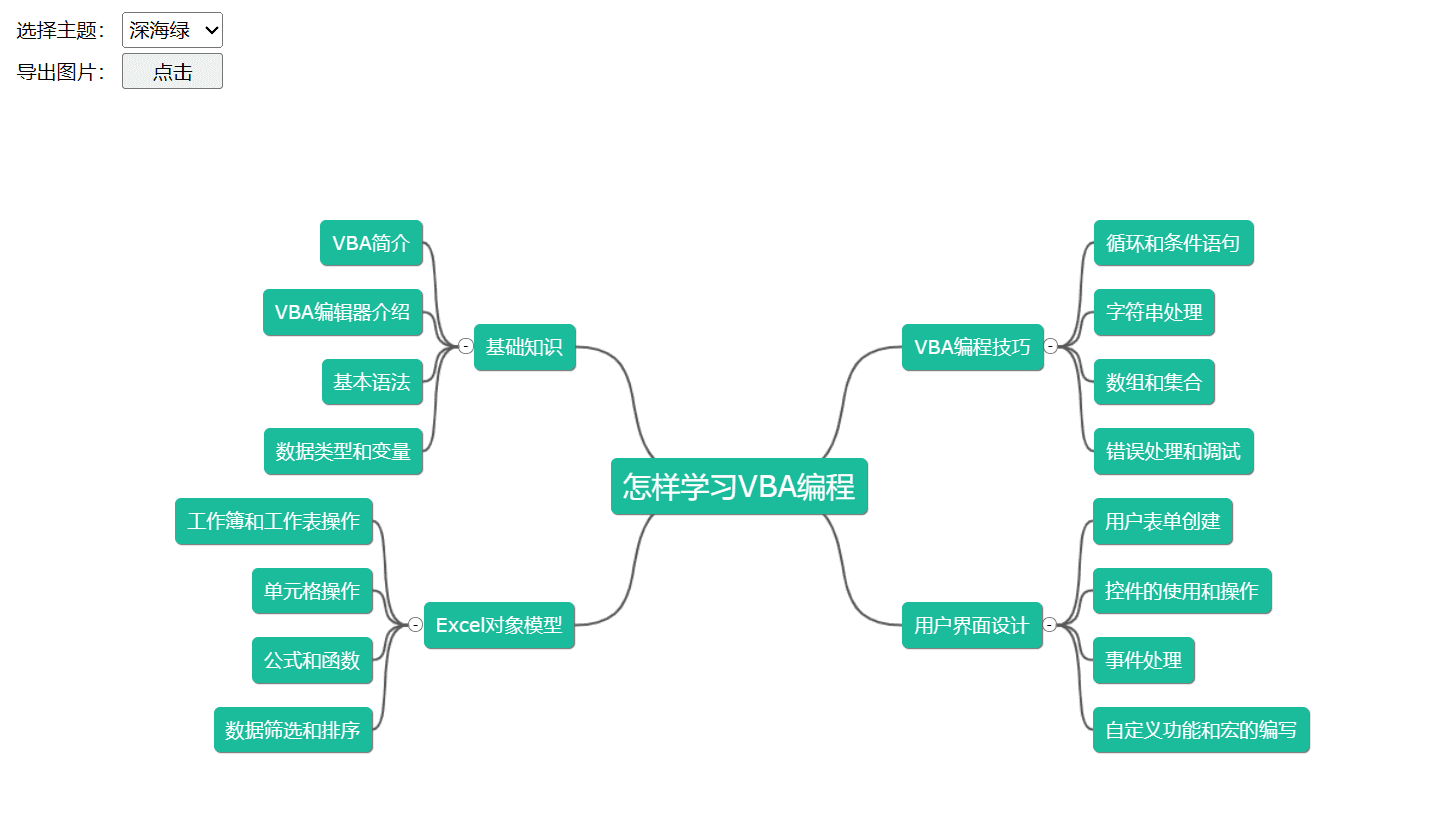
Web editing mode for mind maps
Operation Demonstration
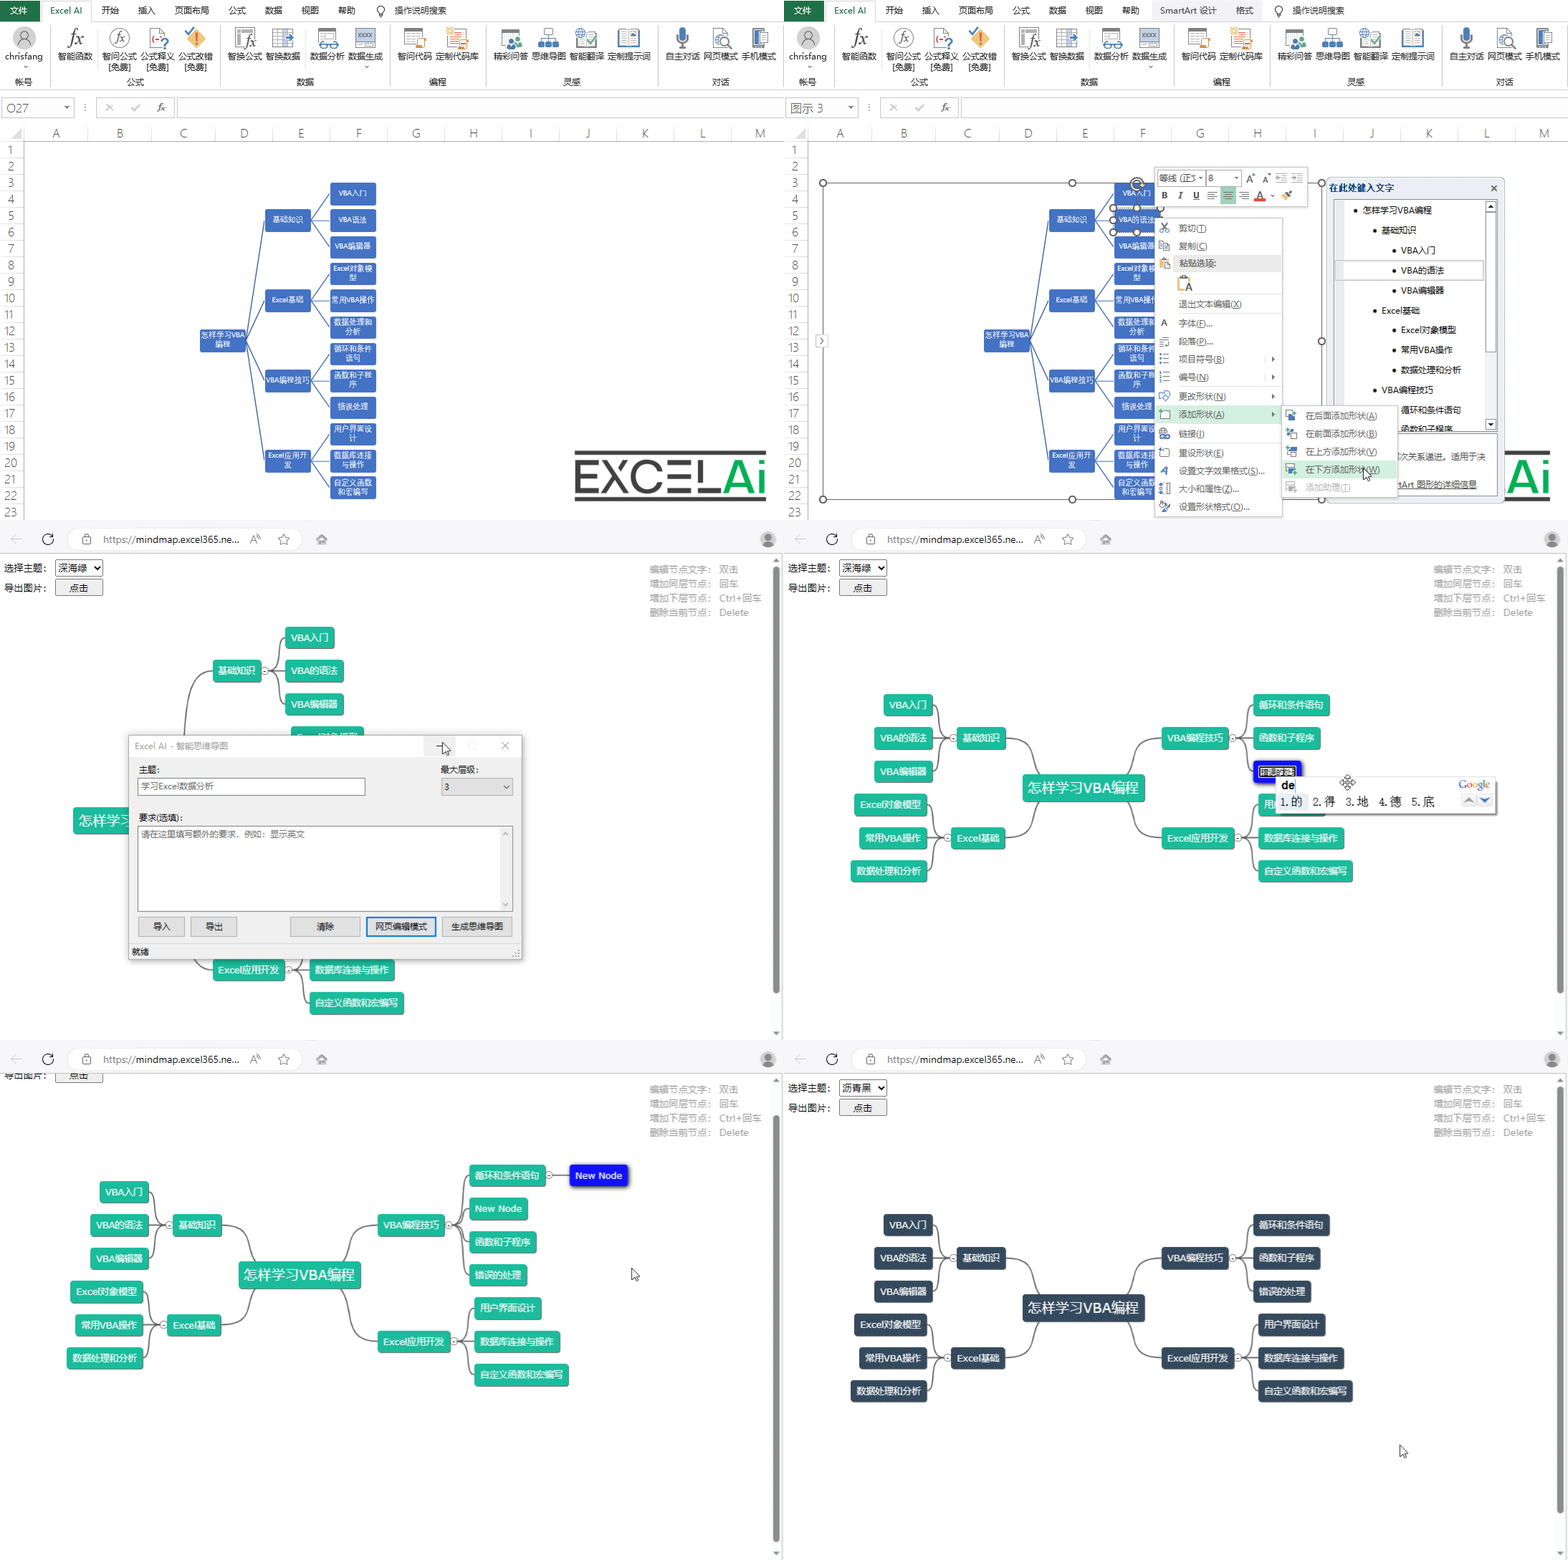 Thinking Maps - Modification
Export and Import
- Select the mind map in the table and click the [Export] button at the bottom of the dialog box to export the target mind map to a file for saving (Json format)
- Click the [Import] button at the bottom of the dialog box, and then select the previously exported and saved mind map archive file (Json file), you can re-form in the table to SmartArt graphical way to present the information saved in the file of the mind map.
- With the above export and import functions, you can easily backup your mind map content and share the results with others.
15, Intelligent Translation
Intelligent Translation provides mutual translation in 20 major world languages, as well as text touch-up functions in more than 10 styles for emails, news, and self-publishing.
Tip: This feature is free in regular mode and paid in enhanced mode.
When you need to write an email or send a tweet in English, your own English level may be limited, and there is no good translation software around, this time you can try the [Smart Translate] function.
The AI-enhanced intelligent translation function supports the mutual translation of up to 20 major world languages, making your communication more convenient. What's even more impressive is that AI can provide you with stylized according to different scenariosadd a few finishing touches to a piece of writing (e.g. on a piece of paper), making your writing more authentic and natural. Whether you are at home or abroad, a student or a worker, you can benefit from this feature to make your cross-cultural communication more fluent.
Position of the buttons in the tabs
- Select the cell containing the text content in the table, and then click on the menu bar in the [Intelligent Translation] button to open the dialog box
- The text of the current cell is automatically filled in the original text field above (you can also manually enter other text to be translated or embellished here, if necessary).
- Then select the target language in the lower left corner, including Chinese, English, French, Spanish, Arabic and other 20 of the world's most widely used languages
- If you want to touch up the text stylistically, you can select it in [Style], which supports a variety of scenarios and styles, such as news, literature, academia, social media, and office emails, in addition to the default normals
- Once the options are set, click the [Translate] button on the top to start the translation, and the word "Translating..." will be displayed in the translation bar below.
- When the translation/polishing is complete, the result will be displayed in the translation field below
Tip: If you simply need to stylize or embellish an existing text, you can keep the target language of the translation the same as the existing language of the text.
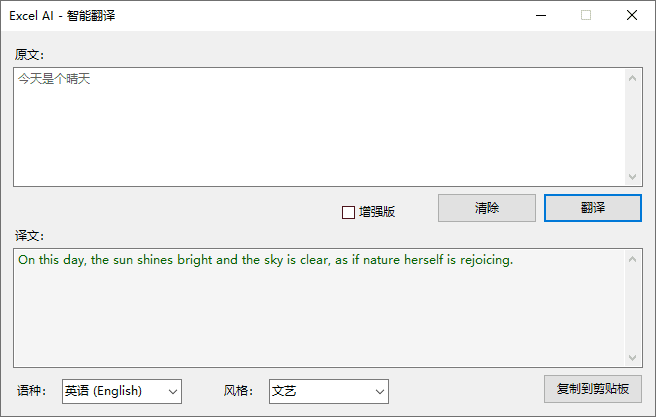
Intelligent Translation's dialog box
- Checking the [Enhanced] checkbox will switch to the Enhanced mode, and the system will call a more advanced AI model to generate translation results. Enhanced mode uses GPT-4o model by default, you can switch to other models in [Personal Center]. Note: Enhanced mode is not a free feature, it will consume your AI power!
- If you wish to copy the generated translation results to other places, you can click the [Copy to Clipboard] button in the window, and the contents of the translation column will be stored in the system clipboard, and you can go anywhere you need to paste them.
Operation Demonstration
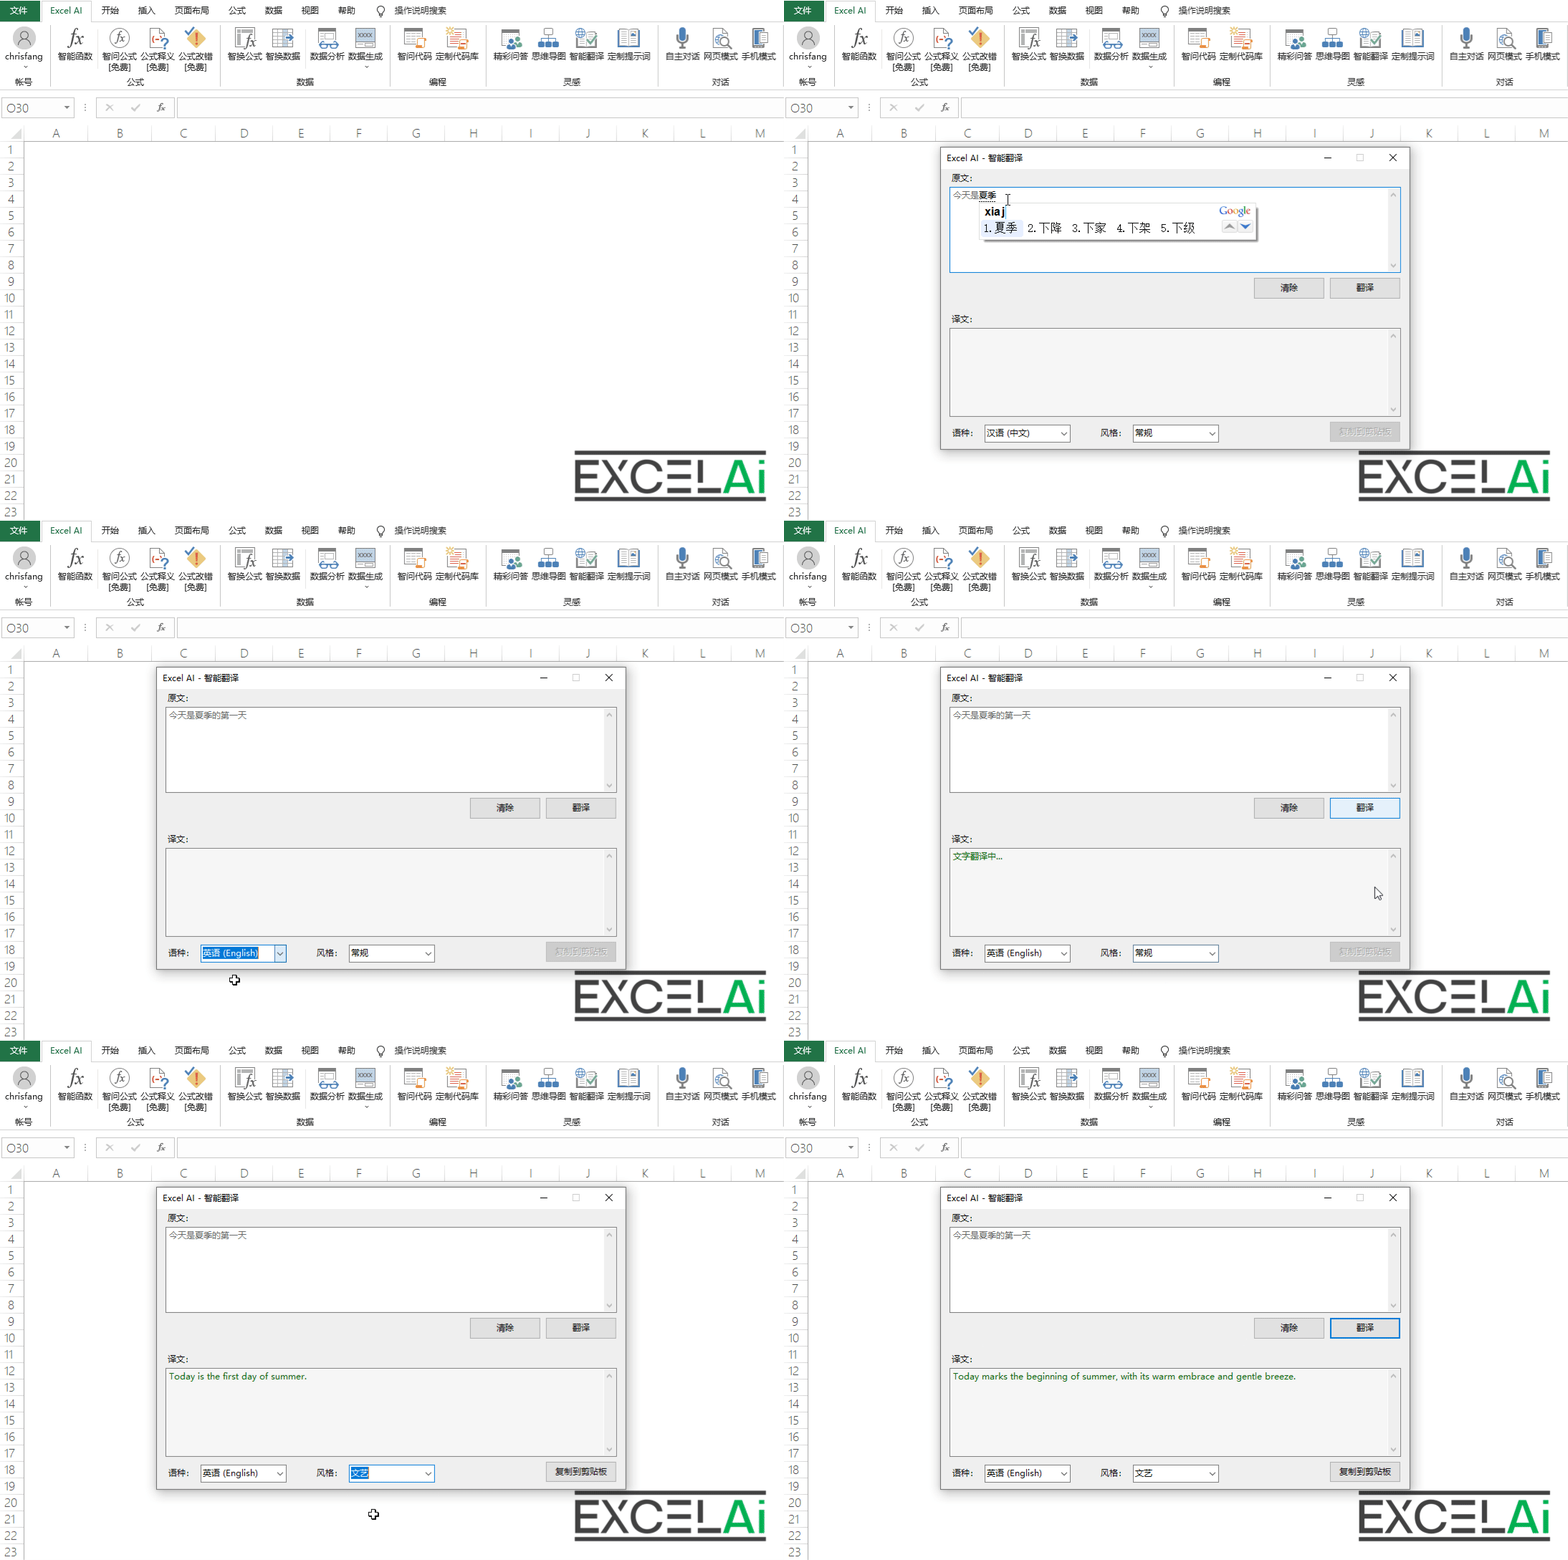 intelligent translation
quick operation
- This feature also supports right-click menu shortcuts.
- In the form of selected cells containing text content right-click, in the context of the right-click menu, select [Intelligent Translation].
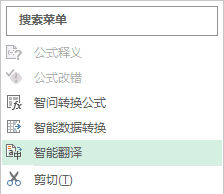
context menu (computing)
- Instead of displaying a dialog window, the program will display the translation result in a pop-up window directly after the translation is completed.
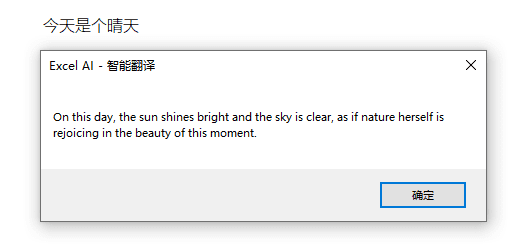
Shortcut pop-ups for smart translations
Note: When Intelligent Translator uses the right-click shortcut operation, the target language and the touch-up style are based on the settings in the [Intelligent Translator] dialog box by default.
Friendly note: The right-click operation method can only translate the contents of a single cell at a time, and does not support batch translation. If you need to do batch translation, you can refer to the instructions of AI.AssocTrans function.
Operation Demonstration
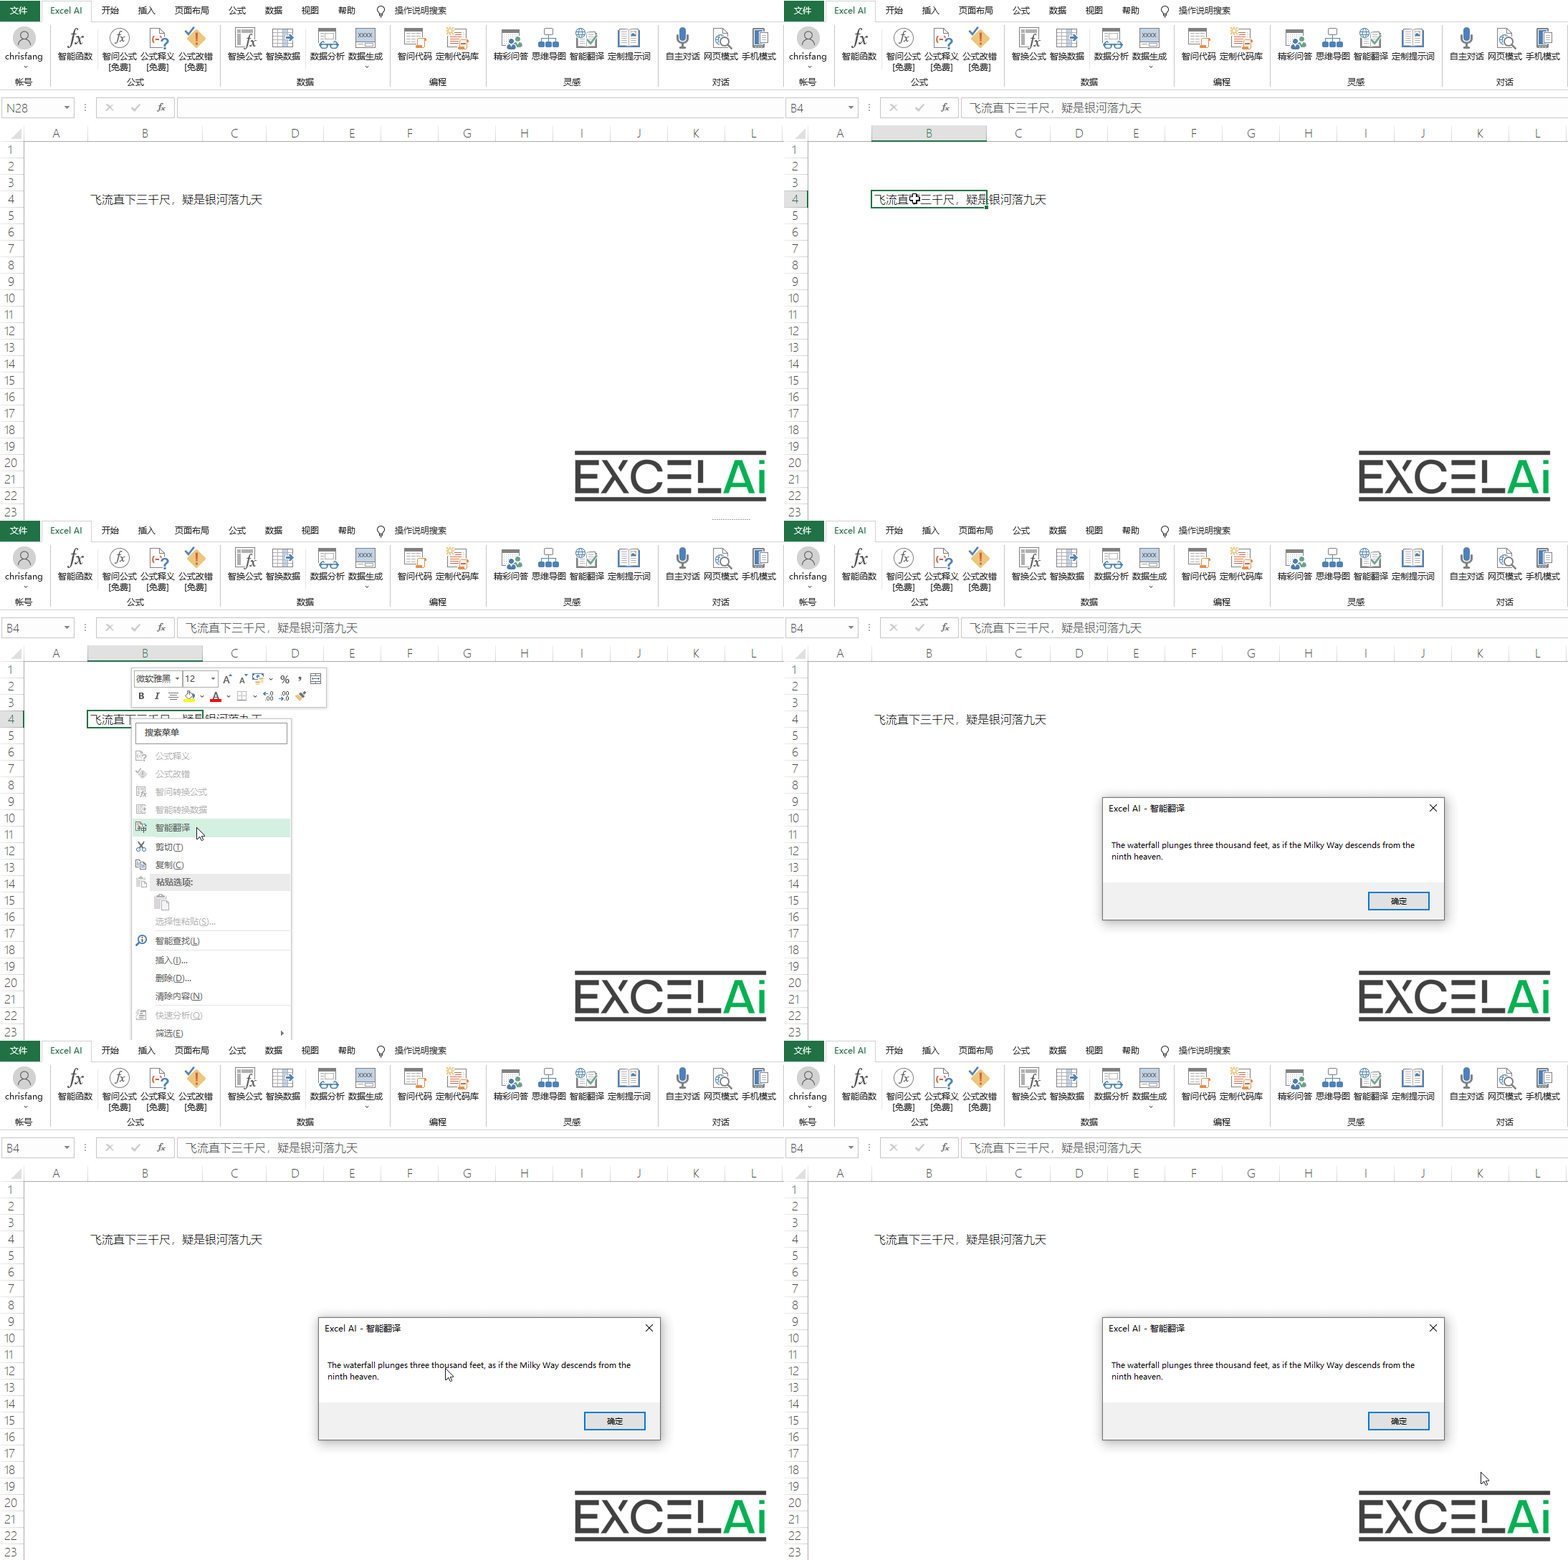 Right-click shortcuts for Smart Translator
Situations requiring attention
- When the selected active cell does not contain any text, the [Smart Translate] menu in the context menu will be grayed out and unavailable.
16, Autonomous Dialogue
Autonomous Conversation allows you to talk directly with ChatGPT in Excel's dialog window mode, and supports saving and importing of chat logs.
Tip: Both the regular and enhanced modes of this feature are paid features.
We combine AI technology with Excel's existing functions and application scenarios so that you can use AI functions more easily and foolproofly to improve the efficiency of your operations in Excel. Simply put, our program communicates more efficiently with AI instead of you. However, we also know that there are some scenarios where our design can't fully meet your needs, and you may need to talk to the AI directly to seek better answers.
Our [Autonomous Conversation] feature provides you with the opportunity to chat and talk directly with the AI, you can get the opportunity to ask questions more freely so that the AI can serve you better.

Position of the buttons in the tabs
- Click on the [Autonomous Dialog] button in the menu bar to open the dialog box, a chat window will be displayed
- Chat in the text box below, then click the [Send] button or press the Ctrl+Enter Chat can be sent
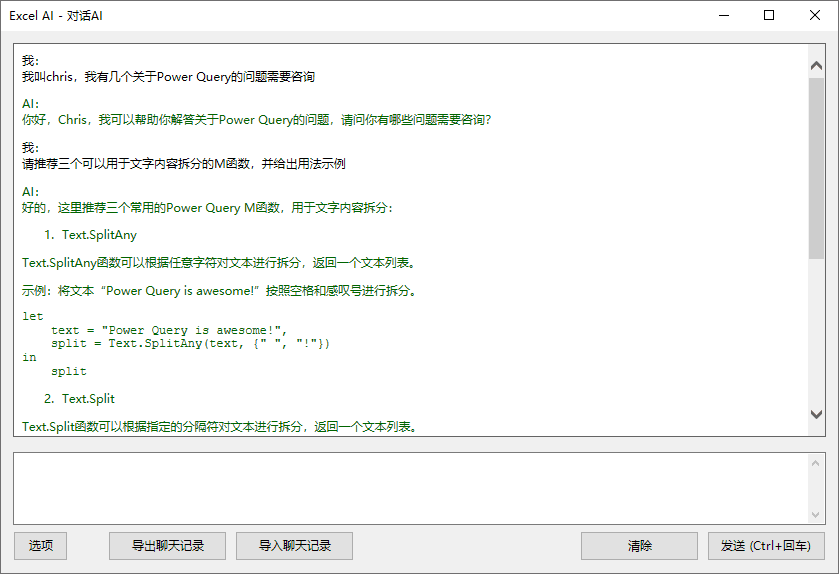
Dialog box for self-directed dialogues
Operation Demonstration
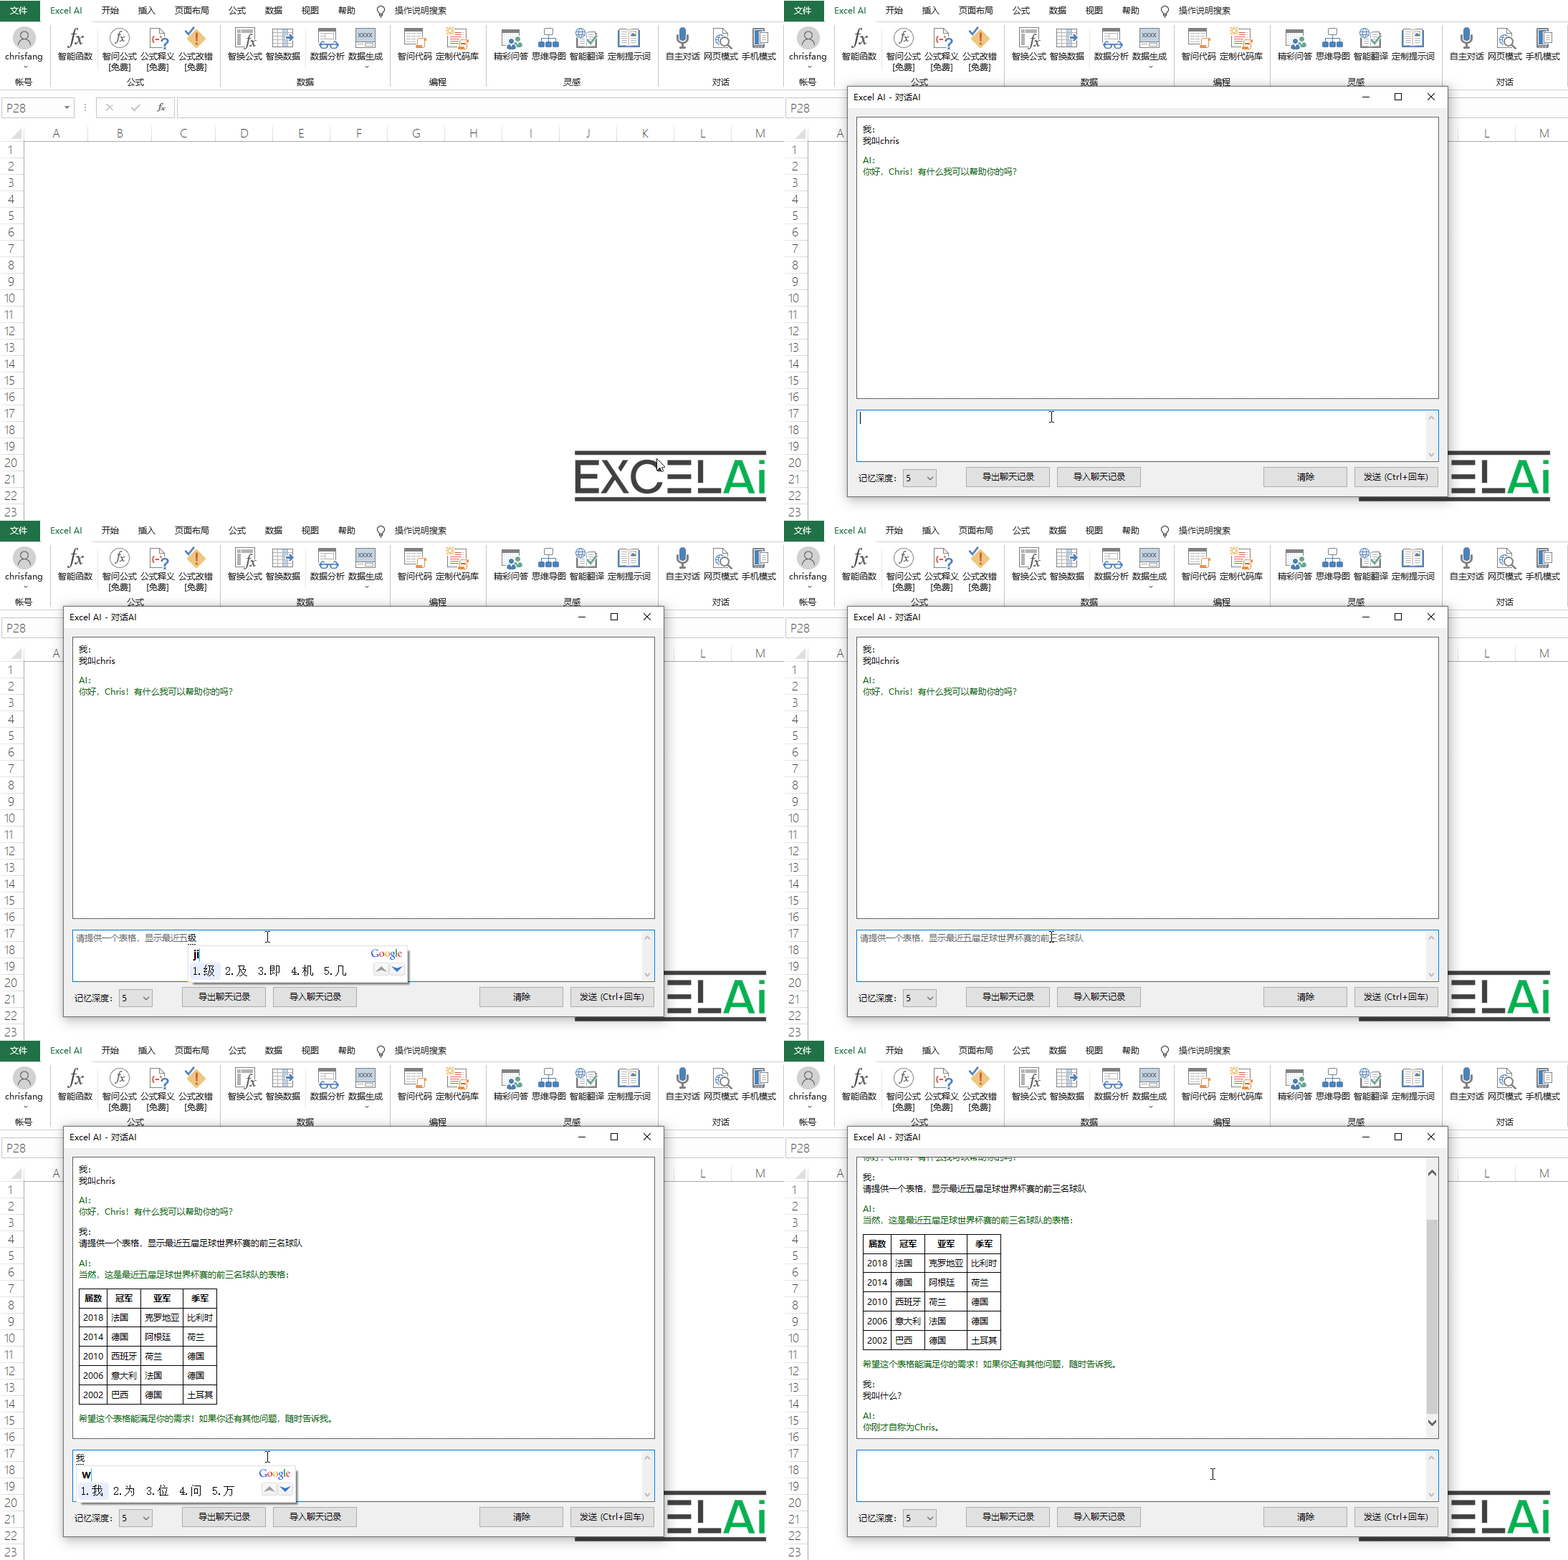 self-directed dialog
Option Settings
- In this chatting process, AI has certain memory function, he will remember the previous conversation with you, but such memory is not infinite, click the [Options] button in the lower left corner of the window, you can set the memory depth in the options. n groups of conversations means that you can memorize the most recent n groups of conversations back and forth content (one of your speeches and one of the AI's replies are counted as a group). For example, if the memory depth is set to 5 conversations, if I mention my name to the AI, then after 5 or more conversations, the AI will no longer remember my name. The higher the memory depth parameter is set, the longer the content can be remembered, but the more AI power it will consume
- Checking the [Enhanced] checkbox in the Options window will switch to the Enhanced mode, and the system will call a more advanced AI model to carry out the conversation. Enhanced version uses GPT-4o model by default, you can switch to other models in [Personal Center].
- After checking [Enable Networking Function], the AI will automatically look up the relevant information on the Internet as needed during the conversation before proceeding with the conversation.
- After checking [Enable Search], the AI will automatically use Bing search engine to find the relevant information for the conversation.
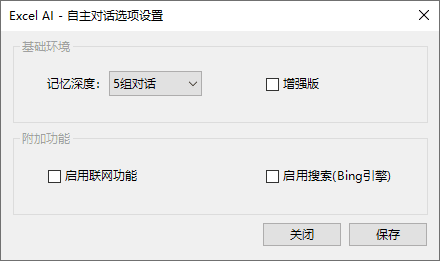
Options window for autonomous dialog
window collaterals
The chat window of [Autonomous Conversation] has been developed with support for snap technology, so you can use this feature as long as you are on an operating system that supports snap technology (Windows 10 or above).
Simply put, window docking is to allow your chat window can be displayed side-by-side with other program windows (can be Excel's work window, or other program windows) at the same time, to facilitate collaborative work.
- Drag the chat window with the mouse to the left or right edge of the screen, and then release the mouse when the docking effect is displayed, which can also be done with the shortcut.
- Select a program window on the other side of the docking window that needs to be displayed side-by-side.
- Move the separator line between two windows to adjust the width of the window display.
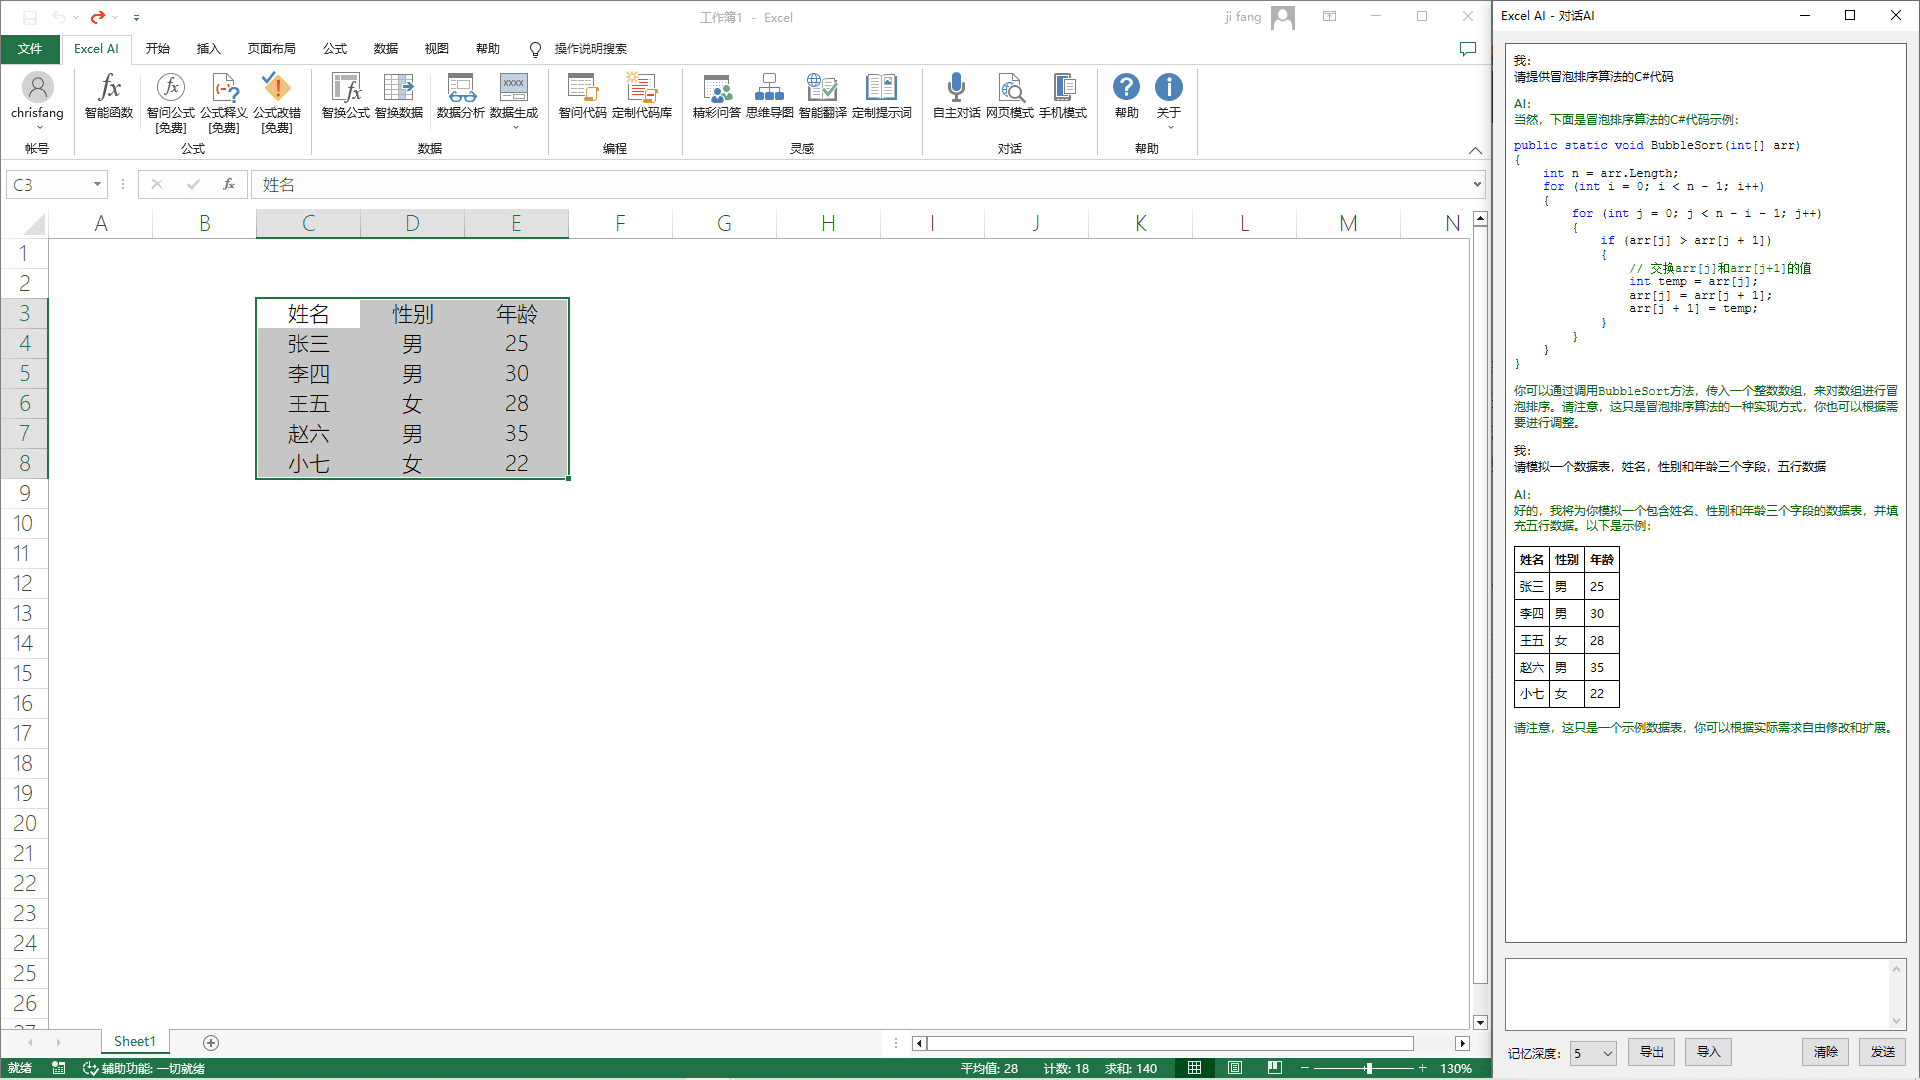
The effect of the window sticker
Operation Demonstration
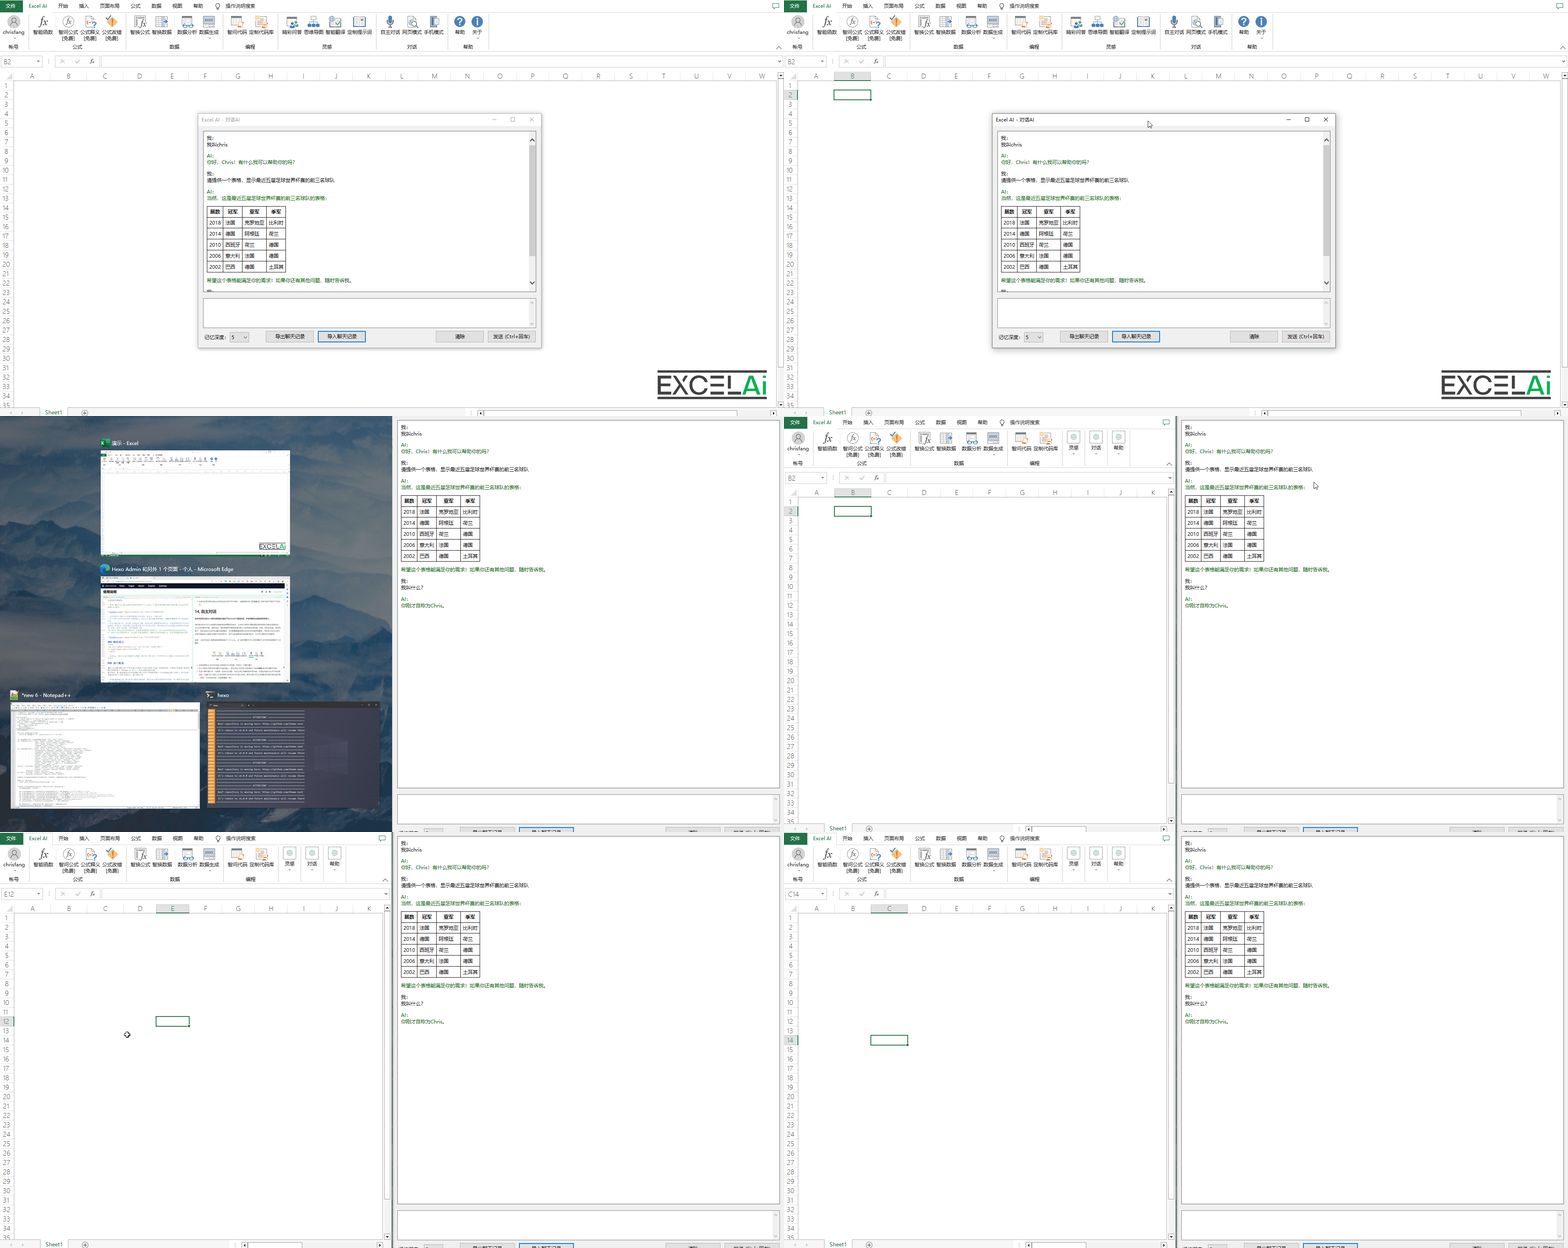 Autonomous Dialogue - Window Stickers
Export/Import Chat Logs
- Conversation content in the chat window can be copied by selecting it with the mouse and using the shortcut key
- If you want to export and save all the chats in the dialog box, you can click [Export Chat Records] at the bottom of the window, and the program will automatically save the chats in the path you choose, and you can choose to save it as an archive file in Excel format or Json format.
- Chat archives in Excel format are convenient for you to read and browse, while chat archives in Json format are compatible with the import/export function in [Autonomous Dialogue - Web Mode]. Note: Chat archives in Excel format can be opened in Excel for browsing, but please don't change the format in order to avoid data errors that can't be re-imported.
- If you need to continue the previous conversation at a certain moment, you can use the [Import Chat Records] function to import the archived chat records into the current window, and then you can continue chatting with the AI with the content of the previous conversation. Note: Importing the chat records will clear all the chat content in the current window. The imported chats will still be limited by the memory depth setting in the current window.
- Click the [Clear] button to clear all conversations in the current chat window.
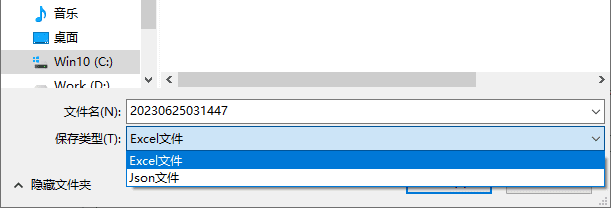
You can select the file format when exporting chat logs
Situations requiring attention
- In some cases, after you send content in the chat, you will not get a reply from the AI, but instead you will receive the message "AI Service Request Failed", so you can try to retype the content and resend it again.
- After the above situation, the conversation content in the chat window may be messy due to the addition of invalid content, you can try to use the clear function to empty it. If you don't want to lose the previous chat logs, you can use [Export Chat Logs] function to export the chat contents to Excel file, then open the chat log file, delete some messy conversation contents manually, and then re-import them to the chat window through [Import Chat Logs] function.
17, Autonomous dialog - web mode
The web mode for autonomous conversations allows you to talk directly with ChatGPT in a web browser window and supports saving and importing of chat logs.

Position of the buttons in the tabs
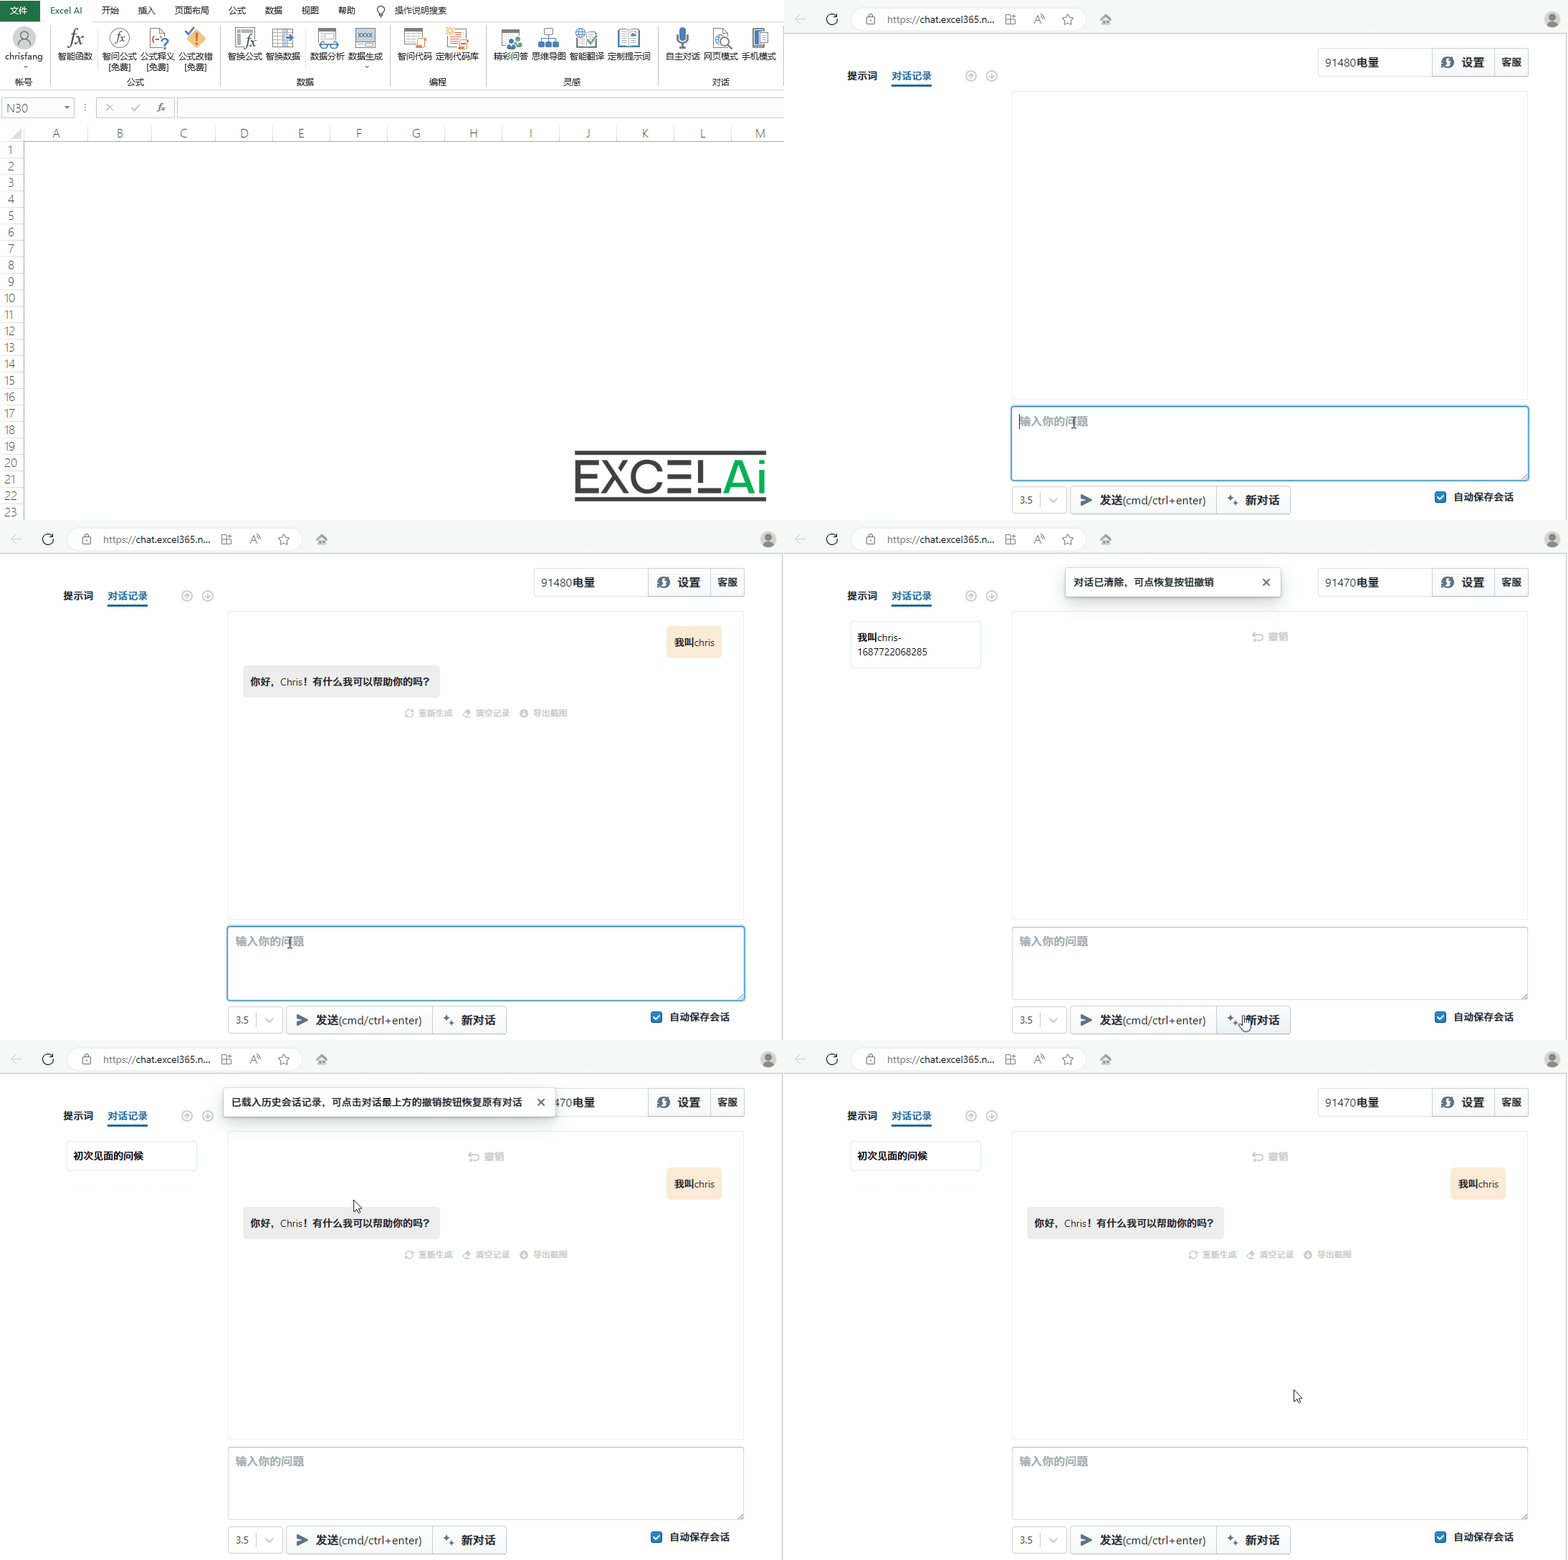
- Clicking on the [Web Mode] button in the menu bar will open a browser web page window through which you can continue to have an autonomous dialog with ChatGPT.
- The left side of the bottom switches between ChatGPT models (3.5 or 4.0)
- Click the [Save Conversation] button on the right side of the bottom, you can save the content of the conversation in the current chat window in the form of a conversation log, which is displayed on the left side of the window.
- Click the Export button on the right side of [Dialog Records] to export the above saved dialog records to a file (Json format).
- Click on the Import button on the right side of [Conversation Log] to re-import the previously saved chat archive file (Json file) to the web page.
- If you have exported chat logs in Json format using the [Export Chat Logs] function in the [Auto-conversation] window in Excel, you can also use the Import function to import these chat logs in web mode.
Note: If the [Auto Save Conversation] checkbox is displayed on the right side of the bottom, if this option is checked, the current chat will be saved as a conversation record every time you click the [New Conversation] button.
Description: Use the browser's favorite function to bookmark this web page window, the next time you can open this web page directly from the collection to chat, and no longer need to click the menu from Excel to enter, but only if the browser cache has not been cleared!
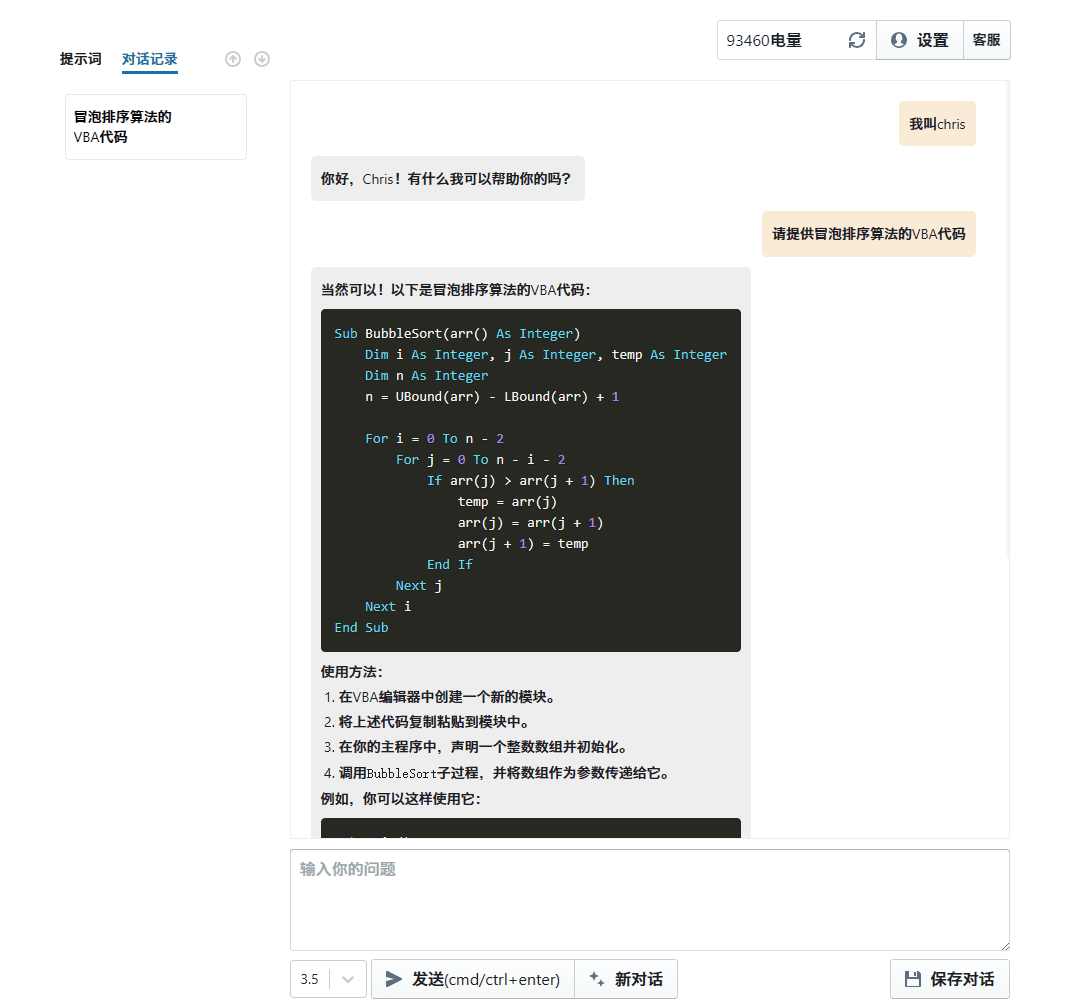
Autonomous dialog web model
Operation Demonstration
 Autonomous dialog - web mode
18, Autonomous dialog - cell phone mode
Autonomous Conversation's cell phone mode allows you to talk directly with ChatGPT on your cell phone.
If you want to use the Autonomous Dialogue function on your cell phone, you can use the [Cell Phone Mode] of Autonomous Dialogue.

Position of the buttons in the tabs
- Click on the [Mobile Mode] button in the menu bar, a QR code window will be displayed
- Scanning the QR code with your cell phone will open the webpage of the autonomous conversation in your cell phone's browser, so you can chat on your cell phone.
Note: Please keep your QR code in a safe place, if it is accidentally leaked, other people can also use this function by scanning the code, and it will consume your AI battery power
19, Registration and login
If you are using this plugin for the first time, you need to click the [Login] button in the menu bar to register your account.

Position of the buttons in the tabs
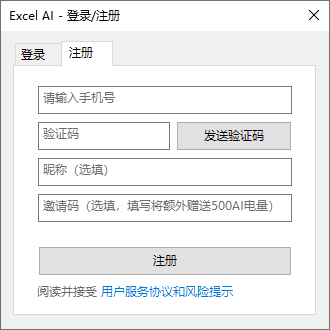
- Click the [Login] button in the menu bar to display the [Login/Register] dialog box.
- In the dialog box switch to the [Registration] page, then fill in the phone number you can normally receive SMS, and then click on the [Send Verification Code] button, later your phone will receive the SMS verification code from the [Jingyu Information]!
- Fill in the second column with the verification code you received.
- If you wish, you can put your nickname in the third field
- If you have been given an invitation code (a 6-digit combination of letters and numbers) by another user, you can fill in the fourth column with this invitation code and both you and the user who invited you will receive an additional AI Power Bonus on your account!
- Finally, click the [Register] button to complete the account registration, registration will be automatically logged in after success!
Friendly reminder: Registering an account means you agree to accept the plugin's "User Service Agreement and Risk Warning".
Register
Under normal circumstances, each time you open Excel, the add-in program will automatically log in to your account for you. If you use the [Logout] function to exit the login status, or due to some network reasons did not realize the automatic login, you can also choose to manually re-login.
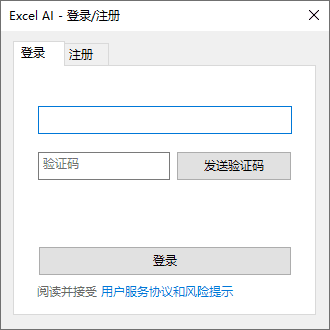
- Click the [Login] button in the menu bar to display the [Login/Register] dialog box.
- Switch to the [Login] page in the dialog box, then fill in the phone number you used when registering, then click the [Send Verification Code] button, and later you will receive the SMS verification code from [Jingyu Information] on your cell phone.
- Fill in the verification code you received in the verification code column, and then click the [Login] button, you can complete the login after verification!
Friendly reminder: the validity of the SMS verification code is 10 minutes, please log in within 10 minutes of receiving the SMS, otherwise the code will be invalid.
Login
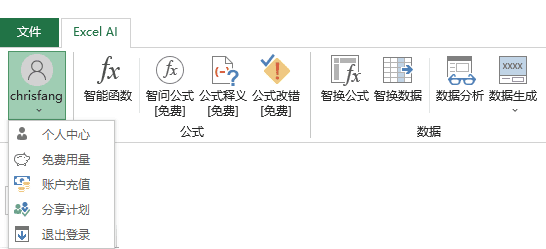
Under the login status, you can click the drop-down menu of [Account] to enter [Personal Center] and other menu items for related operations.
Account drop-down menu
20, Personal Center
In [Personal Center] you can view the balance of AI power and the details of power recharge.
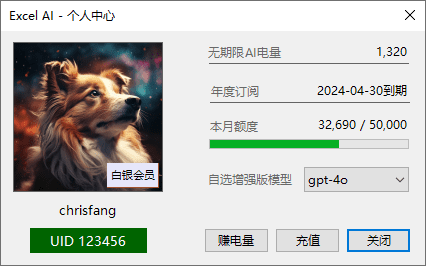
personal center
- Click on [Personal Center] in the drop-down menu of [Account] to open the dialog box
- The left side will show your membership level (Gold, Silver, Ordinary) and your UID.
- The right hand side will show the current indefinite AI charge remaining on your account
- If you are an annual subscriber, the subscription expiration date and the monthly traffic usage for the current month will also be shown
- You can select the specific AI model type to be used in [Enhanced] mode in [Enhanced Model of Your Choice].
- Clicking on the [Earn Power] button will redirect you to the [Sharing Program] page.
- Clicking the [Top Up] button will redirect you to the [Account Top Up] page.
- If you click on the number of the open-ended AI charge in the upper right corner, the charging record of the open-ended charge is displayed
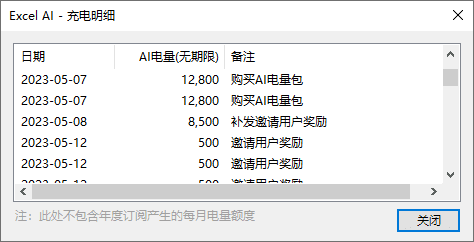
Charging record of unlimited charge duration
Note: The charging log only showsUnlimited powerrecords, it will not show the monthly packet traffic records generated by the annual subscription
Situations requiring attention
If the open-ended AI charge in the upper right corner shows a network anomaly This means that your computer is currently unable to access our AI servers, and you will not be able to use the plugin's features properly.
You need to check your internet connection to make sure that it is not blocked by firewalls, or that there are no unusual problems due to the use of special internet connections such as proxy servers.
In addition, in some special areas (e.g. Xiamen), due to the local operator's policy problems, it will cause our AI service to be blocked, you can try to modify the DNS service to solve the problem, the specific modification of DNS service can be Baidu.
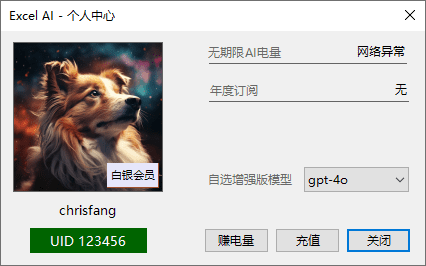
network anomaly
Tips: Therefore, you can judge the network status and the availability of AI services by whether the network abnormality is displayed in the Personal Center.
21, Free usage
In order to make it easier for users to experience the function, we provide many free usage opportunities for new users, and you can check the usage of these free credits in [Free Usage].
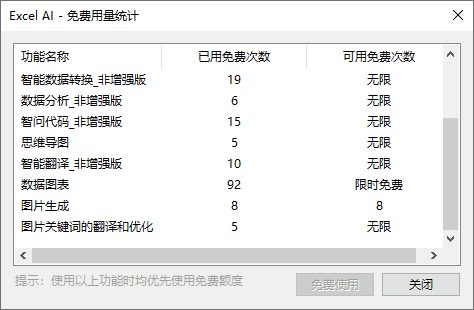
Free usage
- Click on [Free Usage] in the drop-down menu of [Account] to open the dialog box
- The dialog box displays the number of free times available for each feature and the number of free times that have actually been used
- Those features that have not yet reached the maximum number of available free uses will not consume your AI power when you use them.
Note: If you find that the number of times a feature is used does not increase after you use it, try logging out and logging back in to your account.
Tip: The [Free Use] button in the dialog box is convenient for you to jump to the selected function, but thedoes not meanIt is only free when you click on this button, and as long as you have not reached the maximum number of free uses for a particular feature, you can enjoy free use of that feature anywhere.
22, Account Recharge
We pre-charge each user's account with a certain amount of free AI power, and when you run out of this power, you will need to top up your account to continue using the relevant AI features.
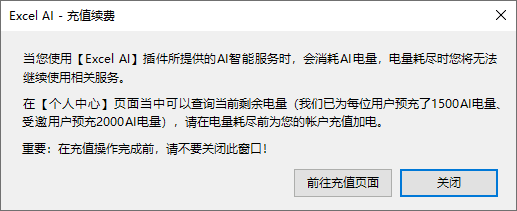
Recharge your account
- Click [Account Top-up] in the drop-down menu of [Account Number] to open the dialog box
- Click the [Go to top-up page] button to go to the top-up page, do not close this dialog box until the top-up is complete.
- Select your recharge product on the recharge page, complete the payment with Alipay, and then return to this dialog box and click the [Close] button.
- Re-open [Personal Center] to check the AI power generated by the new recharge
Note: If you have selected a rechargeable product but have not completed the actual payment, the next time you recharge the product will show an unfinished order that needs to be closed, you can close the previous unfinished order and then continue to pay for the operation.
Description: Top-up methods include annual subscription and power packs. When you buy an annual subscription, you will be automatically recharged with monthly power in twelve months, which can only be used in the same month and will not be carried forward every other month; when you buy an individual power pack, there is no limitation on the time of use (therefore it is called open-ended), so you can use it at any time. The two methods can co-exist and complement each other, and the system will prioritize the deduction of the monthly power in the annual subscription.
Note: If you have subscribed to the Silver Membership Package and wish to upgrade to the Gold Membership Package, please contact customer service to do so.
23, Sharing Program
If you find our plugin useful, you are very welcome to share the plugin with your friends. We have an invite code and a share link for you, any user who signs up with your invite code will reward you with AI power, and the friends you invite will also receive an extra bonus.
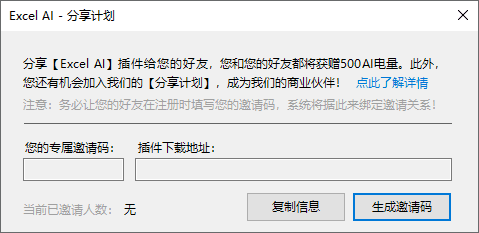
sharing program
- Click on [Sharing Program] in the drop-down menu of [Account] to open the dialog box
- Click the [Generate Invitation Code] button, it will generate your own exclusive invitation code (6 digits and letters combination)
- Click the [Copy Message] button, the system will automatically generate a paragraph of text, including the sharing link and your invitation code, you just need to paste it into a text box can be sent to your invitation recipients!
- If a user fills in your invitation code when registering, the system will send bonus AI power to your account and the other account at the same time, and you can view the relevant records in the power recharge details in [Personal Center].
- The lower left corner of the dialog box will show the number of people you have invited (based on the invitation code filled in during registration)
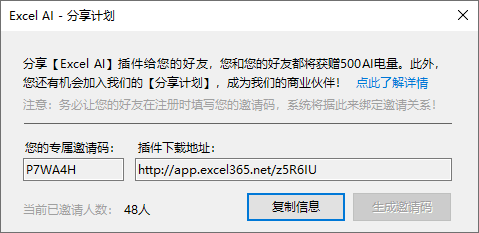
Generated invitation code and share link
Tips: Please be sure to remind your invitee, in the registration account, you need to fill in your invitation code, otherwise your invitation will not be recorded by the system!
Plugin Updates
Mode 1: Automatic update
- When Excel is opened in the online state, the add-in automatically detects the latest version and reminds the user to install it.
- After clicking the OK button, the new version of the add-in will be downloaded and installed automatically (progress will be shown in the Excel status bar).
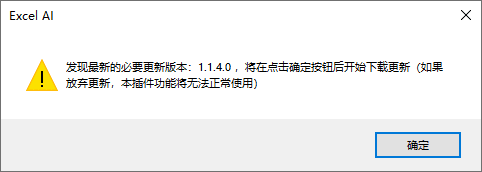
Discover the new version
- After the installation is complete, a pop-up window will display a message, at this time, please manually close Excel (you must close all Excel windows and completely exit the Excel program. If necessary, you can save your work before closing), before closing Excel, please do not use Excel AI functions again, so as not to cause installation failure.
Installation completed
- Re-open Excel, you can continue to use the latest version of Excel AI plug-ins, in the [About & Updates] in which you can view the current version number!
Note: Updated plugin versions are categorized intoOptional Updatescap (a poem)Required UpdatesOf the two types, optional updates can be selected by the user to update immediately, while required updates will automatically complete the update installation.
Way 2: Manual update
If automatic updates don't work, or if you feel the need, you can also choose to update manually
- Click the [About & Updates] button in the menu bar to open the About window
- Click the [Update] button in the window, the program will automatically detect the latest version and ask you whether to install it or not
- Users to confirm the installation will automatically begin to download and install, after the installation is complete, the same need to manually close Excel and then re-open!
About the window
Note: Updated plugin versions are categorized intoOptional Updatescap (a poem)Required UpdatesTwo types are available, where the user is free to choose whether to install immediately or not. If users cancel theRequired UpdatesMost of the features of this plugin will be grayed out and unavailable. When the user updates the plugin, the function menu will be restored to the available state.
Plugin Uninstallation
If you no longer use the Excel AI add-in and need to uninstall it from Excel, you can do so:
Way 1: Use an uninstall tool
- Download the special uninstallation tool on the [Download] page, or find the uninstallation tool from the plug-in installation zip, run it and click on the uninstall button to complete the uninstallation of the plug-in
In some special cases, if the plug-in is abnormally unable to update to the latest version, it is recommended to uninstall and reinstall the plug-in using the above methods
Friendly reminder, if after uninstalling you want to install Excel AI plug-ins again, you can re-download the latest version of the plug-in installation file, and then refer to this site [Installation] page in the instructions, reinstall the plug-in!
Way 2: Easy uninstallation
- With Excel open, press the Alt,t,i triple bond (chemistry)
- In the [Add-ons] window that pops up, remove the Excel_Ai_Assistant checkbox to complete the uninstallation of the plug-in
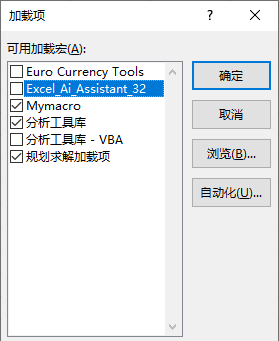
Add-ons window
Way 3: Uninstall completely
Mode 2 method can not let the plug-in continue to load and run, but the uninstallation is not complete, it will affect the normal installation of the new version of this plug-in. Therefore, if you need to manually uninstall completely, you can refer to the following operation:
- Excel open state, click [File] - [Options], in the window on the left side of the list, select [Add-ins
- In the right-hand window, find the Excel_Ai_Assistant The path location of the file will be displayed below the add-on, when selected by the mouse.
- Close Excel, according to the above file path, find the specific file in the computer, delete the file
- Open Excel again and press Alt,t,i three keys, and in the [Add-ons] window that pops up, go ahead and click on the Excel_Ai_Assistant checkbox, it will indicate that the file cannot be found, and then realize the deletion of the
common error
AI service request failed
In some cases, when using the functions of the plug-in program, a pop-up will appear. AI service request failed This may be due to the network or AI server's supply capacity problem, you can wait for a moment and retry to use the plug-in function for a few more tries.AI service request failure will not consume your AI power.
If the program always displays AI service request failed error message, you can open the [Personal Center] dialog box to check whether the indefinite AI power is displayed as network anomaly If it shows network anomaly, it means that your network cannot connect to our AI server.
In this case you need to check your internet connection to make sure that it is not blocked by firewalls, or that there are no unusual problems due to the use of special internet connections such as proxy servers, VPNs, and so on.
AI power shortage
If your account AI power balance is insufficient, it will be displayed when using the relevant functions AI power shortage of the error message.
In some cases, the [Personal Center] shows that there is still power left, but when you use the function, it still prompts "AI power is insufficient", this is because our AI service can only know the AI power consumed by this request after the service is completed. This is because our AI service only knows the AI power consumed in this request after the service is completed. Therefore, the system will deduct a certain amount of AI power (usually 410) in advance when the user uses the function, and then return the unused power to the user's account after calculating the actual usage. Therefore, if the account balance does not reach the pre-deducted amount, it will show insufficient power.
© Copyright notes
Article copyright AI Sharing Circle All, please do not reproduce without permission.
Related articles

No comments...

 Apply to table Note: This operation overwrites the existing contents of the currently active cell, so Excel AI will alert you to the risks of this operation and require your confirmation.
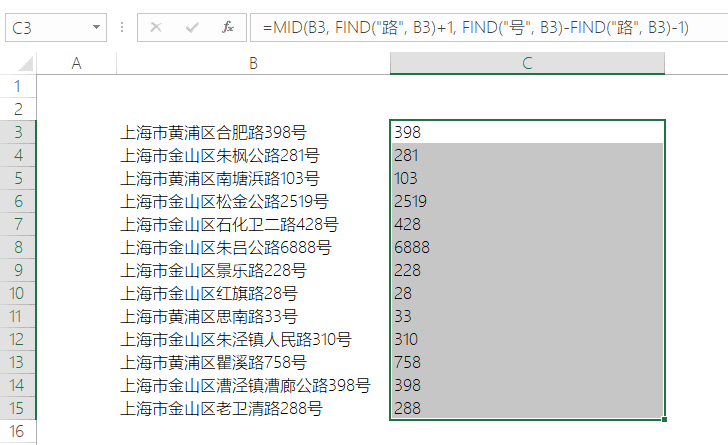 The effect of inserting a formula into a table Note: Inserting a new column to fill in the formula requires your confirmation.
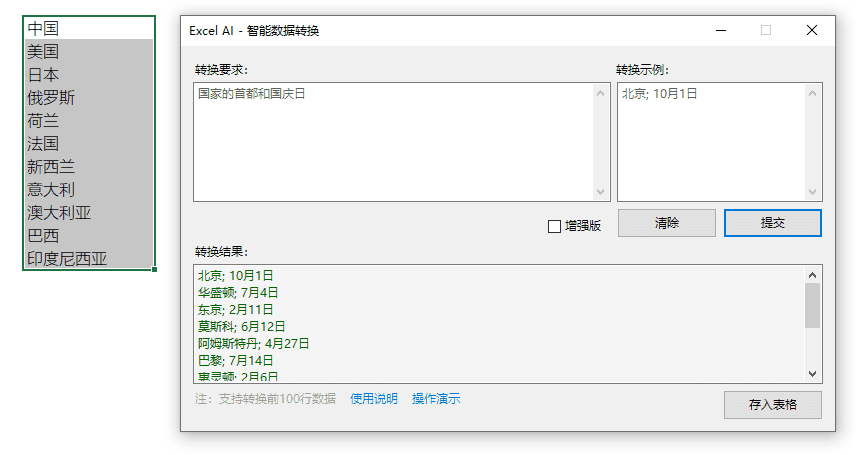 Wise Change Data dialog box