DashInfer-VLM, multimodal SOTA inference performance over vLLM!
introductory
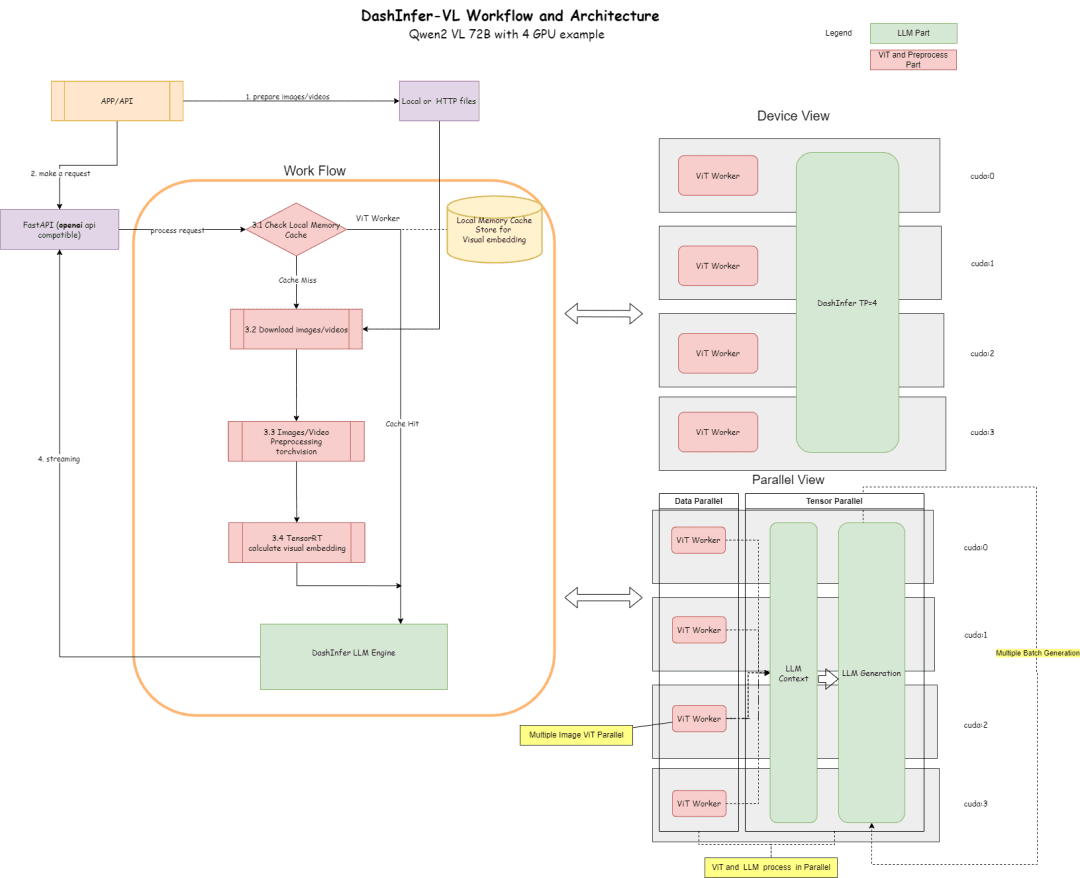
DashInfer-VLM is an inference architecture for visual multimodal large model VLMs, especially optimized for inference acceleration of Qwen VL models. The biggest difference between DashInfer-VLM and other inference acceleration frameworks for VLMs is that it separates the VIT part from the LLM part and the VIT and LLM runs in parallel without interfering with each other. and the VIT and LLM run in parallel without interfering with each other.
This is characterized by the fact that the image and video preprocessing in VLM, as well as the feature extraction part of VIT, will not interrupt the generation of LLM, and can also be a VIT/LLM separation of the architecture, which is the first VLM service framework in the open source community to use this architecture.
In a multi-card deployment, it has a ViT processing unit on each card, which gives a very significant performance advantage in video, multi-image scenarios.
In addition, for the ViT part, it supports memory caching so that there is no need to recalculate ViT repeatedly under multiple rounds of dialog.
Below is a diagram of its architecture, and its configuration according to the 4-card part 72B.

An architecture diagram describes the process and architecture:
- In the ViT part, many inference elicitation can be used for inference, such as TensorRT or onnxruntime (onnx model export will be performed on the ViT part of the model in the framework,) TensorRT is currently supported by default in the framework.
- In the LLM section, DashInfer is used for inference.
- Cache section, support ViT result Memory Cache, LLM section Prerfix Cache, LLM section Multimodal Prefix Cache (not enabled by default)
Code Address:
https://github.com/modelscope/dash-infer
Document Address:
https://dashinfer.readthedocs.io/en/latest/vlm/vlm_offline_inference_en.html
best practice
Experience DashInfer on the free GPU math of the Magic Hitch community:
首先是dashinfer-vlm和TensorRT的安装。

# 首先安装所需的 package
import os

# 下载并安装 dashinfer 2.0.0rc2 版本
# 如果需要,可以使用 wget 下载并解压 TensorRT 包
# pip 安装 dashinfer 2.0.0rc2
#!pip install https://github.com/modelscope/dash-infer/releases/download/v2.0.0-rc2/dashinfer-2.0.0rc2-cp310-cp310-manylinux_2_17_x86_64.manylinux2014_x86_64.whl
#!wget https://modelscope.oss-cn-beijing.aliyuncs.com/releases/TensorRT-10.6.0.26.Linux.x86_64-gnu.cuda-12.6.tar.gz
#!tar -xvzf TensorRT-10.6.0.26.Linux.x86_64-gnu.cuda-12.6.tar.gz

# 下载到本地并替换为 modelscope 对应的 URL
# 安装 dashinfer,因 package 较大,推荐下载到本地后安装
#!wget https://modelscope.oss-cn-beijing.aliyuncs.com/releases/dashinfer-2.0.0rc3-cp310-cp310-manylinux_2_17_x86_64.manylinux2014_x86_64.whl
#!pip install ./dashinfer-2.0.0rc3-cp310-cp310-manylinux_2_17_x86_64.manylinux2014_x86_64.whl

# 安装 dashinfer vlm
#!pip install dashinfer-vlm

# 安装 OpenAI 客户端
#!pip install openai==1.56.2

# 安装 TensorRT 的 Python 包,从下载的包中打开安装
#!pip install TensorRT-10.6.0.26/python/tensorrt-10.6.0-cp310-none-linux_x86_64.whl
TensorRT requires environment variable configuration:
import os

# 获取 TensorRT 运行时库的路径
trt_runtime_path = os.getcwd() + "/TensorRT-10.6.0.26/lib/"

# 获取当前的 LD_LIBRARY_PATH 环境变量值
current_ld_library_path = os.environ.get('LD_LIBRARY_PATH', '')

# 将新路径添加到现有值中
if current_ld_library_path:
# 如果 LD
After the environment is installed, start dashinfer vlm to reason about the model and form an openai-compatible server, the model can be changed to 7B, 72B, etc.
All GPU memory in the environment is used by default.
!dashinfer_vlm_serve --model qwen/Qwen2-VL-2B-Instruct --port 8000 --host 127.0.0.1
This process initializes DashInfer, as well as the external engine used by ViT (TensorRT in this case), and starts an openai service.
Seeing these logs indicates that the TRT was initialized successfully:

Seeing these logs indicates that DashInfer was initialized successfully:

Seeing these logs indicates that the openai service was initialized successfully:

Here all the initialization is successful, you can open another notebook for client and benchmarking.
Notebook Address:https://modelscope.cn/notebook/share/ipynb/6ea987c5/vl-start-server.ipynb
Image Understanding Demo
Demonstrate a demo for image understanding with multiple images:
# Install the required OpenAI client version
!pip install openai==1.56.2 # VL support requires a recent OpenAI client.

from openai import OpenAI

# Initialize the OpenAI client
client = OpenAI(
base_url="http://localhost:8000/v1",
api_key="EMPTY"
)

# Prepare the API call for a chat completion
response = client.chat.completions.create(
model="model",
messages=[
{
"role": "user",
"content": [
{"type": "text", "text": "Are these images different?"},
{
"type": "image_url",
"image_url": {
"url": "https://farm4.staticflickr.com/3075/3168662394_7d7103de7d_z_d.jpg",
}
},
{
"type": "image_url",
"image_url": {
"url": "https://farm2.staticflickr.com/1533/26541536141_41abe98db3_z_d.jpg",
}
},
],
}
],
stream=True,
max_completion_tokens=1024,
temperature=0.1,
)

# Process the streamed response
full_response = ""
for chunk in response:
# Append the delta content to the full response
full_response += chunk.choices[0].delta.content
print(".", end="") # Print a dot for each chunk received

# Print the full response
print(f"\nImage: Full Response:\n{full_response}")
Video comprehension demo
Since openai does not define a standard video interface, this paper provides a video_url type, which automatically downloads, extracts frames and analyzes the video.
# video example
!pip install openai==1.56.2 # Ensure the OpenAI client supports video link features.

from openai import OpenAI

# Initialize the OpenAI client
client = OpenAI(
base_url="http://localhost:8000/v1",
api_key="EMPTY"
)

# Create a chat completion request with a video URL
response = client.chat.completions.create(
model="model",
messages=[
{
"role": "user",
"content": [
{
"type": "text",
"text": "Generate a compelling description that I can upload along with the video."
},
{
"type": "video_url",
"video_url": {
"url": "https://cloud.video.taobao.com/vod/JCM2awgFE2C2vsACpDESXZ3h5_iQ5yCZCypmjtEs2Ck.mp4",
"fps": 2
}
}
]
}
],
max_completion_tokens=1024,
top_p=0.5,
temperature=0.1,
frequency_penalty=1.05,
stream=True,
)

# Process the streaming response
full_response = ""
for chunk in response:
# Append the delta content from the chunk to the full response
full_response += chunk.choices[0].delta.content
print(".", end="") # Indicate progress with dots

# Print the complete response
print(f"\nFull Response: \n{full_response}")
benchmark
Use the image above to understand the EXAMPLE and simply do a multi-concurrent test for throughput testing.
# benchmark!pip install openai==1.56.2
import time
import concurrent.futures
from openai import OpenAI

# 初始化 OpenAI 客户端
client = OpenAI(
base_url="http://localhost:8000/v1",
api_key="EMPTY"
)

# 请求参数
model = "model"
messages = [
{
"role": "user",
"content": [
{"type": "text", "text": "Are these images different?"},
{
"type": "image_url",
"image_url": {
"url": "https://farm4.staticflickr.com/3075/3168662394_7d7103de7d_z_d.jpg",
}
},
{
"type": "image_url",
"image_url": {
"url": "https://farm2.staticflickr.com/1533/26541536141_41abe98db3_z_d.jpg",
}
},
],
}
]

# 并发请求函数
def send_request():
start_time = time.time()
response = client.chat.completions.create(
model=model,
messages=messages,
stream=False,
max_completion_tokens=1024,
temperature=0.1,
)
end_time = time.time()
latency = end_time - start_time
return latency

# 基准测试函数
def benchmark(num_requests, num_workers):
latencies = []
start_time = time.time()

with concurrent.futures.ThreadPoolExecutor(max_workers=num_workers) as executor:
futures = [executor.submit(send_request) for _ in range(num_requests)]
for future in concurrent.futures.as_completed(futures):
latencies.append(future.result())

end_time = time.time()
total_time = end_time - start_time
qps = num_requests / total_time
average_latency = sum(latencies) / len(latencies)
throughput = num_requests * 1024 / total_time # 假设每个请求的响应大小为 1024 字节

print(f"Total Time: {total_time:.2f} seconds")
print(f"QPS: {qps:.2f}")
print(f"Average Latency: {average_latency:.2f} seconds")

# 主程序入口
if __name__ == "__main__":
num_requests = 100 # 总请求数
num_workers = 10 # 并发工作线程数
benchmark(num_requests, num_workers)
Test results:

Notebook Address:https://modelscope.cn/notebook/share/ipynb/5560603a/vl-test-and-benchmark.ipynb
Comprehensive and vLLM performance comparison:
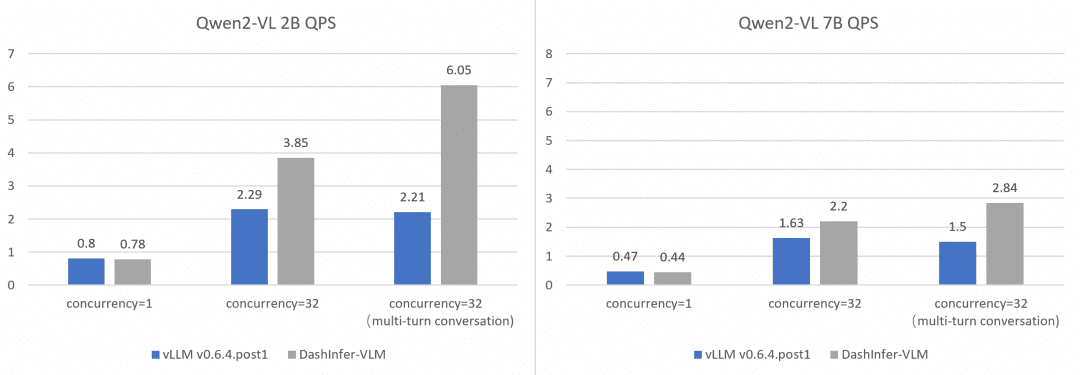
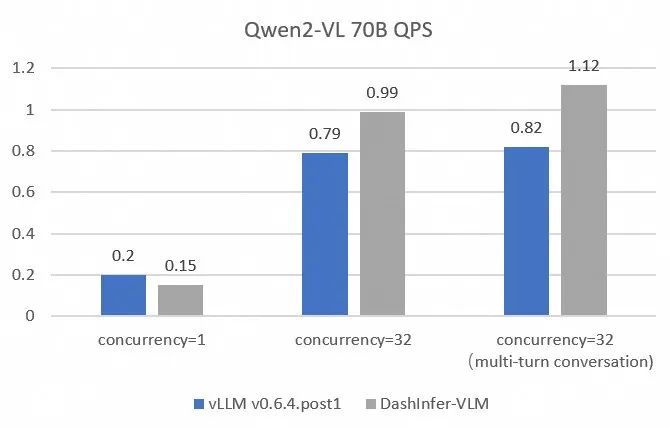
In order to compare and contrast the performance of vLLM more comprehensively and accurately, we used OpenGVLab/InternVL-Chat-V1-2-SFT-Data to benchmark single-concurrent, multiple-concurrent, and multiple-round conversations on different sizes of models, and the detailed reproduction scripts are shown in the link, and the results are as follows:
It can be seen that DashInfer has some performance advantages in all cases, especially in multi-round conversations.


© Copyright notes
Article copyright AI Sharing Circle All, please do not reproduce without permission.
Related posts

No comments...


