AI Engineering Academy: 2.1 Implementing RAG from Scratch
summarize
This guide will walk you through creating a simple search enhancement generation using pure Python (RAG) system. We will use an embedding model and a large language model (LLM) to retrieve relevant documents and generate responses based on user queries.

https://github.com/adithya-s-k/AI-Engineering.academy/tree/main/RAG/00_RAG_from_Scratch
Steps involved
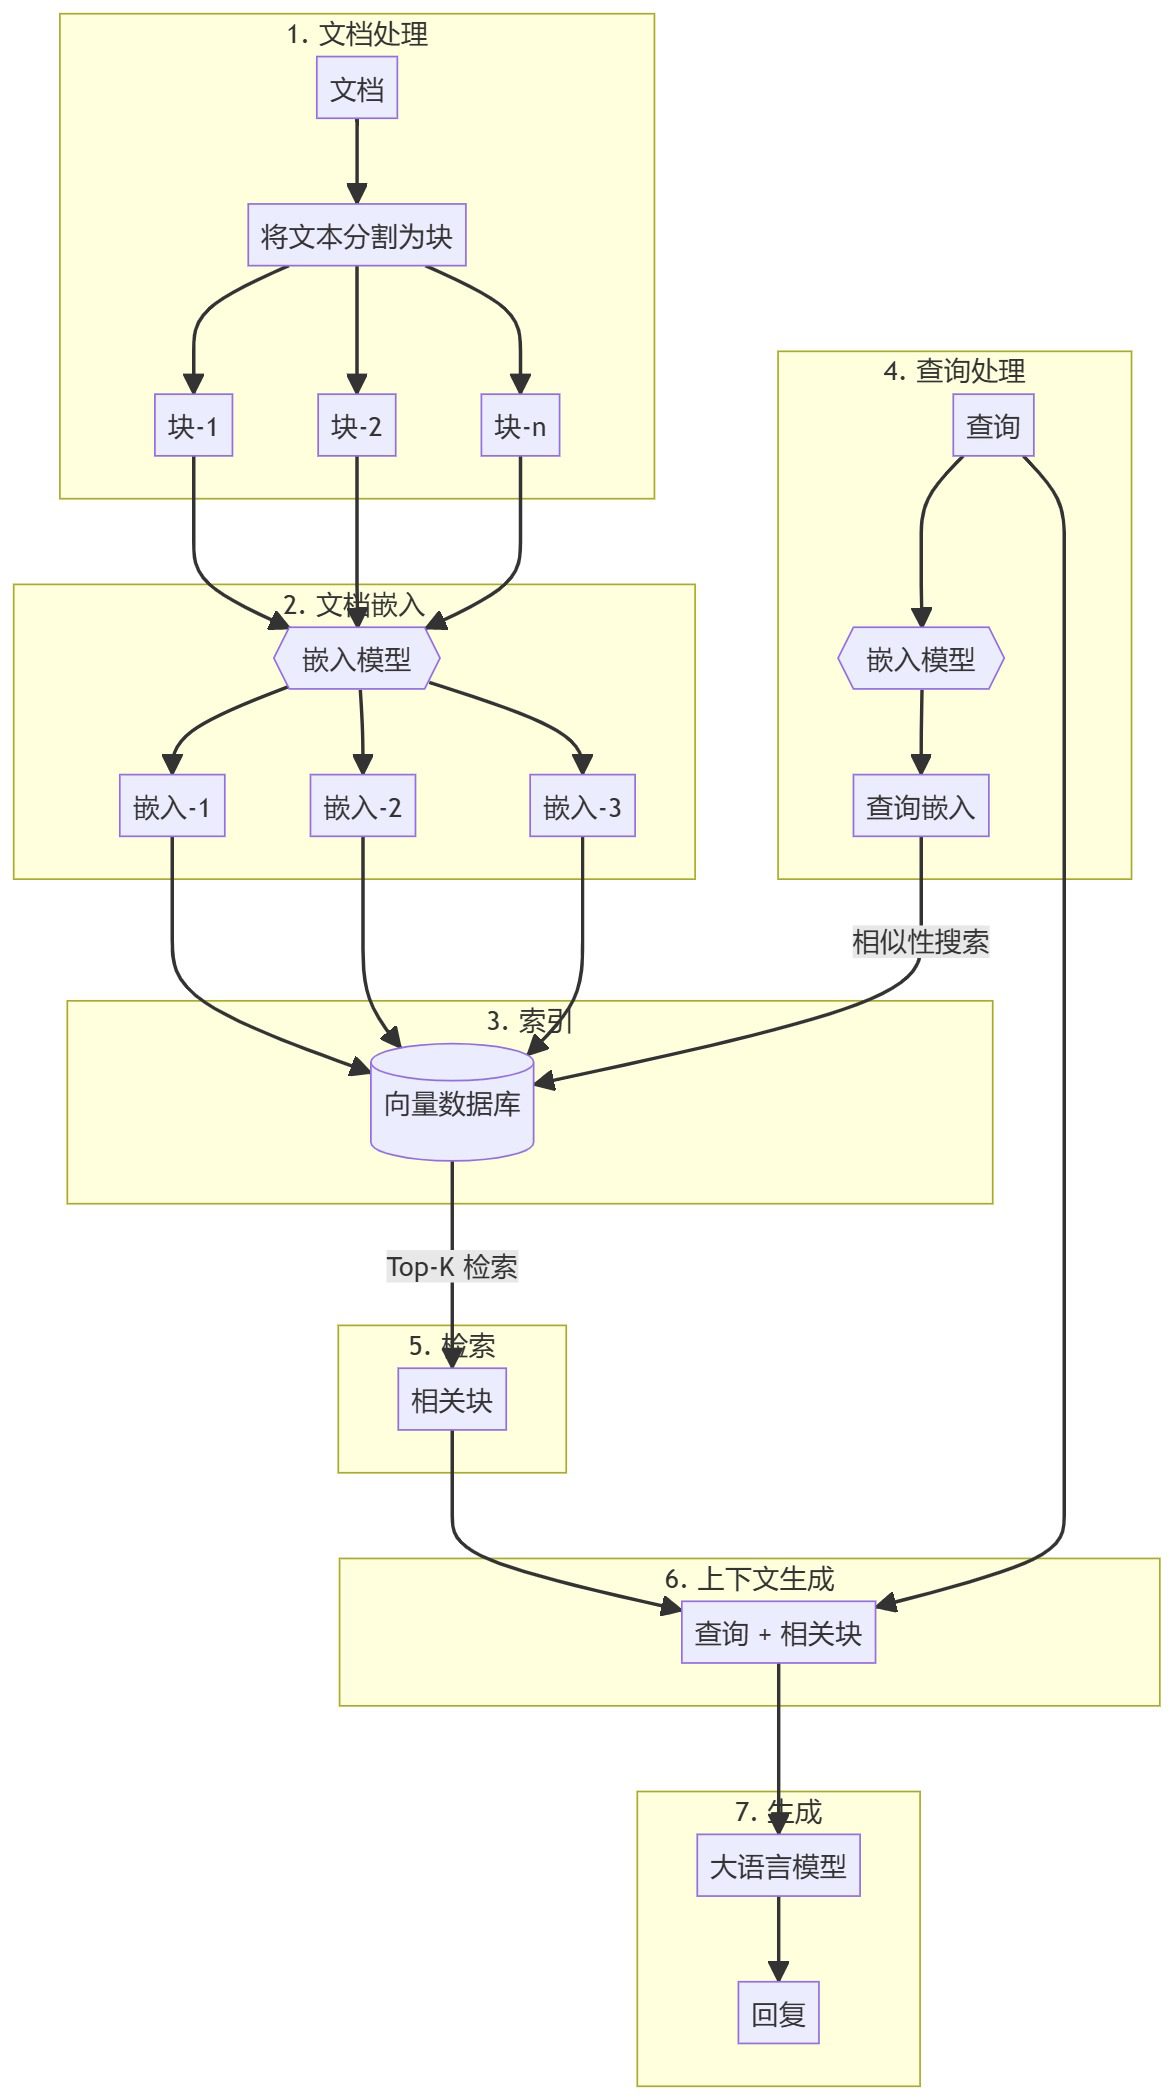
The whole process can be divided into two main steps:
- Knowledge Base Creation
- generated part
Knowledge Base Creation
First, you need to prepare a knowledge base (documents, PDFs, wiki pages). These are the base data for the Language Model (LLM). The specific process includes:
- chunking: Break text into small sub-document chunks to simplify processing.
- embedding: Compute numerical embeddings for each sub-document block in order to understand the semantic similarity of the query.
- stockpile: Store these embeddings in a way that allows for quick retrieval. While it is common to use vector stores/databases, this tutorial shows that this is not necessary.
generated part
When a user query is entered, an embedding is computed for the query and the most relevant sub-document blocks are retrieved from the knowledge base. These relevant chunks are appended to the user query to form a context and fed into the LLM to generate a response.
1. Environmental settings
There are a few packages that need to be installed before you can start.
sentence-transformers: Used to generate embeddings for documents and queries.numpy: for similarity comparisons.scipy: for advanced similarity calculations.wikipedia-api: Used to load Wikipedia pages as knowledge bases.textwrap: Used to format output text.
!pip install -q sentence-transformers
!pip install -q wikipedia-api
!pip install -q numpy
!pip install -q scipy
2. Loading the embedding model
Let's load an embedded model. This tutorial uses the gte-base-en-v1.5The
from sentence_transformers import SentenceTransformer
model = SentenceTransformer("Alibaba-NLP/gte-base-en-v1.5", trust_remote_code=True)
About the model
gte-base-en-v1.5 Model is an open source English model provided by the Alibaba NLP team. It is part of the GTE (Generalized Text Embedding) family, designed for generating high-quality embeddings for a variety of natural language processing tasks. The model is optimized for capturing the semantic meaning of English text and can be used for tasks such as sentence similarity, semantic search and clustering.trust_remote_code=True Parameters allow the use of custom code associated with the model to ensure that it works as expected.
3. Obtaining textual content from Wikipedia and preparing it
- First load a Wikipedia article as a knowledge base. The text will be split into manageable chunks (subdocuments), usually by paragraphs.
from wikipediaapi import Wikipedia wiki = Wikipedia('RAGBot/0.0', 'en') doc = wiki.page('Hayao_Miyazaki').text paragraphs = doc.split('\n\n') # 分块 - While there are many chunking strategies available, many of them may not be applicable. It is best to check your Knowledge Base (KB) to determine the most appropriate strategy. In this example, we chunk by paragraph.
- If you want to see what these blocks look like, you can import the
textwraplibrary and print it out paragraph by paragraph.import textwrap for i, p in enumerate(paragraphs): wrapped_text = textwrap.fill(p, width=100) print("-----------------------------------------------------------------") print(wrapped_text) print("-----------------------------------------------------------------") - If the document contains images and tables, it is recommended that they be extracted separately and embedded using a visual model.
4. Embedding documents
- Next, the model's modeling is done by calling the
encodemethod, which takes the text data (e.g.paragraphs) coded as embedded.docs_embed = model.encode(paragraphs, normalize_embeddings=True) - These embeddings are dense vector representations of the text that capture the semantic meaning and allow the model to understand and process the text in a mathematical form.
- We normalize the embedding here.
- What is normalization? Normalization is a process of adjusting the embedding values to have a unit paradigm (i.e., a vector length of 1).
- Why normalize? The normalized embedding ensures that the distances between vectors primarily reflect differences in direction rather than size. This improves the performance of the model in similarity search tasks, where the "proximity" or "similarity" between texts is compared.
- in the end
docs_embedis a collection of vector representations of the text data, where each vector corresponds to theparagraphsA paragraph in the list. - utilization
shapecommand to see the number of blocks and the dimension of each embedding vector (the size of the embedding vector depends on the type of embedding model).docs_embed.shape - You can also see what the actual embedding looks like, which is a set of normalized values.
docs_embed[0]
5. Embedding queries
Embed the sample user query in a similar manner to the embedded document.
query = "What was Studio Ghibli's first film?"
query_embed = model.encode(query, normalize_embeddings=True)
You can check query_embed shape to confirm the dimension of the embedded query.
query_embed.shape
6. Finding the closest paragraph to the query
One of the easiest ways to retrieve the most relevant chunks of content is to compute the dot product of document embeddings and query embeddings.
a. Calculation of dot product
The dot product is a mathematical operation that multiplies and sums the corresponding elements of two vectors (or matrices). It is often used to measure the similarity between two vectors.
(Note that the dot product is computed by taking the query_embed (transpose of the vector).
import numpy as np
similarities = np.dot(docs_embed, query_embed.T)
b. Understand dot products and their shapes
NumPy arrays of .shape property returns a tuple representing the dimensions of the array.
similarities.shape
The expected shape in this code is as follows:
- in the event that
docs_embedhas the shape of (n_docs, n_dim):- n_docs is the number of documents.
- n_dim is the dimension embedded in each document.
query_embed.Twill have the shape (n_dim, 1), since we are comparing against a single query.- dot-product
similaritiesThe shape of the array will be (n_docs,), indicating that this is a 1-dimensional array (vector) containing n_docs elements. Each element represents the similarity score between the query and a particular document. - Why check the shape? Ensuring that the shape is as expected (n_docs,) confirms that the dot product was performed correctly and that the similarity scores for each document have been calculated correctly.
You can print similarities array to check the similarity scores, where each value corresponds to a dot product result:
print(similarities)
c. Interpretation of dot products
The dot product between two vectors (embeddings) measures their similarity: higher values indicate higher similarity between the query and the document. If the embeddings are normalized, these values are directly proportional to the cosine similarity between the vectors. If un-normalized, they still indicate similarity, but also reflect the size of the embedding.
d. Identify the 3 most similar documents
To find the 3 most similar documents based on their similarity scores, you can use the following code:
top_3_idx = np.argsort(similarities, axis=0)[-3:][::-1].tolist()
- np.argsort(similarities, axis=0). This function pairs the
similaritiesThe index of the array is sorted. For example, ifsimilarities = [0.1, 0.7, 0.4](math.) genusnp.argsortwill return[0, 2, 1]The indexes of the minimum and maximum values are 0 and 1, respectively. - [-3:]: This slicing operation selects the 3 indexes with the highest similarity scores (the last 3 elements after sorting).
- [::-1]: This operation reverses the order, so the index is sorted in descending order of similarity.
- tolist(). Converts an indexed array to a Python list. Result:
top_3_idxAn index containing the 3 most similar documents, in descending order of similarity.
e. Extraction of the most similar documents
most_similar_documents = [paragraphs[idx] for idx in top_3_idx]
- List Derivative: This line creates a file named
most_similar_documentsThe list ofparagraphsThe list corresponds to thetop_3_idxThe actual paragraph of the index. - paragraphs[idx]. with regards to
top_3_idxFor each index in the
f. Formatting and displaying the most similar documents
CONTEXT The variable is initially initialized to the empty string, and will then be appended with the newline text of the most similar document in an enumeration loop.
CONTEXT = ""
for i, p in enumerate(most_similar_documents):
wrapped_text = textwrap.fill(p, width=100)
print("-----------------------------------------------------------------")
print(wrapped_text)
print("-----------------------------------------------------------------")
CONTEXT += wrapped_text + "\n\n"
7. Generating a response
Now we have a query and related content blocks that will be passed together to the Large Language Model (LLM).
a. Declaration of search
query = "What was Studio Ghibli's first film?"
b. Create a prompt
prompt = f"""
use the following CONTEXT to answer the QUESTION at the end.
If you don't know the answer, just say that you don't know, don't try to make up an answer.
CONTEXT: {CONTEXT}
QUESTION: {query}
"""
c. Setting up OpenAI
- Install OpenAI to access and use the Large Language Model (LLM).
!pip install -q openai - Enable access to OpenAI API keys (can be set in secrets in Google Colab).
from google.colab import userdata userdata.get('openai') import openai - Create an OpenAI client.
from openai import OpenAI
client = OpenAI(api_key=userdata.get('openai'))
d. Call the API to generate a response
response = client.chat.completions.create(
model="gpt-4o",
messages=[
{"role": "user", "content": prompt},
]
)
- client.chat.completions.create: This method invokes a large chat-based language model to create a new reply (generate).
- client. Represents the API client object that connects to the service (OpenAI in this case).
- chat.completions.create. Specifies that you are requesting the creation of a chat-based generation.
For more information about the parameters passed to the method
- model="gpt-4o". Specifies the model used to generate the response." gpt-4o" is a specific variant of the GPT-4 model. Different models may have different behaviors, fine-tuning methods, or capabilities, so specifying the model is important to ensure that the desired output is obtained.
- messages. This parameter is a list of message objects to represent the conversation history. This allows the model to understand the context of the chat. In this example, we provide only one message in the list:
{"role": "user", "content": prompt}The - role. "user" denotes the role of the message sender, i.e. the user who interacts with the model.
- content. Contains the actual text of the message sent by the user. The variable prompt holds this text, which the model will use as input to generate the response.
e. With regard to replies received
When you make a request to an API like the OpenAI GPT model to generate a chat reply, the response is usually returned in a structured format, usually a dictionary.
This structure usually includes:
- choices. A list (array) containing multiple possible responses generated by the model. Each item in this list represents a possible response or completion.
- message. An object or dictionary in each selection that contains the actual content of the message generated by the model.
- content. The textual content of the message, i.e. the actual response or completion generated by the model.
f. Printed responses
print(response.choices[0].message.content)
We choose choices The first item in the list, and then accessing one of the message object. Finally, we access the message hit the nail on the head content field, which contains the actual text generated by the model.
reach a verdict
This completes our explanation of building RAG systems from scratch. It is highly recommended that you first build your initial RAG setup in pure Python to better understand how these systems work.
© Copyright notes
Article copyright AI Sharing Circle All, please do not reproduce without permission.
Related posts

No comments...


