CR-Mentor: Knowledge Base + LLM Driven Intelligent Code Review Mentor for GitHub
General Introduction
CR-Mentor is an intelligent code review tool that combines a specialized knowledge base with the power of Large Language Modeling (LLM). It not only supports code review for all programming languages, but also customizes review criteria and focus areas for teams based on best practices accumulated in the knowledge base. Through continuous accumulation of knowledge base and deep learning, CR-Mentor can effectively improve the quality of the team's code and significantly reduce the review time and error rate.

Function List
- Full-language code review: Code review support for all major programming languages.
- Customized review criteria: Customize exclusive review criteria for teams based on best practices from the knowledge base.
- Intelligent single document review: Combine knowledge base experience with LLM analysis to provide expert scoring and improvement recommendations for single-file code changes.
- Global Code Analysis: Based on all documented code changes, provide a comprehensive review report through LLM, including code walkthroughs, change descriptions, and timing charts.
- GitHub Deep Integration: Seamlessly interface with GitHub workflows to automate code reviews.
- Multi-language response: Language to support customized code review feedback.
Using Help
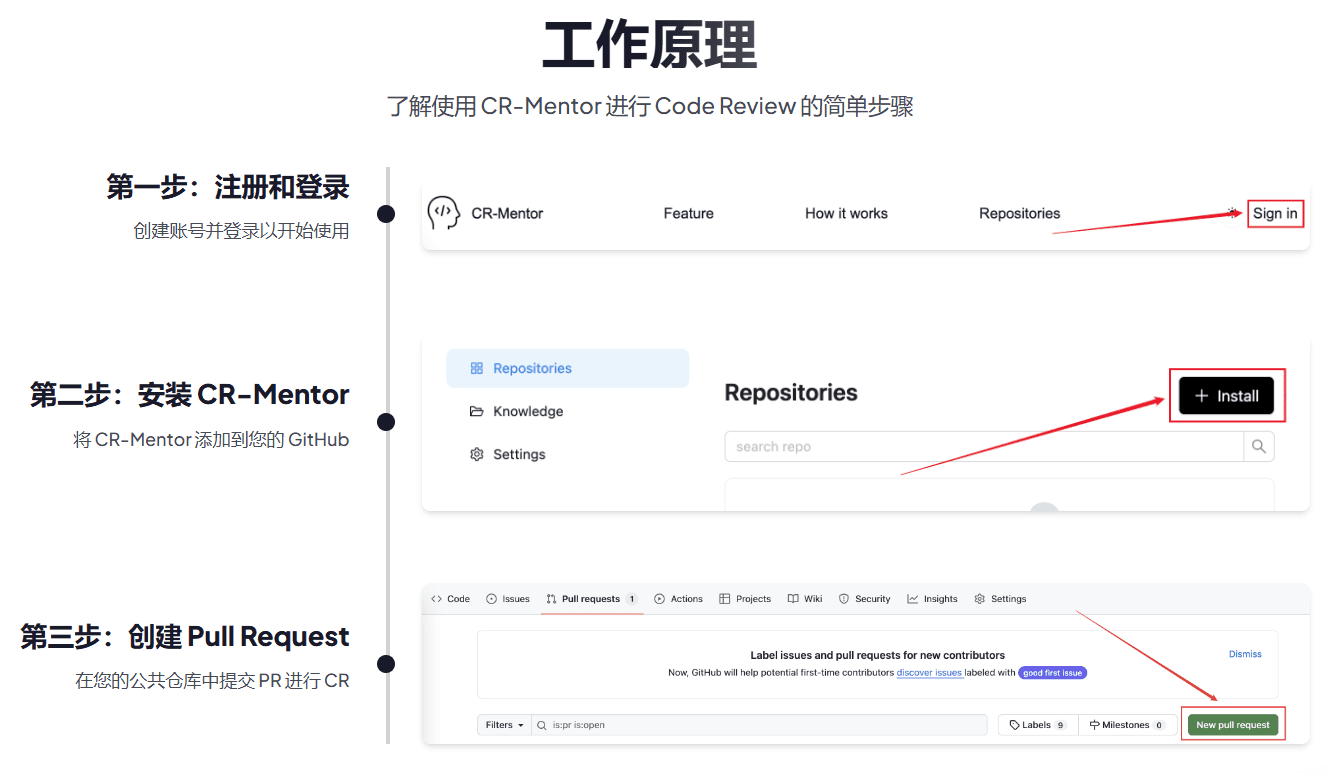
Installation process
- Registration and Login: Create a CR-Mentor account and log in.
- Installing CR-Mentor: Add CR-Mentor to your GitHub repository.
- Creating a Pull Request: Submit a PR in your public repository for code review.
Usage Process
- Submit Code: Commit your code to a GitHub repository.
- Automatic review: CR-Mentor automatically analyzes the code and generates a detailed code review report.
- View Report: The report includes code walkthroughs, change descriptions, and timing diagrams to help developers understand the impact of code changes.
- Optimization Recommendations: Optimize code to improve code quality and performance based on the recommendations in the report.
Detailed steps
- Registration and LoginTo register: Visit the CR-Mentor website, click on the "Register" button, and fill out the necessary information to complete your registration. After registration, log in with your registered account and password.
- Installing CR-Mentor: After logging in, go to the Installation Guide page and follow the steps to add CR-Mentor to your GitHub repository. The steps are as follows:
- Create a new repository or select an existing one on GitHub.
- In the repository settings, add the GitHub App for CR-Mentor.
- Configure the Webhook URL and other necessary information.
- Creating a Pull Request: In your GitHub repository, create a new branch and make code changes. After committing the changes, create a Pull Request and CR-Mentor will automatically start a code review.
- View the review report: CR-Mentor generates a detailed code review report that includes code walkthroughs, change notes, and timing diagrams. Developers can view the report on the Pull Request page on GitHub.
- Optimized code: Optimize code based on recommendations from review reports.CR-Mentor's recommendations are based on best practices from the knowledge base and LLM's analysis to help developers improve code quality and performance.
caveat
- Customized review criteria: On the Settings page of CR-Mentor, you can customize the code review criteria according to your project needs. Customizing the criteria ensures that the code conforms to the team's best practices.
- Multi-language support: CR-Mentor supports code review in multiple programming languages. Developers can select the language to be reviewed on the settings page.
- Report Export: Review reports can be exported to PDF, HTML and Markdown formats for easy sharing and archiving.
technology stack
- 🔥 Using Next.js App Router Building Modern Web Applications
- 🎨 Use Tailwind CSS Realizing Elegant Responsive Design
- 🔐 Use Clerk Provide secure and reliable user authentication
- 📦 Use Supabase Enabling high-performance data storage
- 🔗 Use Github App Implementing Deep GitHub Integration
- 🧠 Use Dify Building Intelligent LLM workflow
Deployment Guide
You can deploy this template by setting up the following services and adding the appropriate environment variables:
- (of a computer) run
npm installInstall the dependencies and runnpm run devStart the development server. - The system will ask you to provide
CLERK_SECRET_KEY. The specific steps are as follows: - Now your front-end and back-end should be running and you can log in but not yet do a code review.
- Create a Supabase Account to get API keyThe
- Create a Supabase project in
Project SettingsReproduced in.SUPABASE_URLSUPABASE_KEY
Execute the following SQL statement to create the
githubId_clerkIdTable.CREATE TABLE "public"."githubId_clerkId" ( "github_id" text NOT NULL, "clerk_id" text NOT NULL, PRIMARY KEY ("github_id") );Execute the following SQL statement to create the
repoName_fileTable.CREATE TABLE "public"."repoName_file" ( "repo_fullName" text NOT NULL, "file_name" text NOT NULL, "folder_name" text NOT NULL, PRIMARY KEY ("repo_fullName", "file_name", "folder_name") ); - exist
Storage(used form a nominal expression)S3 ConnectionReproduced in.SUPABASE_S3_ENDPOINTSUPABASE_S3_REGION
- exist
Storage(used form a nominal expression)S3 Access KeysNew in.SUPABASE_STORE_IDSUPABASE_STORE_SECRET_KEY
- exist
Storagehit the nail on the headNew bucketNew Bucket.- Fill in the Bucket name in the
SUPABASE_BUCKET_NAME
- Fill in the Bucket name in the
SUPABASE_URL= SUPABASE_KEY= SUPABASE_S3_ENDPOINT= SUPABASE_S3_REGION= SUPABASE_STORE_ID= SUPABASE_STORE_SECRET_KEY= SUPABASE_BUCKET_NAME= - Create a Supabase project in
- Create a Github account, and then create a Github AppThe
- exist
Settings->Developer settings->GitHub Appsclicking inNew GitHub AppThe - write data in a box (on a questionnaire or web form)
GitHub App name,Homepage URL,Webhook URLand other information. - generating
Private keyand download, copyApp ID,Client ID,Client secretuntil (a time).env.localDocumentation.
GITHUB_APP_ID= GITHUB_CLIENT_ID= GITHUB_CLIENT_SECRET= # 只填写 -----BEGIN RSA PRIVATE KEY----- 和 -----END RSA PRIVATE KEY----- 之间的内容 GITHUB_PRIVATE_KEY= - exist
- Create a Dify account and configure an LLM workflow.
- Register for a Dify account and configure the LLM model at the model vendor
- exist Dify Studio Import Workflow.
- Click on "Create Application" and select "Import DSL".
- Switch to URL mode and fill in the URL of the workflow file.
https://ovlxxbdwimhigoejxkqn.supabase.co/storage/v1/object/public/test-bucket-api/Dify_DSL/CR-Mentor.yml - Click Create to complete the import
- Post a workflow.
- Click the "Publish" button on the "Organize" page.
- Get API Key.
- Click on "API Access" in the left navigation bar
- Switch to the Workflow App API page.
- Click "API Key" in the upper right corner to create a new secret key.
- Copy the secret key to the
.env.localDocumentation.
DIFY_APIKEY=
DIFY_BASE_URL=https://api.dify.ai/v1  # 固定值
© Copyright notes
Article copyright AI Sharing Circle All, please do not reproduce without permission.
Related posts

No comments...


