综合介绍
CogView3 是由清华大学和智囊团队(智谱清言)开发的先进文本生成图像系统。它基于级联扩散模型,通过多阶段生成高分辨率图像。CogView3 的主要特点包括多阶段生成、创新架构和高效性能,适用于艺术创作、广告设计、游戏开发等多个领域。
该系列模型的能力,已经上线「智谱清言」(chatglm.cn),可以在清言上体验。


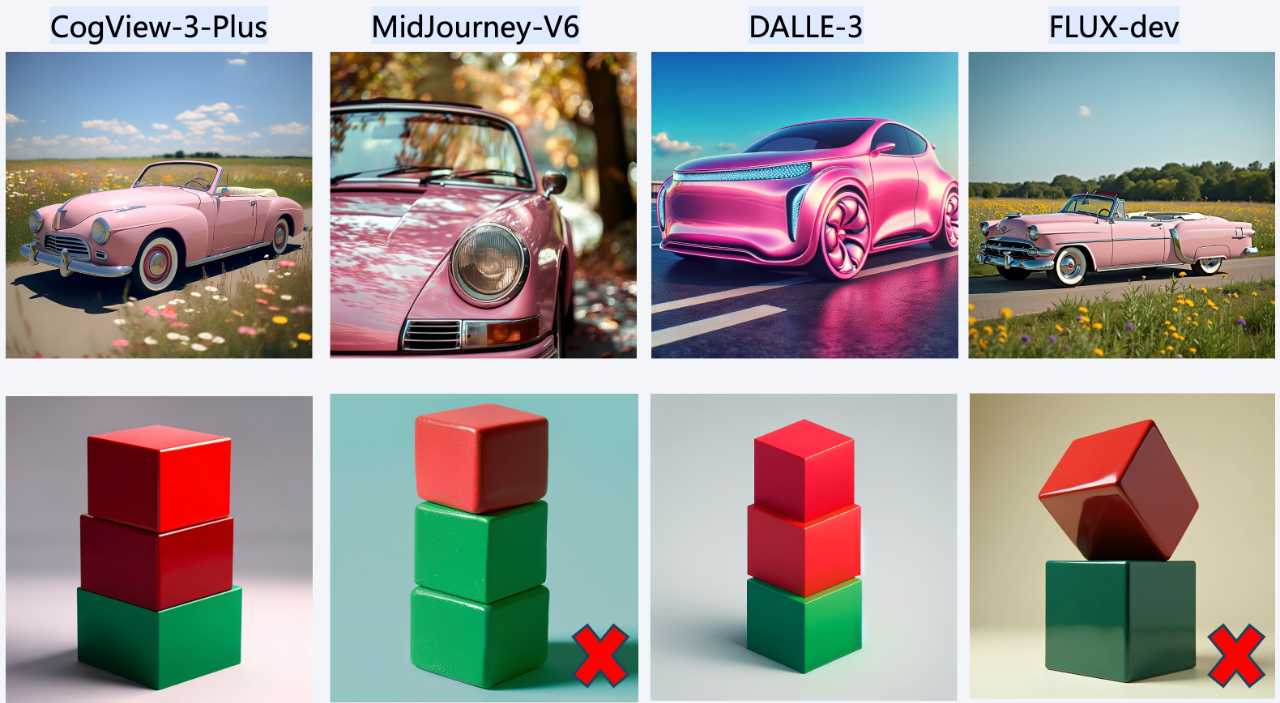
上:A pink colored car. 下:A stack of 3 cubes. A red cube is on the top, sitting on a red cube. The red cube is in the middle, sitting on a green cube. The green cube is on the bottom.
功能列表
- 多阶段生成 :首先生成低分辨率图像,然后通过中继扩散过程逐步提升图像分辨率,最终生成高达 2048x2048 的高分辨率图像。
- 高效性能 :CogView3 在生成高质量图像的同时,显著降低了训练和推理成本。与当前最先进的开源模型 SDXL 相比,CogView3 的推理时间仅为其 1/10。
- 创新架构 :CogView3 引入了最新的 DiT(Diffusion Transformer)架构,采用 Zero-SNR 扩散噪声调度,并结合文本-图像联合注意力机制,进一步提升了整体性能。
- 开源代码 :CogView3 的代码和模型已在 GitHub 上开源,用户可以自由下载和使用。
使用帮助
安装和注册
- 访问网站 :打开 CogView3 官方网站 GitHub。
- 下载代码 :点击页面上的 "Code" 按钮,选择 "Download ZIP" 下载项目文件,或使用 git 命令下载:
git<span> </span>clone<span> </span>https://github.com/THUDM/CogView3.git。 - 安装依赖 :确保从源代码安装 diffusers 库:
pip install git+https://github.com/huggingface/diffusers.git
使用流程
- 提示优化 :
- 虽然 CogView3 系列模型是用长图像描述训练的,但我们强烈建议在生成文本到图像之前使用大型语言模型(LLMs)重写提示,这将显著提高生成质量。
- 运行以下脚本优化提示:
python prompt_optimize.py --api_key "Zhipu AI API Key"--prompt {your prompt} --base_url "https://open.bigmodel.cn/api/paas/v4"--model "glm-4-plus"
- 推理模型(Diffusers) :
- 首先,确保从源代码安装 diffusers 库:
pip install git+https://github.com/huggingface/diffusers.git - 然后,运行以下代码:
fromdiffusers importCogView3PlusPipeline
importtorch

pipe = CogView3PlusPipeline.from_pretrained("THUDM/CogView3-Plus-3B", torch_dtype=torch.float16).to("cuda")
pipe.enable_model_cpu_offload()
pipe.vae.enable_slicing()
pipe.vae.enable_tiling()

prompt = "A vibrant cherry red sports car sits proudly under the gleaming sun, its polished exterior smooth and flawless, casting a mirror-like reflection. The car features a low, aerodynamic body, angular headlights that gaze forward like predatory eyes, and a set of black, high-gloss racing rims that contrast starkly with the red. A subtle hint of chrome embellishes the grille and exhaust, while the tinted windows suggest a luxurious and private interior. The scene conveys a sense of speed and elegance, the car appearing as if it's about to burst into a sprint along a coastal road, with the ocean's azure waves crashing in the background."

image = pipe(
    prompt=prompt,
    guidance_scale=7.0,
    num_images_per_prompt=1,
    num_inference_steps=50,
    width=1024,
    height=1024,
).images[0]

image.save("cogview3.png")
- 首先,确保从源代码安装 diffusers 库:
- 推理模型(SAT) :
- 请参考 SAT 教程获取逐步的模型推理说明。
常见问题
- 安装失败 :确保 Python 版本符合要求,安装 PyTorch 时注意版本兼容性。
- 图像质量 :文本描述的具体性和训练数据集的丰富度会影响生成图像的效果,建议使用详细的文本描述和多样化的数据集进行训练。
© 版权声明
文章版权归 AI分享圈 所有,未经允许请勿转载。
相关文章

暂无评论...


