General Introduction
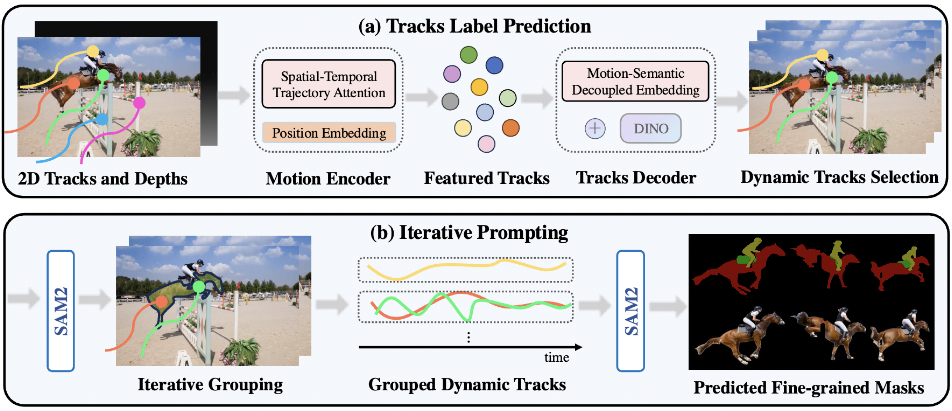
SegAnyMo is an open source project developed by a team of researchers at UC Berkeley and Peking University, including members such as Nan Huang. The tool focuses on video processing and can automatically recognize and segment arbitrary moving objects in a video, such as people, animals, or vehicles. It combines technologies such as TAPNet, DINOv2, and SAM2, and plans to present results at CVPR 2025. The project code is fully public and free for users to download, use or modify for developers, researchers and video processing enthusiasts.The goal of SegAnyMo is to simplify the analysis of moving video and provide efficient segmentation solutions.
Function List
- Automatically detects moving objects in the video and generates accurate segmentation masks.
- Supports video formats (e.g. MP4, AVI) or image sequence input.
- Provides pre-trained models to support rapid deployment and testing.
- Integration with TAPNet generates 2D tracking traces to capture motion information.
- Using DINOv2 to extract semantic features to improve segmentation accuracy.
- Pixel-level segmentation using the SAM2 refinement mask.
- Support customized dataset training to adapt to different scenarios.
- Output visualized results for easy checking and adjustment.
Using Help
SegAnyMo requires a certain technical foundation and is mainly aimed at users with programming experience. Below is a detailed installation and usage guide.
Installation process
- Prepare hardware and software
The project is developed on Ubuntu 22.04, and a NVIDIA RTX A6000 or similar CUDA-enabled graphics card is recommended. Requires Git and Anaconda pre-installed.- Clone the code repository:
git clone --recurse-submodules https://github.com/nnanhuang/SegAnyMo - Go to the project catalog:
cd SegAnyMo
- Clone the code repository:
- Creating a Virtual Environment
Create a separate Python environment with Anaconda to avoid dependency conflicts.- Creating the environment:
conda create -n seg python=3.12.4 - Activate the environment:
conda activate seg
- Creating the environment:
- Installing core dependencies
Install PyTorch and other necessary libraries.- Install PyTorch (supports CUDA 12.1):
conda install pytorch==2.4.0 torchvision==0.19.0 torchaudio==2.4.0 pytorch-cuda=12.1 -c pytorch -c nvidia - Install other dependencies:
pip install -r requirements.txt - Install xformers (accelerated reasoning):
pip install -U xformers --index-url https://download.pytorch.org/whl/cu121
- Install PyTorch (supports CUDA 12.1):
- Installation of DINOv2
DINOv2 is used for feature extraction.- Go to the preprocessing catalog and clone:
cd preproc && git clone https://github.com/facebookresearch/dinov2
- Go to the preprocessing catalog and clone:
- Installing SAM2
SAM2 is the mask refinement core.- Enter the SAM2 catalog:
cd sam2 - Installation:
pip install -e . - Download the pre-trained model:
cd checkpoints && ./download_ckpts.sh && cd ../..
- Enter the SAM2 catalog:
- Installation of TAPNet
TAPNet is used to generate 2D tracking traces.- Go to the TAPNet catalog:
cd preproc/tapnet - Installation:
pip install . - Download the model:
cd ../checkpoints && wget https://storage.googleapis.com/dm-tapnet/bootstap/bootstapir_checkpoint_v2.pt
- Go to the TAPNet catalog:
- Verify Installation
Check that the environment is normal:
python -c "import torch; print(torch.cuda.is_available())"
exports True Indicates success.
Usage
Data preparation
SegAnyMo supports video or image sequence input. The data needs to be organized in the following structure:
data
├── images
│   ├── scene_name
│   │   ├── image_name
│   │   ├── ...
├── bootstapir
│   ├── scene_name
│   │   ├── image_name
│   │   ├── ...
├── dinos
│   ├── scene_name
│   │   ├── image_name
│   │   ├── ...
├── depth_anything_v2
│   ├── scene_name
│   │   ├── image_name
│   │   ├── ...
- If the input is video, use a tool (such as FFmpeg) to extract frames to the
imagesFolder. - If it is an image sequence, put it directly into the corresponding directory.
Operational pre-processing
- Generate depth maps, features and trajectories
Use the following commands to process the data (about 10 minutes, depending on the amount of data):- For image sequences:
python core/utils/run_inference.py --data_dir $DATA_DIR --gpus 0 --depths --tracks --dinos --e - For the video:
python core/utils/run_inference.py --video_path $VIDEO_PATH --gpus 0 --depths --tracks --dinos --e
Parameter Description:
--eEnable Efficient Mode to reduce frame rate and resolution and speed up processing.--step 10Indicates that 1 frame out of every 10 frames is used as the query frame, which can be adjusted downward to improve the accuracy.
- For image sequences:
Predicting motion trajectories
- Download model weights
surname Cong Hugging Face maybe Google Drive Download the pre-trained model. Write the path to theconfigs/example_train.yaml(used form a nominal expression)resume_pathFields.- Running trajectory prediction:
python core/utils/run_inference.py --data_dir $DATA_DIR --motin_seg_dir $OUTPUT_DIR --config_file configs/example_train.yaml --gpus 0 --motion_seg_infer --e
The output is saved in the
$OUTPUT_DIRThe - Running trajectory prediction:
Generate Segmentation Mask
- Using the SAM2 Refinement Mask
- Run Mask Generation:
python core/utils/run_inference.py --data_dir $DATA_DIR --sam2dir $RESULT_DIR --motin_seg_dir $OUTPUT_DIR --gpus 0 --sam2 --e
Parameter Description:
$DATA_DIRis the original image path.$RESULT_DIRis the mask save path.$OUTPUT_DIRis the trajectory prediction result path.
Note: SAM2 supports by default.jpgmaybe.jpegformat, the file name needs to be a plain number. If it does not match, you can change the code or rename the file.
- Run Mask Generation:
Assessment results
- Download pre-calculated results
transferring entity Google Drive Download the official mask for comparison.- Evaluate the DAVIS dataset:
CUDA_VISIBLE_DEVICES=0 python core/eval/eval_mask.py --res_dir $RES_DIR --eval_dir $GT_DIR --eval_seq_list core/utils/moving_val_sequences.txt - Refinement of the assessment:
cd core/eval/davis2017-evaluation && CUDA_VISIBLE_DEVICES=0 python evaluation_method.py --task unsupervised --results_path $MASK_PATH
- Evaluate the DAVIS dataset:
Customized training
- Data preprocessing
The HOI4D dataset is used as an example:
python core/utils/process_HOI.py
python core/utils/run_inference.py --data_dir $DATA_DIR --gpus 0 --tracks --depths --dinos
RGB images and dynamic masks are required for custom datasets.
- Check data integrity:
python current-data-dir/dynamic_stereo/dynamic_replica_data/check_process.py - Cleaning up data saves space:
python core/utils/run_inference.py --data_dir $DATA_DIR --gpus 0 --clean
- model training
modificationsconfigs/$CONFIG.yamlconfiguration, trained with datasets such as Kubric, HOI4D, etc:
CUDA_VISIBLE_DEVICES=0 python train_seq.py ./configs/$CONFIG.yaml
application scenario
- Video post-production
Separate moving objects (e.g. running people) from the video, generate masks and use them for effects compositing. - Behavior Analysis Research
Track animal or human movement trajectories and analyze behavioral patterns. - Autonomous Driving Development
Segmentation of moving objects (e.g., vehicles, pedestrians) in driving videos to optimize the perception system. - Monitoring system optimization
Extract abnormal movements from surveillance videos to improve security efficiency.
QA
- Need a GPU?
Yes, it is recommended that NVIDIA cards support CUDA, otherwise they run inefficiently. - Does it support real-time processing?
The current version is suitable for offline processing, real-time applications need to be optimized on their own. - How much space do you need for training?
Depending on the dataset, a small dataset is a few gigabytes and a large dataset may be hundreds of gigabytes. - How to improve segmentation accuracy?
diminish--stepvalues, or train the model with more labeled data.


