General Introduction
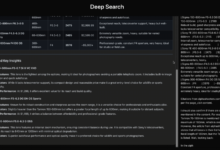
DeepGemini is an open source project created by developer Thomas Sligter. It is an AI management tool that supports multi-model orchestration , the main feature is the ability to flexibly combine a variety of AI models , and called through the OpenAI-compatible API interface . The project is based on Python 3.11 and FastAPI, supports SQLite database storage configuration, and provides a web management interface and Docker deployment. It is suitable for developers, technology enthusiasts and enterprise users, and the MIT license allows free use and modification. DeepGemini supports Chinese and English interfaces, and is feature-rich and easy to use.
The project configures multi-model workflow and multi-model discussion task groups in the interface, which cannot be used directly in the interface, and has to be configured in other chat tools to use the API. This tool is simpler and more practical than the usual intelligent body task scheduling tools, the only drawback is that it consumes more API quota.

Function List
- Supports multi-model orchestration, allowing you to customize the combination of multiple AI models to complete a task.
- Provides character management, enabling AIs to set different personalities and skills.
- Supports discussion groups, where multiple AI characters can collaborate on discussions.
- Multiple discussion modes are built in, including brainstorming, debate, and SWOT analysis.
- Compatible with multiple AI providers such as DeepSeek, Claude, Gemini, Grok3 and more.
- Provides OpenAI-compatible API interfaces that can directly replace OpenAI interfaces in existing applications.
- Support real-time streaming response to enhance user experience.
- Built-in web management interface for easy model configuration and status checking.
- Supports SQLite database and Alembic migration for more stable management configuration.
Using Help
The installation and use of DeepGemini is divided into two ways: local operation and Docker deployment. The following is a detailed description of the installation steps and functional operation flow to help users get started quickly.
Installation process - running locally
- Cloning Project Code
Enter the following command in the terminal to download the project:
git clone https://github.com/sligter/DeepGemini.git
Then go to the project directory:
cd DeepGemini
- Installation of dependencies
Project Recommended UseuvTool installs dependencies, runs:
uv sync
If not uvIt can be done with pip install -r requirements.txt Alternative. Make sure Python version is 3.11 or higher.
- Configuring Environment Variables
Copy the sample configuration file:
cp .env.example .env
Open with a text editor .env, set the following required fields:
ALLOW_API_KEY: Your API key, just define it yourself.ALLOW_ORIGINS: The source of the permitted domain name, fill in*Indicates that all are allowed, or commas are used to separate specific domains.
Optional configurations include model API keys and parameters (such as theDEEPSEEK_API_KEY).
- Starting services
Enter the following command to start:
uv run uvicorn app.main:app --host 0.0.0.0 --port 8000
After a successful launch, open your browser and visit http://localhost:8000/dashboardTo access the Web Management Interface, go to the Web Management Interface.
Installation Process - Docker Deployment
- Pulling a Docker image
Runs in the terminal:
docker pull bradleylzh/deepgemini:latest
- Preparing configuration files and databases
Creates a file in the current directory:
- Linux/Mac:
cp .env.example .env touch deepgemini.db echo "" > deepgemini.db - Windows PowerShell:
cp .env.example .env
echo "" > deepgemini.db
compiler .envSettings ALLOW_API_KEY cap (a poem) ALLOW_ORIGINSThe
- Running a Docker Container
Enter the command to start:
- Linux/Mac:
docker run -d -p 8000:8000 -v $(pwd)/.env:/app/.env -v $(pwd)/deepgemini.db:/app/deepgemini.db --name deepgemini bradleylzh/deepgemini:latest - Windows PowerShell:
docker run -d -p 8000:8000 -v ${PWD}\.env:/app/.env -v ${PWD}\deepgemini.db:/app/deepgemini.db --name deepgemini bradleylzh/deepgemini:latest
运行后,访问 http://localhost:8000/dashboardThe
Using Docker Compose (recommended)
- intend
.envand database files, as described above. - Running:
docker-compose up -d
interviews http://localhost:8000/dashboardThe
Main function operation flow
1. Web management interface operation
- Open your browser and visit
http://localhost:8000/dashboardThe - The interface displays the model status and configuration options. Click "Add Model", enter the model name (e.g., DeepSeek), API key, and parameters (temperature, top_p, etc.), and save.
- In Role Management, create an AI role and set the personality (e.g., "Logical Rigor") and skills (e.g., "Text Generation").
2. Configuring multi-model orchestration
- On the Workflow screen, click New Workflow.
- Example Configuration:
{
"name": "reason_and_execute",
"steps": [
{"model_id": "deepseek", "step_type": "reasoning", "step_order": 1},
{"model_id": "claude", "step_type": "execution", "step_order": 2}
]
}
- Once saved, the workflow will first reason with DeepSeek and then generate results with Claude.
3. Calling API interfaces
- utilization
curlTest the API:
curl -X POST "http://localhost:8000/v1/chat/completions" -H "Authorization: Bearer YOUR_API_KEY" -H "Content-Type: application/json" -d '{"model": "reason_and_execute", "messages": [{"role": "user", "content": "分析并回答:1+1等于几?"}]}'
- interchangeability
YOUR_API_KEYbecause of.envin the key. The return result is a streaming response.
4. Creation of discussion groups
- On the Discussion Groups page, add multiple roles (such as Analyst and Creator).
- Select a discussion mode (e.g. "Brainstorming"), enter a question and click "Start Discussion". The system will display the dialog between the characters.
caveat
- Ensure that the network connection is working properly, some models require access to external APIs.
- The log file is in the
<项目目录>/logs/down, which can be used to troubleshoot problems. - If there is a port conflict during Docker deployment, modify the
-p 8000:8000The first port number in the
application scenario
- AI development experiments
Developers can test multi-model collaboration with DeepGemini. For example, start with Gemini Analyze the question and then use Claude to generate a detailed answer. - Teamwork Simulation
Simulate team meetings through the discussion group feature. Set up different roles to discuss product strategies and output diverse suggestions. - Education and training
Students can use it to learn about the properties of AI models and experiment with different modes of discussion to observe results.
QA
- What AI providers are supported?
Support for DeepSeek, Claude, Gemini, Grok3, OpenAI, etc., as well as customized access to other providers. - What's the point of a discussion group?
Discussion groups allow multiple AI personas to collaborate on complex problems, such as brainstorming or debating, providing multiple perspectives on answers. - How do I debug a problem?
Check the log files, or file an issue on GitHub for help.