This document provides information on the Bit Flows A step-by-step guide to creating an automated workflow in the It shows how to create an automated workflow using the WordPress cap (a poem) "On Post Status Update" event sets the trigger and connects it to the Google Sheets in the operation of the integration. Users will learn how to capture response data, map fields, and set up the required settings for integration. After setting up this workflow, whenever the status of a WordPress post changes (e.g. from draft to published), the post details will automatically be added as a new row in Google Sheets. This saves time and reduces manual work.
Comments Off on Bit Flows seems to be trying to simplify workflow automation, but does it really "save time" and "reduce manual work" as advertised? That depends on how familiar users are with Google Cloud Console and whether they're willing to take the time to configure those complex API keys.
Creating a new workflow
To create a new workflow, first click in Bit Flows on the Flows . Then, click Create Workflow button. You will be prompted to enter a name for the workflow. After entering the name, click the Create . This will create a new workflow and redirect you to the Visual Workflow Editor You can customize your workflow within it.


Select your trigger application
Trigger Step is the starting point of a workflow that provides the necessary data or performs a task at a predetermined time. To select an application, click Select an App , and then click on the desired application. In this example, we will select WordPress as a trigger.

Select the application events that will trigger the workflow
Once you have selected the Trigger application (WordPress) for your workflow, you will see a list of events available for the next step. Select the trigger event to continue. In this example, we will select On Post Status Update as a WordPress trigger event.
When you want something to happen every time your post status changes, you can use the WordPress " On Post Status Update " trigger. For example, if you change an article from Draft to Published or Pending Review, this trigger activates and initiates subsequent steps in the workflow, such as sending an e-mail or updating the system. or updating the system.

Other configuration options
If you select WordPress triggers like we did in the On Post Status Update events, you will also need to configure other settings. The system will ask you to select the Post Type and specific Post . In this demo, we will select the Post as the Post Type and select Lorem Ipsum Demo article as Post. this means that the trigger will run whenever the status of this article changes.
You can select more than one for a trigger Post Types cap (a poem) Posts . In addition, you can use the Custom Post Type to meet your specific needs.

Depending on the application and trigger event selected, you may need to configure triggers for further customization and settings. For example, if you select Forms, you will be prompted to select a specific form; if you want to apply it to all forms, you can also select the Any Form The
Capture Response
Now you need to capture the response that will be used to map to the different data points in the subsequent action steps of the workflow. Click the Capture Response button and finish triggering the event. In this example, we clicked the Capture Response and will demonstrate the article Lorem Ipsum The state of the Draft change to Publish (This use of WordPress is for demo purposes only. (WordPress is used here for demonstration purposes only. You will need to send data to the trigger from the selected application, depending on the configuration of that application.) For more guidance, see the video below.
When finished, click Close Button.Congratulations! You have successfully set up the trigger.

Capturing the response is necessary because it allows you to understand and map the data coming from the trigger. When a trigger event occurs, the data associated with that event (such as user details, form inputs, or post information) is sent to the workflow. Capture this response:
- Identifying data : It helps you to see what specific data the trigger is sending.
- Preparing for mapping : enables you to map this data to the appropriate field in an action step (for example, adding a row in Google Sheets or sending an email).
- Ensuring accuracy : Verify that the trigger is configured correctly and sends the expected data.

After the response is captured:
- View Data : View captured data fields to see what information is available.
- mapped data : Use the captured data fields to map them to the corresponding fields in the action step. Example:
- Maps the "Name" in the trigger response to the "Name" column in Google Sheets.
- Test Workflow : Run a test to ensure that data flows correctly from the trigger to the action step.
- Completion of workflows : Save and activate workflows to run as expected when a trigger event occurs.
Comment: The "Capture Response" step may sound technical, but it's really about having the user manually trigger an event so that the system can "learn" the structure of the data. This may seem a bit awkward, but for beginners, visualizing the structure of the data may be really helpful.
Add procedure
After setting up the trigger, you can continue to add to the workflow Action Steps . The action step defines what happens when the trigger executes. You can choose from a variety of applications and actions to perform tasks such as sending data, updating records, or notifying users.
To add an action step to a workflow:
- Click on the "+" button
In the workflow builder, locate and click next to the Trigger step in the + button. This will add a new step to your workflow and open the Action App Selection Pop-up window. - Search for the desired application
In the pop-up window, search for the application you want to use in this step. When you find it, click the application name to select it. - Configuring Application Settings
After selecting the application, a settings pop-up window will appear. Here, you need to select an action event. Then, configure the options and settings required for the application to function correctly in the workflow step.
Repeat these steps for any other actions you want to include in the workflow.
For demonstration purposes, we will show you how to send data to the Google Sheets The
Send data to Google Sheets
Adding Steps
To add an action, click the plus (+) icon next to the trigger. This will add a new step to your workflow.


Select Application
After you add an action step, you need to select an application to send data to. To select an application, click the plus (+) icon in the action step. This will open a pop-up window showing a list of all available applications.


From the list of applications, you can select the preferred action. You can also search for the application to which you want to send the data. In this example, we will select Google Sheets as the action.

Selecting application action events
If you select Google Sheets as an action, as we did, you will see the available events that can be executed. For example, when you click Google Sheets, the available events are " Add Row. " This means that a row of your data will be added to Google Sheets whenever the trigger event runs.
An application can have multiple trigger or action events. You need to select the application and event according to your needs.

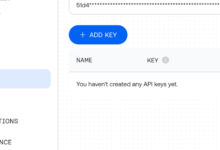
Add Connection
Select " Add Row " event, you will be prompted to select a connection. Click " Add " button to create a new connection. You will need to enter the Google Console application's Client ID cap (a poem) Client Secret . In addition, you can set the connection name for future identification. Remember, you don't need to connect again for the same Google account. Next time, just select the connection from the drop-down list.


Get Client ID and Client Secret
To get your Client ID and Client Secret, you need to go to Google Cloud Console and create an application.
- Go to Google Cloud Console
- show (a ticket) Google Cloud Console and sign in with your Google account.
- Create a project or select an existing project
- If you don't have a project yet, click Create Project and follow the prompts to set it up.
- If you have an existing project, select it from the project list.


- Enabling APIs
- Now, go to " APIs & Services ."
- Search and enable Google Drive API cap (a poem) Google Sheets API https://bit-integrations.com/wp-docs/actions/google-sheets-integrations/#2-enable-apis https://flowfy.io/users-guide/action/ connect-google-sheets-to-shopify/#2-enable-apis https://arouf-65.towp.io/docs/bit-flows/flows/google-sheets/#2-enable-apis

- Configuring the Consent Screen
- Go to "Configure Consent Screen."
- Click on OAuth Overview under "Get Started" The
- write data in a box (on a questionnaire or web form) App Information, Audience, Contact Information and then click Finish The
- click (using a mouse or other pointing device) Create The
- Publish the app.
- In the left menu, click Audience cap (a poem) Publish the app The
- Create the client.
- In the left menu, go to Clients and click "CREATE CLIENT."
- option Web Application as the application type.
- importation Name The
- Add your Authorized JavaScript Origins cap (a poem) Authorized Redirect URIs (found on the Integration page).
- Enable data access.
- In the scope section, click " Add or Remove Scopes ." Add the following scopes. then, click " Update ."
- https://www.googleapis.com/auth/drive
- https://www.googleapis.com/auth/drive.file
- https://www.googleapis.com/auth/drive.metadata
- https://www.googleapis.com/auth/spreadsheets
- https://www.googleapis.com/auth/userinfo.profile
- https://www.googleapis.com/auth/userinfo.email
- Scroll down and click Save The
- In the scope section, click " Add or Remove Scopes ." Add the following scopes. then, click " Update ."
When adding scopes, you may see some restricted scopes . Your integration will still work after you add them, but if you encounter any errors, you will need to verify the app . To do this, go to the left side of the Verification Center and complete the validation process.
Learn more: Google Cloud App Verification

- Generate Client ID and Client Secret
- Go to the "Credentials" section.
- click (using a mouse or other pointing device) Action lower Download Icons The
- There will be a pop-up window The display will show your Client ID cap (a poem) Client Secret The
- make a copy of These credentials.
- check them off paste (as in "copy and paste") until (a time) integration page in the corresponding field on the

After successfully entering your Google Sheets Client ID and Client Secret, click " Connect " Continue. Then follow the steps below:
-
- Select your Google account.
- Click " Advanced ."
- Click " Go to "
- Click " Continue ."
- Grant the necessary permissions (for this example, all permissions are selected).
- Your connection to Google Sheets is now successfully established.

Congratulations! You have successfully connected your Google Console App to Bit Flows.
Comments: Setting up Google Sheets integration is **"easy "**! Users need to be half Google Cloud experts to complete these steps. For those unfamiliar with the API and OAuth 2.0, this is a nightmare. Bit Flows should really consider simplifying this process, or at least provide more detailed and user-friendly instructions.
Once Bit Flows has successfully connected to your Google app, the newly created connection will automatically be " Select Connection " under Selection.

After connecting to Google Sheets, you will need to select your spreadsheet. If you have more than one spreadsheet, select the spreadsheet you want to use for this operation.

After selecting the spreadsheet, you will need to select a specific worksheet within it. Since a spreadsheet can contain multiple worksheets, select the worksheet you want to use for this operation. Here we have two available worksheets and we will select the "arouf.towpSite" worksheet.

After selecting the worksheet, you will need to map the trigger fields to the action fields, in this case Google Sheets.To map your fields, click the Add Row button. You will then see two fields: Column cap (a poem) Value The
- with regards to Column , select columns from the spreadsheet of your choice.
- with regards to Value , mapping it to the appropriate trigger response field, in this case the WordPress On Post Status Update events. In addition, you can use the Flow , Math , String maybe System and other options to get customized values or perform calculations.
Congratulations! You have successfully set Google Sheets as your action.
Comments: Field mapping is a critical step for automation tools, and Bit Flows seems to provide the basics. However, for more complex data conversion and processing, users may need to look for more advanced tools or write custom code.
After setting up your triggers and actions, you can test your flow to verify that the integration is working properly. To do this, simply click the Test Flow Once . Then, finish triggering the event, in this case the WordPress On Post Status Update . To demonstrate, let's change the state of the article and observe the results.

Integration Log
You can view your integration logs to monitor flow activity. To view the logs, click the Logs button. All logs related to this flow will be displayed there.